Boxing Thread

classic Classic list List threaded Threaded
15 messages Options
Reply | Threaded
Open this post in threaded view
|

Boxing Thread

mojo321
I posted a thing at the bottom of the "build Guide" page.   But if anyone wants to list their tips and mothods for boxing effects, I'd love to hear them.  

My issue with the build guide is, I can't see how he soldered the circuit in last, when the solder goes on the backside of the board!   Do you wire everything up installed in the box, and then remove it all, flip it over, and make the final solders to the board, and then reinstall it all in the enclosure?  

I've tried a few things, none of them perfect or even close to easy.  

My last try, I mounted the pots on a piece of cardboard.  wired it all up, tested it, and then tried to box it all at once.  Big pain.  So how do you guys do it?  

I see a lot of people post things like "I finished this ____effect.  It sounds great!  I'll be boxing it up tomorrow."

Well, if you finished it, and it isn't boxed, you clearly aren't doing it like the Build Guide says.  Unless you plan on de-soldering it all and then putting it back together in the box, ala Build Guide.

So how do you guys do it?  My builds work and sound great, but look horrendous and crammed (which is why I've never posted my pics)    I even get nervous about short circuiting things they are so crammed sometimes.
Reply | Threaded
Open this post in threaded view
|

Re: Boxing Thread

otalgiafx
I use a test box that I knocked up.  Basically its box that has the input and output jacks, footswitch and power supply all wired up.  Coming out of this box I have 4 crocodile clip wires that would connect to the Circuit Input, Circuit Output, Circuit ground and circuit Positive (assuming that the circuit you are building is not positive ground.

So, for my builds I complete the circuit, connect the 4 wires to the test box to test the circuit works and if it does then I put it into an enclosure.

I also tend to run any required pot grounds to the spare holes on the vero (if there are any) as this avoids having lots of daisy chained ground wires clogging up the pedals guts.

Hope this helps!
Reply | Threaded
Open this post in threaded view
|

Re: Boxing Thread

JaviCAP
Administrator
In reply to this post by mojo321
Is just practise. After some buils, you know how long you should get the wires, where the pots should go, and so on.

I test the boards without switches (no stomp nor toggles), and no final jacks. I have a pair of wired jacks, and a wired dc jack / battery clip.  So when a board is finished, just have to mecanically connect the in, out, +9v and ground.

Once checked the board, you just have to drill the enclosure, get the final jacks, dc jack and battery clip (if used) and switches and do the real wiring (except pots) inside the new enclosure.

Would never build a full pedal without checking the boards first, by the way.

BR


Reply | Threaded
Open this post in threaded view
|

Re: Boxing Thread

induction
In reply to this post by mojo321
My method:

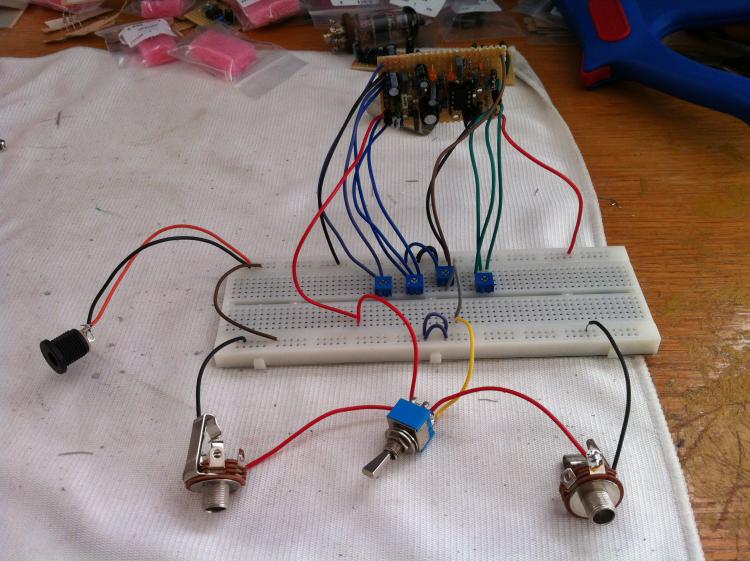
1. Breadboard the circuit to see how it should sound and decide if it needs mods or if I even want to build it.

2. Design the vero.

3. Build the vero, including longish wire leads, but no offboard parts. (Wire is cheap. It's better to make the leads too long and cut them down later than have to take everything apart or twist it around later to attach a longer wire. The extra can be used in another box or as a breadboard jumper.) I only use shielded wire when absolutely necessary.

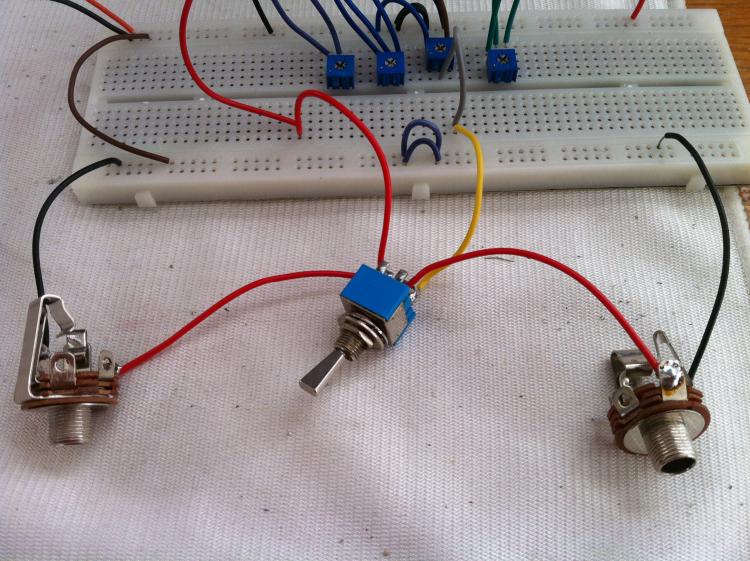
4. Test the vero on the breadboard. All offboard parts have their own leads soldered on and plugged into the vero. I use the same parts that will go in the box so I can be sure that everything works as expected, and make sure the switch doesn't pop. It's easier to fix these problems now than after everything is in the box.

5. Make holes in the box. (I draw a quick diagram by hand. I lay the parts in the box to help decide how much room I need and where everything should go, then measure with a ruler and note the measurements on the diagram. Then I use the same ruler to make pencil marks on the box where the holes go. Then center punch, drills of increasing size, step drill to size.

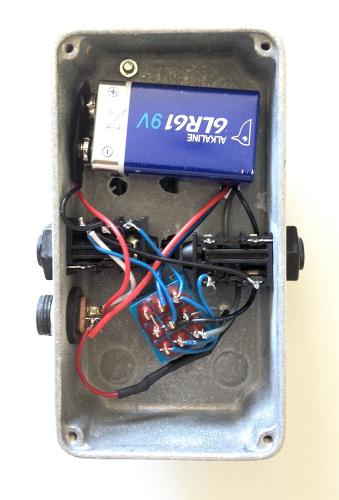
6. Plan all my wire routing, which can be revised later if necessary. Physically placing the board, pots, jacks in the box can be helpful for this. I try to avoid parallel wires when I can, but that quickly degenerates into a rat's nest, so I make it neat and then fix any accidental capacitance problems later, if necessary (which hasn't happened yet.) I use quasi-star grounding: all grounds go to the input jack, either directly or via daisy chain. Since I don't use isolated jacks, the output jack ground connects to the input jack ground via the enclosure, but I also use a wire to ground the output jack. This constitutes a ground loop, but I haven't had any problems with it so far. Relying on the enclosure for grounding anything works at first, but dissimilar metals in contact tend to corrode, and the connection will often fail over time.

7. Cut electrical tape into circles to cover the backs of the pots to prevent shorts (because I'm too cheap to buy those pot covers and I don't sell my pedals, so nobody will care about this one little shortcut.) I use two layers.

8. Since the board goes on top of the pots, I wire up all the pots. If the led goes under the board as well, I install the bezel, wire up the anode, and attach a longish cathode lead for connecting to the stomp switch. If there are any toggle switches, I decide whether it will be easiest to treat them similarly to the pots, or deal with it in step 10. This decision is based on how accessible the toggle lug will be after the board is in place. I use solid core wire, and the board is held pretty tightly in place at this point. Some consider holding the board in place with wire to be bad practice, which is probably true, but I don't sell my pedals, so I don't care.

9. Install the pots on the box. I use lock washers on the inside to make them easier to tighten without rotating.

10. Install the stomp switch, DC jack, input/output jacks, battery leads (if included), and anything else in whatever order is easiest. (Experience helps here, which is as good an excuse as any to make more pedals.)

11. Test the assembled box.

12. Put on the back plate.

13. Rock on.

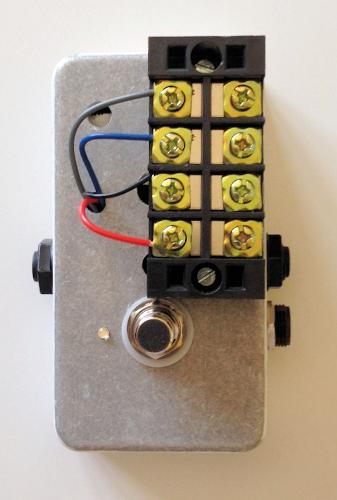
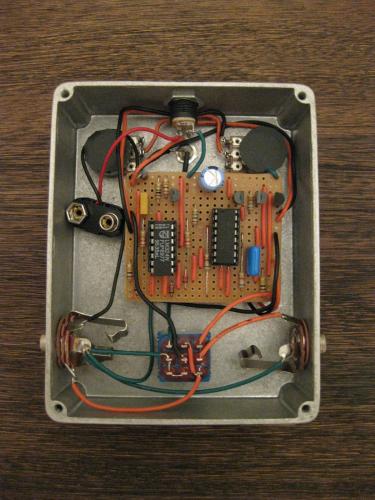
Here's a picture of my snow white auto wah:


And here's my Black 65:


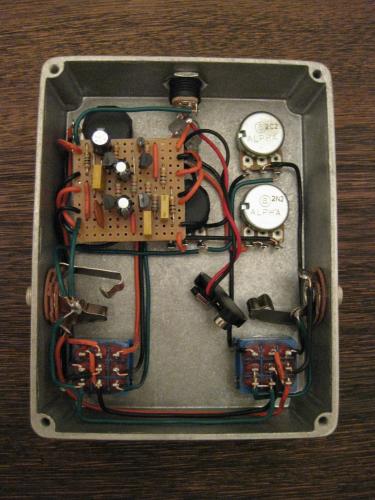
These are my neatest builds so far. The first few were much uglier, before I figure out my recipe.

Reply | Threaded
Open this post in threaded view
|

Re: Boxing Thread

mojo321
In reply to this post by mojo321
Thanks a lot guys.  Exactly what I was hoping for!

I just placed an order for some odds and ends.  I wish I had waited to hear these ideas.  Alligator clips would have been a good purchase!  They're now in my new wishlist.  That's a new record. After the last order I placed, I had an empty wishlist for like 2 weeks.  This one only lasted 2 hours!  LOL
Reply | Threaded
Open this post in threaded view
|

Re: Boxing Thread

mojo321
In reply to this post by mojo321
Nice Builds, by the way, Induction!  
Reply | Threaded
Open this post in threaded view
|

Re: Boxing Thread

mojo321
In reply to this post by mojo321
JAVICAP --- holy crap!  I just saw your Arctic White Fuzz.  Is that an A size enclosure?!?  

Wow.

Reply | Threaded
Open this post in threaded view
|

Re: Boxing Thread

JaviCAP
Administrator
Yeah, is a 1590A. Niced you like it :)

BR
Reply | Threaded
Open this post in threaded view
|

Re: Boxing Thread

alltrax74
In reply to this post by mojo321
Here is the test box I use

On the left you have from bottom to top : +9V, ground, Input Output, and the same on the right for the circuit.
I find the screw connectors easier than alligator clips, but that's just me
Reply | Threaded
Open this post in threaded view
|

Re: Boxing Thread

adstrum
I built something very similar but I used one of these on the top.
Reply | Threaded
Open this post in threaded view
|

Re: Boxing Thread

Dave
I do the same as Otalgiafx to test circuits, then I'll desolder any pots, mount everything in the enclosure, solder everything up, except the circuit board, then I'll do the board last, tidy up any wiring with zip ties, and voila!
Thanks
Dave
Reply | Threaded
Open this post in threaded view
|

Re: Boxing Thread

alltrax74
In reply to this post by adstrum
Yes, these RCA sockets are even better
Reply | Threaded
Open this post in threaded view
|

Re: Boxing Thread

mojo321
In reply to this post by alltrax74
Dang, that's cool. I'm gonna build one.
Reply | Threaded
Open this post in threaded view
|

Re: Boxing Thread

Freppo
This is how i'm testing circuits before boxing them

I just bought a bunch of trimmers in different values and hook it up on the breadboard. Very fast and easy and you don't have to solder/desolder anything. I soldered a couple of jacks to a switch that I use for checking against the bypassed signal. Sometimes I hook up anti-log pots via alligator clips, but the trimmers are usually fine. I make the wires a bit longer then nessecary so it's easy to hook up the board, then I trim the wires when boxing.


The breadboard also makes it easy to try out different values of pots and testing other stuff, like a highpass filter on the 9v rail when needed.
/ Fredrik
check out my building blog at www.parasitstudio.se
Reply | Threaded
Open this post in threaded view
|

Re: Boxing Thread

mojo321
that is really a great idea. thanks so much for sharing it!!!!! orderingtrimmers now