Debugging plexi-drive with trimmers
|
Hi all.
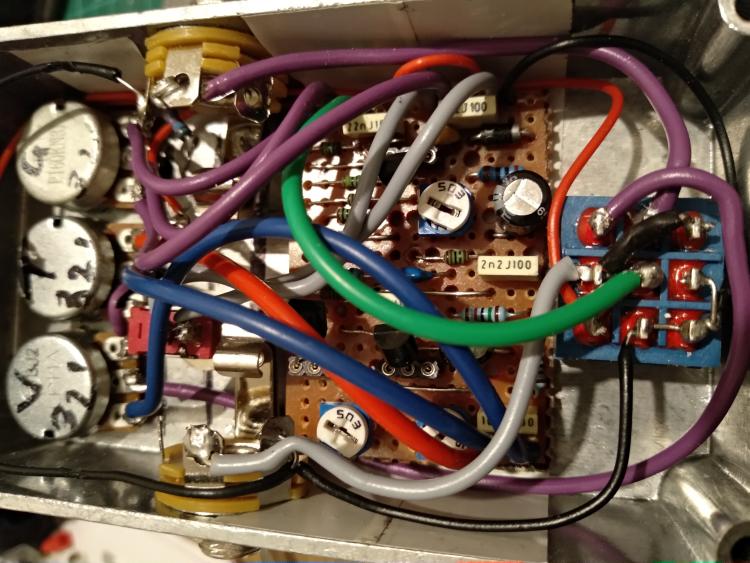
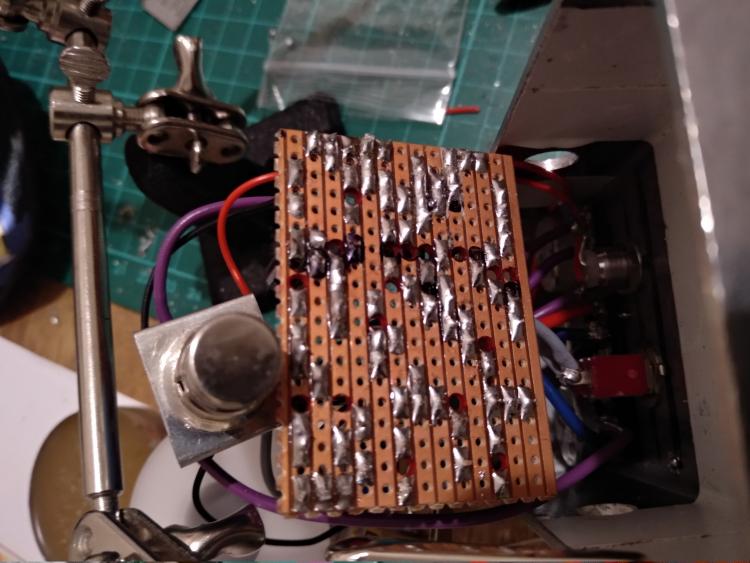
First time I've had a problem with a build, can't work it out  Bypassed, all is fine, but when engaged all I get is a tiny amount of noise which changes with pot turning. Have biased j201s with the trimmers, checked for continuity / shorts, checked footswitch and sockets. What can I do next? Thanks all! Layout page: http://tagboardeffects.blogspot.com/2013/09/plexi-drive-with-trimmers.html?m=0   
|
|
I have never seen jacks like that but, it looks like you have the in/output signals from the footswitch going to Sleeve, these should go to Tip and Sleeve to ground.
https://www.diystompboxes.com/beginnerboost/Fig29.jpg |
|
Hi aelling,
Thanks for the reply. Sockets are wired correctly, and pedal functions correctly in bypass mode. When switched, there's silence, aside from very faint hiss which is affected by pot turning. Any suggestions? Thanks! |
Re: Debugging plexi-drive with trimmers
|
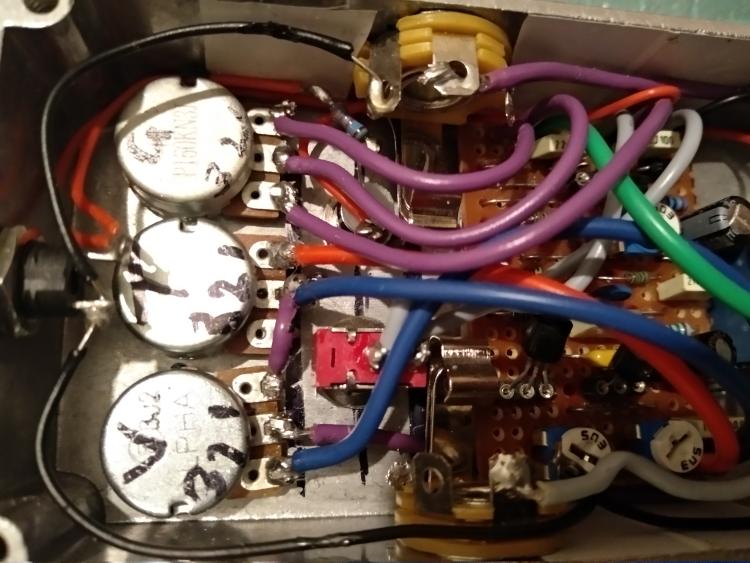
Looks like the black wire on the output jack needs to be taken off and moved to the other post would should be sleeve. From the looks of the middle picture the black wire seems to be soldered to Ring instead of Sleeve. I could be wrong can't tell for sure from just a picture just trying to help out.
|
|
Thanks glasspak, but the sockets are soldered correctly, positive tip, ground sleeve. Probably looks odd because I've used switched jacks.
Pedal bypasses correctly, so the signal is getting through the sockets and footswitch ok. |
|
Hey Bones,
An audio probe should help find the issue fairly quickly. If you don't already have one, this will give you some ideas on how to easily make one. https://youtu.be/jWvIfDSxbIk I actually just use a standard 1/4 inch jack with one end of a 1 uf cap soldered to the tip, then probe with the other end of the cap. (I used a 1uf film cap just because the legs are thicker and easy to probe with) And ground the ring of this jack to the effect ground. Then just use a standard guitar cable between this modified jack and your amp. (Keep amp volume low) Then plug another cable from guitar (or audio source) to input of effect. Probe the effect's input with the free end of the 1uf cap, you should hear the guitar signal through the amp. Then would just probe various points through the circuit until you lose the audio. I can help you probe strategically. Of course you only want to probe the audio path.
1978 Gibson Les Paul Standard, Cherry Sunburst
|
|
Excellent, thanks Mao! Will try that asap
|
|
Assuming this is your 1st time with an audio probe, here's a couple tips.
1st, if you make one like the video, or how I've done it, there will be a good bit of noise picked up by the probe along with the audio signal, so that's normal. Be sure your probing tip is small and sturdy enough that it won't easily bend as your touching it to the component legs. You dont want to short anything out as you will be probing the circuit with it powered up. And or course, you dont want to probe the power supply lines. The probing capacitor you use should be rated well above the supply voltage, A cap rated at 50v or 100v is more than safe in case you do hit a 9v line. (I've done this a few times and had no issues with my Tayda 1uf box film cap) And last, once you have the probe made and hooked up properly as descibed above or per the video, to get the hang of probing try the following: Set your amp to a comfortable volume (keep it very low to start). With NO POWER applied to the effect, put it in (true) bypass mode, strum the guitar (or turn on your audio source) and probe the tip of the input jack. If/when you hear the audio signal coming through the probe, then probe the tip of the output jack and it should sound the same as the input. (It may sound like a noisy AM radio, that's ok as long as you do hear the audio source). Then apply power to the effect and repeat those same checks. Should sound the same as with no power. From here you engage the effect and follow the schematic probing along the audio path until you lose the audio. For the Plexi Drive, you can probe pin 2 of the Gain pot which is almost midway through the circuit path. If you hear audio, the issue is further down the circuit. if not, then its between the input jack and the Gain pot. You could also start by probing the gate of each j201 and see what you get. You then would just narrow it down by probing through the circuit. Pick the easiest spots to probe 1st, like pot lugs, resistor legs, transistor legs. Let me know if you need any help.
1978 Gibson Les Paul Standard, Cherry Sunburst
|
|
Hi Mao,
I've made the audio probe and done some testing, but I'm stuck on how I should proceed  Test results: - no audio on gain 2 (or other 2 lugs) - no audio on rows below the input (left side - is the signal not carried down by the resistors?) - no audio on row directly above input - audio on 2nd row up from input (connected by 22nf) - audio on S & D (noticibly amplified) of left side jfet - audio to switch lug 1 (and switch 2, when 'on') - no audio on any legs of other jfets Any tips on where to go from here? Thanks again! Edit: typo |
|
Anyone got any hints on what might be wrong? Thanks!
|
|
In reply to this post by bones79
Hey Bones,
Sorry for my delayed response... Regarding: - no audio on gain 2 (or other 2 lugs) - audio on 2nd row up from input (connected by 22nf) - audio on S & D (noticibly amplified) of left side jfet - audio to switch lug 1 (and switch 2, when 'on') This seems to indicate the signal is getting lost right at the Gain pot lug 3. Looking at that layout, it may be that Gain 3 is shorting to either the 9v track or to the drain of the top right jfet. I would do a continuity check to be sure the Gain 3 track isn't shorting to the track above or the track below. Disconnect the power and put one lead on lug 3, and the other lead to the copper side checking every point along the track above and then the track below. There shouldn't be any continuity to either track. If you don't find any issues there, then disconnect the Gain 3 wire at the pot, re-connect the power and then audio probe the top of the 220p and report back. I'll keep an eye out for your response and get back to you asap.
1978 Gibson Les Paul Standard, Cherry Sunburst
|
|
Hey Mao!
Thanks so much for the reply. Some progress... I checked the rows you suggested, and found my multimeter "clicked" once on contact (not the normal sustained continuity tone) on the lower row, so I knifed the gutters again till it stopped, then tested the pedal again. Still not working. So then I disconnected the gain 3 at the pot lug. Audio probe at top of 220pF had a clear signal coming through. I then probed the gain 3 wire end, which had slightly distorted but strong signal coming through. Strangely, when i reconnected the wire to the lug, the signal seemed to almost disappear. There was still no signal from the other lugs (with 3 reconnected). I guess that means the pot is duff. I'll try to get a replacement tomorrow and see how that goes. Thanks again. |
|
This post was updated on .
In the meantime you could disconnect the pot all together and check the resistance between lugs as you rotate the pot
With the pot out, you could also bypass the pot by twisting together the wires that were going to lug 2 and lug 3 and from that twisted junction twist in a 1 meg resistor to ground. If the pot was the only issue, the pedal should then come alive.
1978 Gibson Les Paul Standard, Cherry Sunburst
|
Re: Debugging plexi-drive with trimmers
|
Did you ever figure this out? I am having the same problem with my build
|
«
Return to Debugging
|
1 view|%1 views
| Free forum by Nabble | Edit this page |

