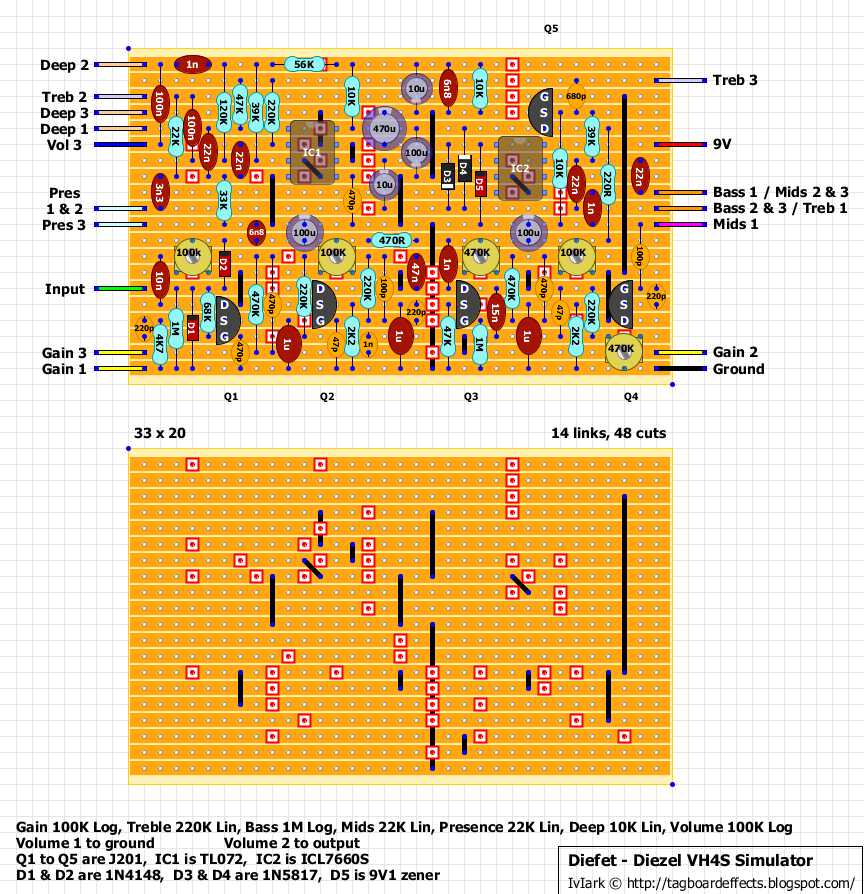
1. I notice that some of your pF-range caps are physically very large. Are you sure about the values of those? I see one of them looks like mica, but the others look like they could be film. Just something to double-check, might be fine.
They are mica - I have a lot of mica caps I got online as an assortment pack. In addition, I just got another load of film 470p caps. They are all correct values - the 240pf I took a 160 and added 68 in parallel. The only ones that are not exact values are where I used 43pf in place of 47pf. All 680. 470. 100 pf caps are correct value.
2. Where exactly was the copper bridge you found? It might help me figure out what could have gotten damaged.
Good question. First recall that I had the right side 100uF cap down a row (both connections), I replaced that cap in the correct position. Solder bridge was at row six from top, the topmost cut of the three vertical cuts at 7:00 on the 470 uF cap in the circuit diagram.
Additionally, yesterday I found that in trying to fix what looked like another solder bridge I made an accidental cut (now fixed) in an adjacent row. I didn't see the problem until I looked at the pic below blown up, you will see it unfixed. (sixth row from top - below right two vertical holes) I was continuity testing and kept getting a reading between those two adjacent rows, so I "went to town" - turned out it was the 470k pot bridging them ((long story) anyway - that whole area is now fixed - and I am getting sound through the circuit, just not gain.
3. Can you post a solder-side picture, just for reference?
Here it is - just note that I already fixed two problems you might see . not proud of this solder job, but the copper was not lined up with the holes, so when I made cuts many of them left tiny slivers on one side. I never had that happen before so I didn't notice at first.
http://s1304.photobucket.com/user/Paul_Motter/media/DSC02999_zps96xlz5pb.jpg.html4. Were D1 and D2 damaged, or did you replace them just as a precaution?
Just as a precaution, although when tested after removed one seemed possibly damaged (I think D2). The other tested ok.
5. Did you use the trimmers to bias the J201's?
Yes, but once I plugged it in I found I could get a lot more gain doing it by ear, so they are now at max gain - not at recommended voltage
6. Any component substitutions?
Just using 43 pf for a 47 pf cap, and using 500k trimpots in place of 470k. I don't trust those cheap trimpots much, though. I have seen them burn up before. Otherwise everything is to spec.


 just a determined novice trying my best to learn how all this stuff works by charging forward and learning from my mistakes.