EHX Hog's Foot Modification Suggestions
|
Administrator
|
i just built an EHX Hog's foot, and it's good, but sounds a little boomy and completely cuts the high end off. it's got a ton of boost, and i can tell that it adds some nice color to my ton, but since it looses all definition, since the high end is gone, i can only really use it for R&B, reggae & dub, and i ran it into one of my fuzzes and got some massive doom metal tone that was fantastic. but i still want to get some definition back, so i can hear what i'm doing and when i play with people i don't get completely lost in the background.
so i've been doing some research about the circuit and trying to figure out how to regain some of that high end back, so i figured i would get some opinions about what to do, based on the schematics i found, cause i'm sure there's more then one way i can approach this, but what i'm thinking may not be the easiest solution. what i found is that the hog's foot is essentially a modified screaming bird with 2 changes. the input and output caps were massively increased, and 2 100nF caps were added one from Collector to Ground, and the other is Base to Ground. Hog's Foot Schematic 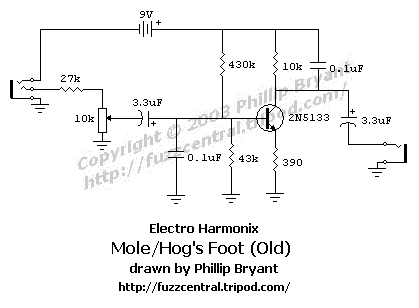 Screaming Bird Schematic 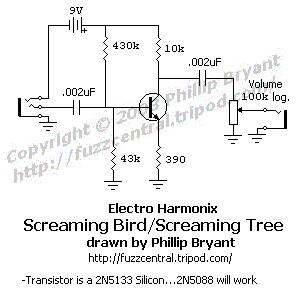 i'm my head i would think that one the size of the input and output caps are HUGE, to say the least, so by lowering them should make a difference, but i was thinking that the 100nF caps are creating low pass filters. but, then i realized that i thought low pass filters run resistor inline with the circuit with a cap to ground near the output, like below: 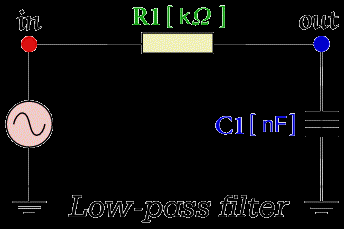 and when you look at the hog's foot schematic neither of the 100nF caps are like that. i also found that moosapotamus has modified the circuit by adding a switch that lifts the 43k resistor to ground, which they claim gives the bass boost a slightly brighter "punchy," sort of compressed, fuzzy tone. i don't want to make if get fuzzy, i still want it to remain clean, so that idea is out. so long story short, my question is how should i modify the circuit to get some of the mids/high end back. |
|
This post was updated on .
The 100nF from base to ground is a low pass filter in conjunction with the 27k input resistor, the resistance between lugs 2 and 3 on the input volume pot, and the output impedance of the previous stage (pickups or previous pedal). Lose it or reduce it and you'll get more treble before the boost stage.
The 100nF to V+ on the collector serves to selectively boost low frequencies and reduce high ones. The voltage gain of the transistor stage is roughly equal to Rc/Re, where Rc is the collector resistor to V+ and Re is the emitter resistor to ground. The cap essentially bypasses Rc for higher frequencies, giving preferential boost to lower frequencies. In more detail, the capacitive reactance of a capacitor (which is essentially a frequency-dependent resistor, in this case) is 1/(2*pi*f*C), where f is the frequency and C is the capacitance. Add that in parallel with Rc, then divide by Re and you get a gain that looks like this: 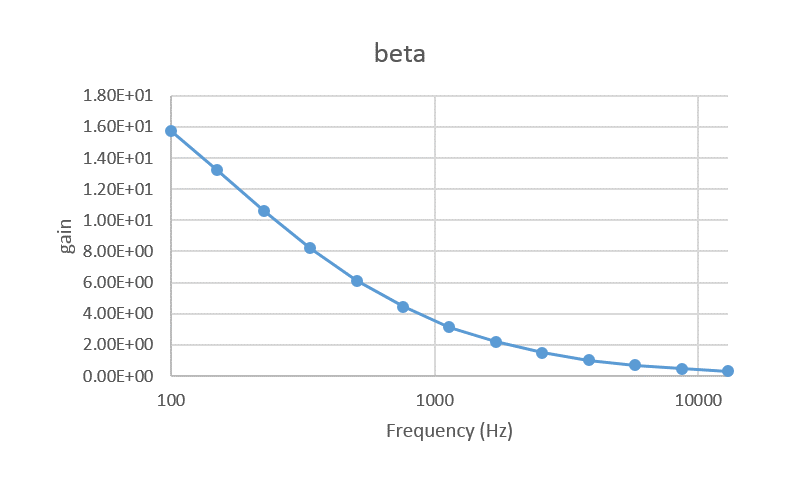 So you get 16x gain at 100Hz, and nearly complete attenuation at 10kHz. So drop the cap or reduce the value to get your treble back Of course the input and output caps can be adjusted to taste as well. It's breadboard time again. |
|
Administrator
|
hmmm. didn't know that you could make a lowpass filter like the one in the hog's foot, so that's really good to know. still learning the ways of electronics
 . .
i didn't check that there was a 27k resistor at the input, so there must be multiple versions of this effect. the layout i made, and the layout mark made is based on this one 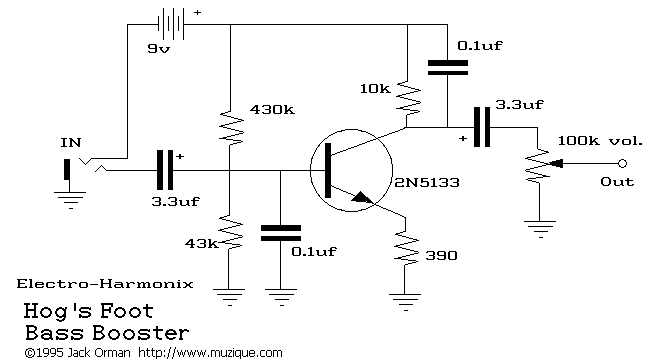 so without the 27k resistor at the input, theoretically if i understand correctly if i remove or lower the 100nF caps, i should be able to regain the high end. right? |
The collector cap is really just the reverse of the emitter bypass cap in a Cot-50. That one boosts treble preferentially, by reducing the emitter resistance for higher frequencies more than for lower frequencies. (AC gain = Rc/Re, which gets bigger when Re gets smaller.) Yes. You still have the output impedance of the previous stage to function as the resistor in your low-pass filter at the input. Feed it a buffered signal (i.e. reduce the output impedance of the previous stage) and you'll probably get much more treble even with the cap. Here's another way to think of it: That cap from base to ground is no different from a really long cable, bleeding treble to ground via the capacitance between the signal wire and the ground shield. In both cases you can get your treble back by either reducing the capacitance (use low capacitance cable) or by putting a buffer in front. The buffer works because when you dump signal to ground, you reduce the voltage signal at the output of the previous stage, and a buffer has the ability to supply more current so that the voltage signal isn't reduced as much, but a pickup doesn't. |
|
Administrator
|
This post was updated on .
wow. that's a great explanation, now that makes a lot of sense. i messed with both caps. when they're are removed it's super open sounding, but seems very generic booster sounding, so i ended up putting in 2 different value caps to help cut some of the highs and boost some of the lows. MUCH better now.
btw, induction i'm beginning to think that it's always breadboard time for me. even when i think i'm good to get off it, right back i go. while it can be annoying and time consuming to do, i'll tell you it's the most important tool i've got. well tools really, i've got 2 breadboards lol. without your help way back when with how to use one, and suggestions with them, i wouldn't have used one ever, and been missing out. |
|
I try to be a breadboard evangelist. I don't build anything without breadboarding it first.
Many beginners really resist getting a breadboard. I think it's because they would rather spend their time and money on things that translate directly to a finished pedal. At least that was my reason. Once I took the breadboard plunge, though, I realize how much time and money breadboards save me. If you want a compressor, but you aren't sure which one, you can fit four of them on two breadboards and then A/B/C/D them until you decide which one(s) you want to build, and whether you want to mod them. If your just curious about what certain pedal sounds like, you can hear it in just a few minutes before you decide whether your curiosity is satisfied, or if it's worth your time and parts for a complete build. Recently I couldn't decide whether to build a harmonic percolator or a harmonic jerkulator. I put both on a breadboard, with a switch to choose the circuit and another switch to choose Si/Ge/no clipping diodes. I discovered that they were similar, but different enough to justify building both. Before I built it, I replaced some of the resistors with pots to see how they affected the tone, and dialed them in to emphasize the differences between the circuits, making each one sound as good as I could get it. Then I replaced the pots with the nearest value resistor after deciding that the pots didn't change the sound in ways that I wanted to tweak very much. I also played with the clipping diodes, ultimately choosing asymmetric combinations so I could have the three different flavors with less change in volume. Without the breadboard, all of those adjustments would have taken so long, and probably would have damaged the vero badly enough that I wouldn't have bothered, and I would have ended up with a pedal that was good but not awesome. With the breadboard, the whole design stage took less than an hour, and it's far and away my new favorite dirt pedal. Breadboarding has massively increased my enjoyment of this hobby. |
|
Administrator
|
Agreed. When I was in High School as a student, 99-03, we still had an electronics class. I was lucky enough to be able to take it before the teacher retired. We got to learn to solder, design pcb's, etch them, drill them, and use them in various builds. We also learned to breadboard. For whatever reason on at the time I could not wrap my head around how to use it, I did what I was supposed to, but when I went to do my own stuff it was like giving a monkey a hat, in the end I just ended up wearing it on my ass. I can't explain why, but it just did not make sense to me, but tell me you wanted to pcb designed, and showed me a schematic and at the time I could do it in no time.
I can't agree more that after being able to do it, I couldn't work without it. Some circuits I know what they sound like, so I got ahead and build them the way they are, and socket the parts I know I want to mess with (input/output caps, clipping diodes, transistors). Others, I usually breadboard first to mess with them to get them where I want them, or just to try them out. So far there's a few circuits I ended u realizing I didn't want to wast my time on them because they didn't sound like I expected them to, and wasn't what I was after. I do think the fact that having YouTube has allowed us to be a little lazy and go "sounds great in the demo, I'll build it," but sometimes it's not what we think it is. I think the same goes for buying pedals. I bought years ago an EHX Ge Overdrive cause in a demo it sounded great. I bought it, took it home, plugged in, and I thought it sounded like shit. Now that we have a layout for it, and I actually understand how it works, how the controls effect the sound, I'm going to breadboard it and see what I think and decide if I was wrong about it, which I'm 99.99999% sure I was! I was young, well much younger, and really didn't know anything, but if I took the time to try I might have learned how to use it and fall in love with it, rather then go based on a video. Long story short, we're all after some elusive tone or sound, bread boarding will get you there without having to build everything under creation to get there. Hell, I'm still on the hunt for one thing in particular and I'm still breadboarding it, I think it's actually been almost a year , but I'll get it. I'm so close I can taste it.......mmmmm.......delicious tone........ahhhhhh (Homer Simpson drooling sound).... |
|
In reply to this post by induction
I breadboarded the Speaker Cranker and found that it sounded good with some old diodes I had in my stash. So I put the parts in a bag (I use the zip lock freezer bags and label them with a sharpie) for a future build on vero.
You definitely save on parts by doing this. I recently just desoldered some components from a ROG Thor vero that just refused to work. I recovered the 16mm pots, transistor and IC sockets, a few caps and the trimmers. The resistors and remaining caps were scrapped (kind of a shame). I'm not so worried about wasting resistors, but good caps can be relatively expensive, and I'm always running short on certain values. I have several other projects that I may harvest parts from too. I can then make a Frankenstein build from harvested parts...  ha ha! ha ha!
I want to breadboard the Red Llama next so I can try out some mods... |
«
Return to Open Chat
|
1 view|%1 views
| Free forum by Nabble | Edit this page |

