First finished pedal - mixed results.
|
Ok, so I have about 20 pedals in an oxidised alloy finish.
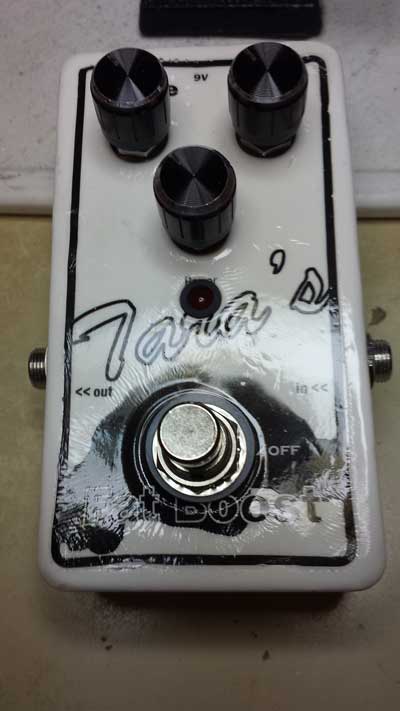
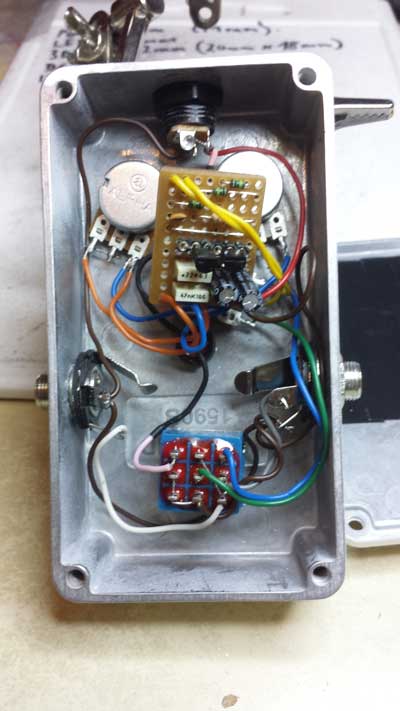
Pro: cheap Con: cheap Anyway, I score a few rattle cans of acrylic. Primer, colour and lacquer. Cool. I also got some wet transfer stuff. I have everything I need. Except patience. Oh yes. Dear old patience. I have a FatBoost ready to box. Ideal candidate. I start to paint. It's a nice hot day. Primer goes on cool. little flattening. Colour goes on cool. Give it a little polish, awesome. Really thick and shiny :) I print the stickers, quick flash of lacquer (kudos, Beaker!) an hour to dry, on they go. First time doing wet transfers since my Airfix Messerschmitt 109 in 1976, but despite nearly 40 years, fat shaky fingers, Mr Magoo eyesight and NO PATIENCE!!!, they go on ok. It looks really cool. An hour or so later, I start to apply the lacquer. 3 or four coats later, it's as shiny as a shiny thing lost in shinytown in a shiny new car. In bright sunshine. Ok, it wasn't perfect but it was pretty good considering my LACK OF PATIENCE!!!!. I leave the finished box in a warm dark place to cure. No, not there you smutty lot... Many hours later (embarrasingly too few, because of my IMPATIENCE!!!) I decide to see how it's doing. It feels ok. So I decide to box it. Big mistake, due to my... yep. So I fit a few things and spot the big fat fingerprints in the lacquer where it hasn't cured yet. I get it a little flatter but it's annoying, because it would have turned out ok IF I HAD ANY PATIENCE!!!! As it if, it's going to stand as asobering reminder of why you should take your time. Things I've learned. I'm ok enough to paint. I have acceptable skills. Wet transfers are a little fiddly, but not too bad. Just don't overwork them. Paint needs a bit longer to dry than I thought, especially the lacquer. I have no patience. I really do need an over. Because then I won't have to work on my impatience :) I've ended up with something that I'm please with in some ways, but disappointed with in the actual finish. What could have been a 6/10, good first effort has actually ended up as a slightly embarrasing 3/10, you f**kwitt. Here she is.  ..and the gut shot...  I have a PlimSoul waiting to box and I've primed the enclosure. Oven shopping tomorrow... :) |
|
Administrator
|
First off, nice effort. Even if the finish is ruined it sounds like you learned a lot in the process
What kind of lacquer are you using? Every kind that I've tried dries super fast. Like dry to the touch in half an hour and ready for handling in 24 The paint is usually the part that takes a long time to dry, and it looks like you went a little crazy with it. For that much paint I would wait a week for it to cure by air, otherwise you need a toaster oven or something to speed up the process. If you spray lacquer over the paint before it cures that just makes it even worse, because now the moisture is more sealed in |
|
Thanks Travis. Yes, the paint is really thick. Probably too thick really. Actually, definitely too thick but I'll use a bit less next time. It could well be the the paint rather than the lacquer, or both, because it's got the 'custard skin' thing going on.
It looks ok from a few feet out, so I'll probably just leave it, but I could knock it back and re-sticker it easy enough if my shame gets the better of me :) |
|
Administrator
|
I would imagine it's both, but even if the lacquer cured you'd still probably have a problem with the paint when you go to tighten up the nuts. The way it bulged out around the washers is a sure sign that it wasn't cured and might be a little thicker than you want
If you plan on painting enclosures a lot, definitely buy a secondhand toaster oven (it doesn't need to be clean and definitely don't eat from it because it will be contaminated by the chemicals). Otherwise you'd have to wait a REALLY long time for that amount of paint to dry to the point where you can install hardware. At least for me it would probably take a week or maybe more depending on conditions Another thing I would suggest is to never check if the finish has cured yet by sticking your finger in the middle of the pedal. Because if it isn't cured then you pretty much ruined it. You can check a more inconspicuous spot like the bottom plate or something that will be covered or drilled Also now that you see how the paint bulges up, you could even start with tightening up a nut on a pot to see how that goes. If the paint starts bulging up then stop right away and let the finish cure longer. If you start with the foot switch then that's hard to hide but a knob will usually be able to hide the damage |
|
Administrator
|
In reply to this post by Ed Nice
By the way, the fact that you made another working pedal is the actual important part. The finish comes second, but the guts on this look like a definite improvement. If you enjoy the sound then you're already 99% there
|
|
In reply to this post by Ed Nice
Nice one Ed,
Looks good. I really like the overall style of your design. It's a steep learning curve this pedal building malarkey. Some mistakes I make time and time again and others just the once. You've probably learnt more than you realise from this project and i'll bet you had a lot of fun along the way. So Congrats. Oh and by the way its flea market day today(Thursday) on Harpurhey market if you can make it over that way....I've seen ovens on there before. |
|
Thanks guys. It's a cool clean boost pedal and, as you say Travis, it's a lot neater inside.
Next step I think will be to make a test box so I can start to do wiring inside the enclosure to tidy it some more without having to build, test, resolder etc... Thanks Bogey, I might just have a drive out later :) |
Re: First finished pedal - mixed results.
|
For a first try, considering how many things can go wrong, you at least deserve a lot of credit for getting close. It is a learning process.
|
«
Return to Open Chat
|
1 view|%1 views
| Free forum by Nabble | Edit this page |

