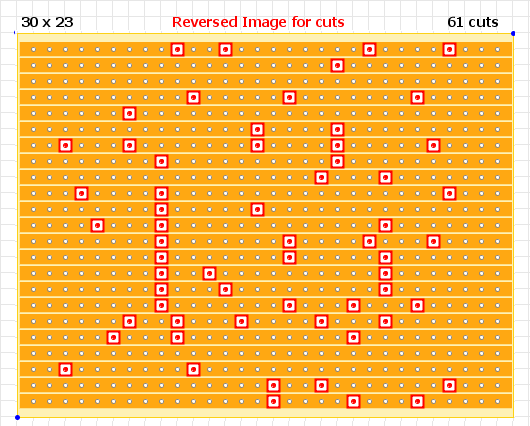
Madbean Moodring (buffered wiring) updated 2015 version

classic Classic list List threaded Threaded
15 messages Options
MAO
Reply | Threaded
Open this post in threaded view
|

Madbean Moodring (buffered wiring) updated 2015 version

MAO
This post was updated on .
UPDATE: posted 2017 edition here

I was hesitant in posting this one, because it has a ton of cuts & links and looked just plain ugly. But now that I have actually built it, it wasn't so bad.

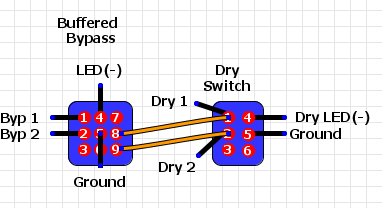
I decided to go with the buffered non-true bypass wiring, but you can easily modify for the true bypass wiring option.

Verified, and everything fits nicely. The layout was designed for 1/4 watt resistors, 5mm electrolytic caps and poly film box capacitors as from Tayda.  I used a monolithic cap for the output 1uf.

I placed a few components diagonally and added a couple of unnecessary cuts & links so the components would fit better.

I originally had a 1590BB in mind when drawing this up, but if you turn the board sideways and use small jacks, it should cram into a 125B.

Note: since I'm using the buffered non-true bypass wiring, a 2PDT is all that is needed for the stomp switch (this may help if you want to use a 125B). If you go with the true bypass method, then the standard 3PDT stomp switch would be used.

Here is the layout:


Here is a reverse image for the cuts:


Here is my populated board: (using a temporary TO-220 regulator until I get a TO-92)


I made a convenient connecting harness for the Belton brick using a Housing Connector 2.54mm 6 Pins (A-830) and 6 Crimp Terminal Connectors 2.54mm (A-837) from Tayda:


Up until this point the Chasm has been my favorite belton project, I haven't had the chance to play the Moodring very long, but it seems to have a little bit more to it. The space and dwell controls sounded really nice.    

Next up the Collosalus...mmm, maybe not.

Enjoy,
Mike

 
1978 Gibson Les Paul Standard, Cherry Sunburst
Reply | Threaded
Open this post in threaded view
|

Re: Madbean Moodring (buffered wiring)

IvIark
Administrator
I got the Collosalus PCB, so I'm a coward!
Great work Mike, thanks for sharing
Reply | Threaded
Open this post in threaded view
|

Re: Madbean Moodring (buffered wiring)

SpaceCommandant
In reply to this post by MAO
Hi, I've built this with buffered wiring but I suspect I've made an error.

The reverb seems to work perfectly in both modes, though when I'm in the pure 'Wet' mode and stomp the effect off, I have absolutely no bypassed signal.

Just wondered if you have any thoughts on this... I've gone over it a bunch and can't see anything out of place.

..?
MAO
Reply | Threaded
Open this post in threaded view
|

Re: Madbean Moodring (buffered wiring)

MAO
This post was updated on .
With this particular "buffered" wiring there will be no output if the DRY switch is open and the Reverb is bypassed . The DRY switch is actually a dry kill switch, leaving just the wet signal as you know, so when you bypass the Reverb (wet signal) with the dry kill switch open, nothing passes through to the output.

If you want to be able to use just the wet signal and then bypass it, you'll need to go with a true bypass wiring and risk the annoying reverberating pops when engaging the reverb,

To do this, you would disconnect BYP-1 and BYP-2 from the stomp switch, remove the **1M** resistor and jumper across the BYP-1 and BYP-2 on the board (after removing the **1M** resistor, place a link between column 2, row 4 and row 7) , install the *1M* resistor and wire up standard true bypass 3PDT stomp switch.  

Mike
1978 Gibson Les Paul Standard, Cherry Sunburst
MAO
Reply | Threaded
Open this post in threaded view
|

Re: Madbean Moodring (buffered wiring)

MAO
This post was updated on .
Just had another thought,

I suppose you could use a 3PDT stomp switch with the buffered wiring rather than the DPDT and run the wires from the DRY switch to the 3rd set of lugs on the 3PDT stomp switch, lugs 8 & 9. When you step on the bypass stomp, you kill the wet signal as usual, but also jumper the dry switch wires closed at the same time thus allowing the dry signal to pass through to the output.

And if that works out, you could go with 2 stomp switches rather than a bypass stomp and a DRY toggle switch.  One DPDT stomp switch to just kill the dry signal, and a 3PDT to simultaneously kill the wet signal and engage the dry signal.

If you never want the dry signal mixed in when you engage the reverb, then you can probably omit the DRY switch altogether and run the DRY wires directly from the board to the 3PDT bypass stomp switch lugs 8 & 9.

Seems like that should work. If I get a chance I will try it out tomorrow.

Mike
1978 Gibson Les Paul Standard, Cherry Sunburst
Reply | Threaded
Open this post in threaded view
|

Re: Madbean Moodring (buffered wiring)

SpaceCommandant
Thanks for your input, the dual stomp switch option would be ideal. I might have to give that a go.
MAO
Reply | Threaded
Open this post in threaded view
|

Re: Madbean Moodring (buffered wiring)

MAO
I tried it out tonight and it worked like a charm, noiseless when bypassing and engaging the wet-only signal.

Here is how it looks with a 3PDT Bypass stomp switch and a SPST toggle for the Dry switch


And with a DPDT stomp switch for the Dry switch with an additional LED


1978 Gibson Les Paul Standard, Cherry Sunburst
Reply | Threaded
Open this post in threaded view
|

Re: Madbean Moodring (buffered wiring)

SpaceCommandant
That's sweet,

Thanks for your help!
MAO
Reply | Threaded
Open this post in threaded view
|

Re: Madbean Moodring (buffered wiring)

MAO
Updated layout based on the new Moodring 2015 version

Jan 2015 layout changes: (see madbean website for more details)

Removed 10R power supply resistor and its cut
Changed regulator from LM78L05 to LM7805
Removed un-needed protection diode on regulator
Re-positioned the 100k resistor that was near the regulator
Re-positioned the 1N5817, the*1M* resistor and the 1uf cap tied to BYP 1 to make room for a current limiting resistor for the bypass LED
Added said CLR and its cut
Added Jon Patton's limiter, a green 5mm LED to pin 7 of the PT2399 (probably should socket this LED and test is out first)


I haven't built this new layout yet, but I'm fairly certain it is verified as the changes were minor.

1978 Gibson Les Paul Standard, Cherry Sunburst
Reply | Threaded
Open this post in threaded view
|

Re: Madbean Moodring (buffered wiring)

strassercaster
i started this last wednesday. is it verified yet. its listed in the unverified section. i have the entire bosrd done just need to wire it up . i hope this works the you tube video for these sounds decent. my friend steve winkler had the idea for the belton brick.mi was hanging out with him and he told me . i asked if he had any and he six that he gave me 3 bdtr3 and 3 bdtr2 . i built a rub a dub and didnt like it. i builtthe rubadub deluxe and it was ok sold it to my cuz. i am hoping this is the best. i definitely dont need a delay i have four already but reverb i need
MAO
Reply | Threaded
Open this post in threaded view
|

Re: Madbean Moodring (buffered wiring)

MAO
Hi, the layout at the top is verified.

I havent actually built the 2nd layout, but as I recall the changes were minor so you should be good. I did however manually implement the 2015 changes in the 1st layout, so I know they work.

Also, I believe I eventually increased 1 or more of the cap values to reduce some white noise I was getting from the PT2399. I'd have to look to be sure what I settled on, but you may want to socket C10, C11, C14 and C15 just in case. If memory serves, I upped C10 and C11 to 2n2 and C14 to 47n.

If this one doesn't work for you (due to PT2399 noise), try the Chasm Reverb by Dead Astronaut. There are a couple of YouTube videos that represent the pedal well.

1978 Gibson Les Paul Standard, Cherry Sunburst
Reply | Threaded
Open this post in threaded view
|

Re: Madbean Moodring (buffered wiring)

strassercaster
ok well its all built but i am doing the offboard wiring still. i see how the 3pdt is layed out . i usually do the tagboard way with the led on the left side.. my questions are i guess i put the output from the board  on the top right of the switch the input from the board  on the middle left and the jack  output on the middle right. and jack input on the i still hook this stuff up normally with the the extra wires then ? please explain offboard wiring a little for me . thanks for the layout and the hard work
Reply | Threaded
Open this post in threaded view
|

Re: Madbean Moodring (buffered wiring)

strassercaster
In reply to this post by MAO
also when i started this the original layout was at the top it no longer appears. i was like man i had my head up my butt anyway you could post the original im getting frustrated ha ha.i notices the electrolytic has moved and a resistor . i have no idea what else may have changed i have starred at it for a while and think i am good but ?..
Reply | Threaded
Open this post in threaded view
|

Re: Madbean Moodring (buffered wiring)

strassercaster
also i was planning on buffered bypass
Reply | Threaded
Open this post in threaded view
|

Re: Madbean Moodring (buffered wiring)

strassercaster
strange the original layout shows when i use my laptop but not my ipad hmm. disregard  the early post about that. man that messed me up now i changed a couple things and ha ha ha im in no mans land