New amp build (kit) in progress...
12


12
|
So I've started building a weber 6h50 kit. Just doing the hardware installation at the moment...
This is gonna be a lot of fun, I really intend on enjoying the process more than last time (although I did enjoy it quite a lot still). Here's a pic of where it's at for the moment: 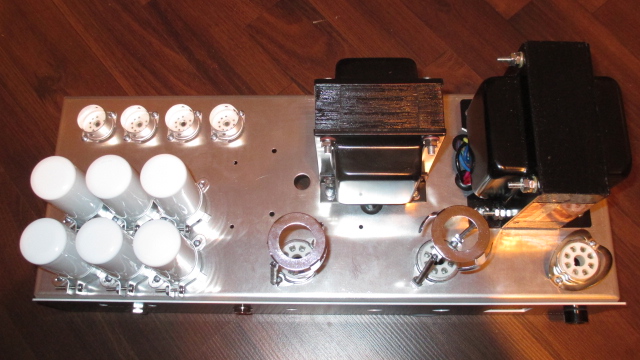
|
|
Damn. How much did that set you back?
|
Re: New amp build (kit) in progress...
|
They're around $600 for the head kit
|
Re: New amp build (kit) in progress...
|
Perhaps there ought to be an DIY Amp sub forum/topic> I myself would like to see that.
Cheers Chris
Yeah, 220, 221. Whatever it takes.
|
|
Administrator
|
In reply to this post by Surgeon
Awesome! What type of amp is this based on?
I've been researching and preparing for my first amp build. Basically I just changed the tubes in two amps this week and while I was in there I realized this really doesn't have to be as expensive and complicated as I originally thought. I don't want to spend kit money though, so I plan on salvaging a chassis, making my own eyelet board, building my own cabinet, etc. One big money saver for me is that I work in a cabinet shop, so any materials and tools I need for the cab are taken care of Please keep updating this thread with your progress! I'll be interested in following |
|
Administrator
|
gorgeous man. i can't wait to hear when it's done. it makes me sad that i haven't had the time, or money, to get back to work on the one i've been planning. i'm definitely jealous.
|
|
Heath: 600$ + shipping to Canada + exchange ratse + taxes = approx 850$ (cdn) when all is said and done... not cheap but still not so bad either, any other kit would've cost me a lot more and the quality on this one is just fine (based on my last from Weber).
Chris: I wonder who'd be participating in this... we might be a few but amps cannot be turned out at the rate that pedals are so it'd be quite a slow subforum... Travis: It's Ted Weber's interpretation of the Hiwatt DR504...cool amp! And no, it's not that complicated and while salvaging parts is great, making sure that the parts you have fit an amp that interests you is another story... Great for the cabs! It's just much simpler for me to get a kit than it is to go hunting for parts... some are quite simple but in the end I'm not sure that I'd save much by buying separately than it would be in kit forms. Transformers for one are quite expansive and I can't/don't want to buy many of them... Rocket: yeah, I'd been wondering how your very cool project was coming along... |
|
Administrator
|
lol, at the moment, its not. since i bought my house i've been too broke to get the parts. i want to get it all at once, but it would probably make more sense to buy it in pieces so when i do get it all i can build the mother. the biggest problem is the chassis. i haven't found the right size one, and one guy that makes vintage style orange ones doesn't have time to do a custom one for me. i really don't want to buy the chassis from electric/green, mostly because the owner is a complete asshat, and i don't want to give him a penny if i can help it.....
|
|
Administrator
|
In reply to this post by Surgeon
Thanks Surgeon
Wow, sounds like a great choice then. My neighbor at my studio has a Hiwatt combo. I'm not sure of the model, but it is an amazing amp.. Really love that clean headroom. It's an excellent choice as a platform for pedals (and obviously great on it's own!) The transformers will be one area where I will have to spend some cash. I think all together I should be able to do this for around $400 but I need to find out exactly everything I'm getting first. I may just buy a chassis anyway because that saves so much potential pain.. Are you using turret board for this? |
|
Administrator
|
After looking at webers site their kits look pretty great. With my $400 budget, I could actually get their 6A20 kit (deluxe reverb) without the cab.
That's very tempting. It seems complicated for a first amp build but I already have plenty of experience wiring up turret, eyelet, and tagstrip. Already know how pots and switches etc work The only things I'm unclear about are sensitive wire placements and I've never wired a tube socket or transformer before. Looking at the transformers outputs it's operation is pretty clear though. What do you say? Looking at the layout I'm confident I can do it, although I see that they have rated it as extremely complex |
|
In reply to this post by rocket88
rocket: yeah, I get the idea... I delayed the kit due to home renovations and right now I think I could've held on a bit longer... at least I'm having fun.
Travis: Weber's kits are quite affordable but the basic quality is very good (and nothing holds you back from upgrading some parts, while building or later). I think you could do it of course, it's not that hard. The hardest parts are figuring out the grounding scheme (which Weber doesn't provide with the layouts) and, well, just learning. It seems simple while looking at it but it gets a bit more confusing while you're in it. Experience and being methodical are key here. The kits usually come with some average quality eyelet boards but this time around they sent me some very nice phenolic turret boards fitted with forked turrets.... looks awesome. And here are the results of the little I could do tonight: -installed the faceplates (but covered them with tape for protection) -Installed a much bigger pilot light than what they provide (better looking and more sturdy while building) -did all the heaters (my least favorite part of the build). 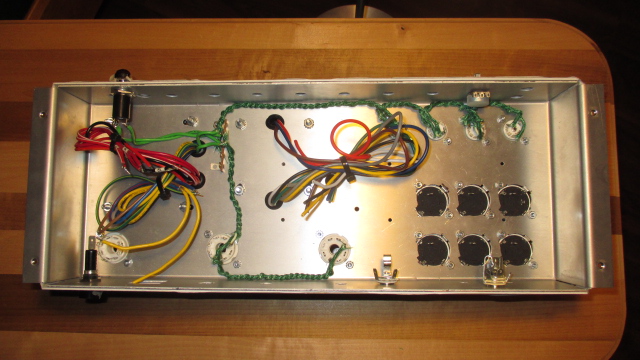
|
|
Administrator
|
Very useful info for me! Thanks
I see that people usually twist the heater wires up as you've done. What are some of the "rules" for wire placement? Are there certain no nos that I should be aware of? This is the part that I'm unsure about. I suppose I really just need to do my own research! |
|
Well, heaters are AC while the rest of an amp's circuit is DC, therefore, the AC can feed some hum in an amp quite easily, especially around the powertubes.
Here are a few important practices: - Twist them as tight as possible to get the magnetic field as small as possible (by having the wires mosly parallell for most of their course). People usually fold the wire in half, chuck the loose ends in a drill, use a screwdriver to hold the folded end and have at it. Works with many kinds of wires, except the cloth-covered type that weber sends with the kits... I have to do it by hand: long and hard on the fingers (ha, long and hard). -Tuck 'em away in the corner of the chassis as much as possible. The chassis acts as a bit of a shield. -Keep 'em twisted as much as you can around the sockets. YOu'll see a lot of builds where people start de-twisting them early on and just go around the sockets, this might work in low-gain amps but can be problematic in high-gainers. The best practice is to keep them as tightly twisted as possible, connect one pin, untwist for the second one (usually on the opposite side of the socket) and reach it from *above* instead of going around the tube... -Keep the wires "in phase", meaning that all pins "9" (for example) should be fed by the same wire... that's why you'll see lots of people using two different colored wires for the heaters, which facilitates this greatly. If you look at the pic I posted above, you'll see just that (and don't assume I'm perfect in any way, I'm still new to this and trying my best): tightly twisted, away in the corner except for the vertical crossing from my phenolic-board connection to the power tubes, and the wires reach the pins from above and not around... you can't see the tubes as being wired in phase but trust me on this one... ;) That's all I have for now... tons of info out there though. |
Re: New amp build (kit) in progress...
|
In reply to this post by Surgeon
I've been itching to get my hands on a 50W Tube Bass kit from mojotone.com but at ~$900 it's hard to find the spare cash for something that's not a necessity.
Then January 15th hit. About halfway through our bar gig (no stage), an entire pitcher of cheap garbage American domestic beer came crashing down on my pedal board. The kill count: - TC PolyTune Noir - New MXR DC Brick - Fancy bendable power strip - My mojo-build D*A*M Ezekiel. Even the rotary died which is a kick in the nuts considering it's an ebay item. :( - My Musket Fuzz build - My Pale Green Comp build - Boss GEB-7 EQ - Strymon Deco ($400) - Myco Three tube overdrive (~$400) - Verellen Meatsmoke Pre ($700 but I got it for $525 on sale) So basically my live setup is destroyed now. Not counting the three pedals I built, that's $1665 in damage. Ben is going to repair the Meatsmoke at no cost because he's awesome. Once fixed, I'm selling the pre and my Super Bassman amp and replacing it with a Meatsmoke head. That's $700 no longer on the board. Going to build a looper box (possibly just purchase a ground control... who knows), throw my pedals in a rack case w/ drawers, and hopefully only have tuner and the loop controls on the floor. :( On a positive note, I ran out of velcro so I wasn't able to swap the Boss EQ with my new Empress EQ, and the Pale Green Comp with my new Empress Comp. So yeah, that 50W kit is slowly drifting off into the sunset... |
|
Wow, Neg, I actually felt that kick in the nuts. OUCH!!!!!!!
|
Re: New amp build (kit) in progress...
|
Yup. It sucks. The guy that caused it didn't really mean to do it but he was completely wasted and was in the process of being removed from the show when it happened. Being a broke ass scrub, there's no point in pursuing cash from him because he doesn't have any to give. I have insurance but at $1000 deductable, doesn't make sense to make a claim for the $665, particularly when Verellen is going to fix the Meatsmoke for free.
|
|
Administrator
|
 kick in the nuts is an understatement. i don't know how you let the guy leave the gig alive. if anything happened to my board or amp i would kill the guy. kick in the nuts is an understatement. i don't know how you let the guy leave the gig alive. if anything happened to my board or amp i would kill the guy.
|
Re: New amp build (kit) in progress...
 Holy fuck that is painful. Holy fuck that is painful.
Through all the worry and pain we move on
|
|
Hey guys, I thought I'd post a pic of where things are at now.
I had to pre-wire all the sockets and cap cans since where the board's gonna be dropped in there won't be any space left to work on these... which makes it look quite messy at the moment but it will clean up nicely. Also, there's the big mess of zip-tied primaries and secondaries in the left half. Quite happy with how things are going at the moment. 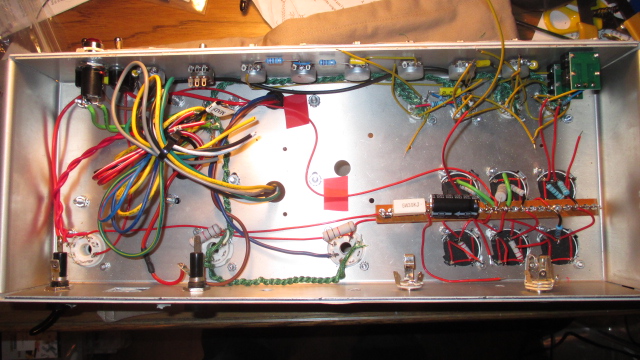
|
|
Latest update:
Chassis in its final pre-board form. Next up is getting the turret board in and connect all the stray wires. Guts: 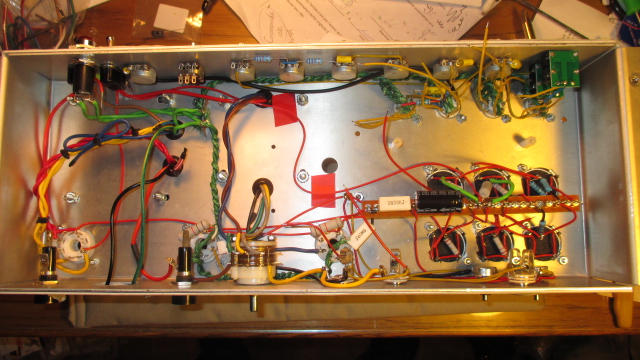 Board: 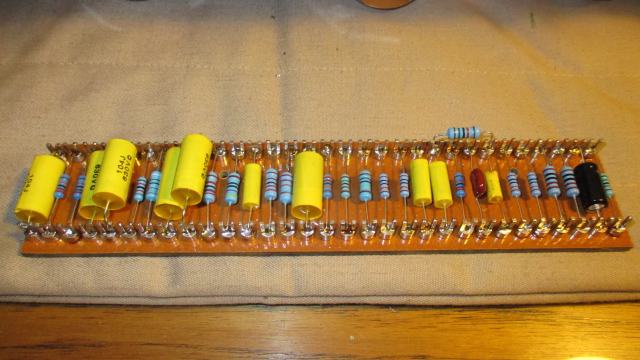 Next order of business it to double-check everything with a fresh copy of the layout. Then solder the board in... then it's power-up time! |
«
Return to Open Chat
|
1 view|%1 views
| Free forum by Nabble | Edit this page |

