SMD Jfet soldering tips?
12

12
|
Anyone got any? My transistors and boards have arrived from Bitsbox. I't's very scary quite how tiny they are!
I managed to solder a couple in place suprisingly easily. It's the getting them in place that takes the time and effort. Once in place though, I nipped them with my haemostats which did a great job of holding them in place. My tip - make sure you have a good magnifier! |
|
Great.
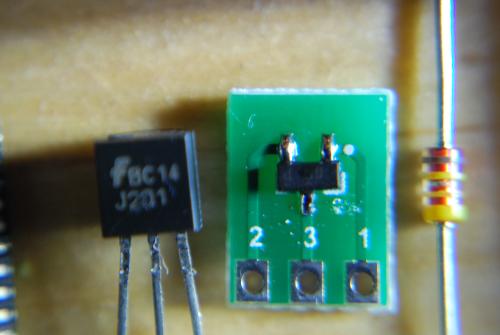
This probably won't apply to you but, when I was dead bugging mine, I placed a SOT-23 on the bare side of a piece of vero. This was clamped in place with reverse tweezers. The vero was suspended in the air with a pair of Third Hands. The centre pin of the JFET was positioned just over a hole in the vero and a cut off wire was poked through the same hole and held in place with Blu Tak on the table. Repeat for each pin. The general consensus seems to require liberal amounts of flux (which can never see myself buying) and tacking a corner pin in place and working on from there. Could you post a pic of one of your completed boards alongside a TO-92 if you get a chance? |
|
Administrator
|
In reply to this post by Beaker
When I did it I tinned the pads first and then positioned it as best as I could and just applied a little heat to one of the legs, enough so the solder melted and then held it in place. Then solder the other two legs and finishing off doing the first leg again to make sure you have a good connection. Not as bad as you suspect with a decent iron.
|
|
In reply to this post by Ciaran Haslett
Thanks for the tips guys - much appreciated.
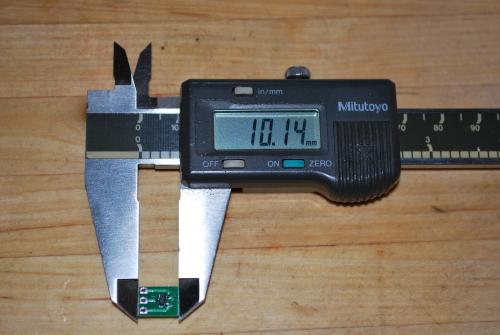
Here you go Ciaran. The boards measure 10mm by 7mm - just about the same size as my little finger nail.   I think you are right about the flux. A dab of flux would stop the little buggers trying to do a runner while trying to grab them with haemostats. I've already worked out that I can hold the board really well in my toolmakers vice, so I have so problem holding the board to solder. I have a very fine, rounded pencil tip for my iron, but even this seems like using a crowbar. I think I need to buy myself some flux and a needle point tip. Even so, once you have one leg soldered, the other two are easy. To be honest, getting the things out of the packaging strips is harder work!  |
|
Cheers Beaker.
Adding legs and a socket looks like they might stand tall on a board so I think I'm going to order a few and try laying them horizontally (depending on what else is around that particular FET position) Looks like you could trim the top off too with a good knife so maybe not too bad |
|
They are 1.5mm thick, so trimming a bit off the length might not be an option (you might just destroy it you try to cut it).
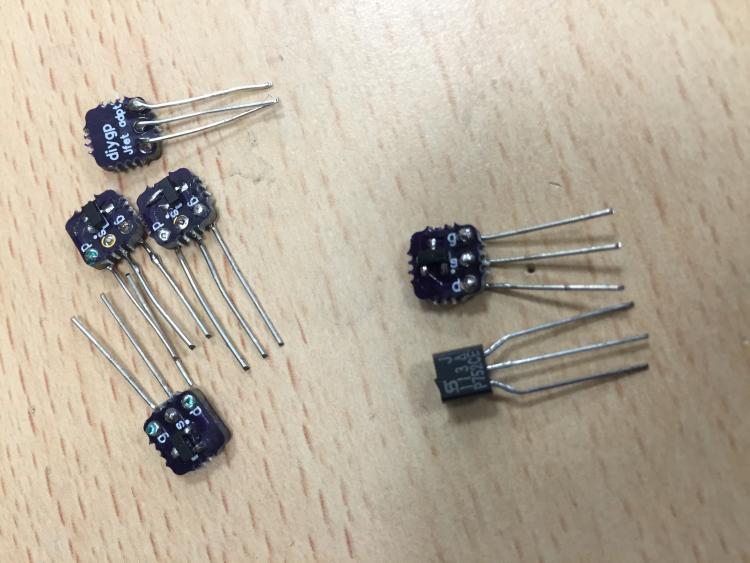
If you don't use a socket and bend and solder the legs in at 90 degrees (straight out the back like a tail, so the board sits up vertically), you can sit the board right down touching the vero. If you do this, they don't come up any higher than a T092 in a socket, or an electrolytic cap. You can also get them to sit down horizontally, hovering over surrounding resistors or ceramic caps, if you solder the legs straight down through the holes. |
|
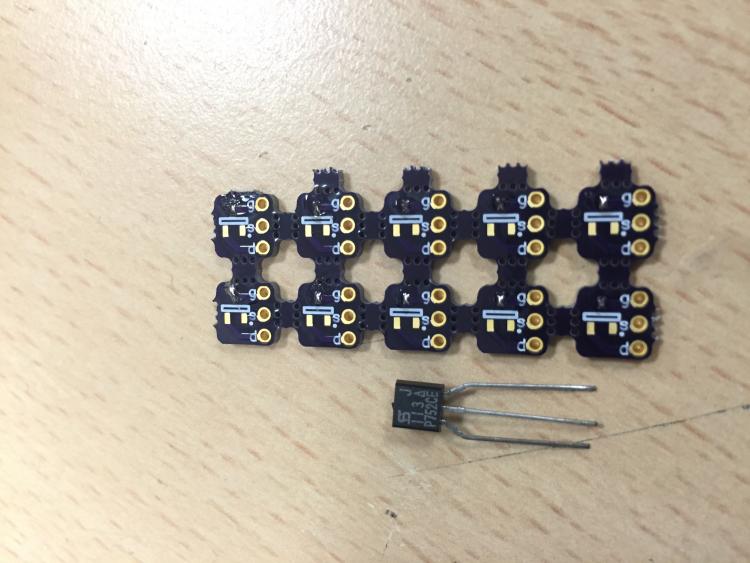
When I order them from DIYguitarpedals all the boards are still connected. Rather then cut them lose before soldering it makes it easier to solder the transistors first. I apply solder to the pad labeled 3 in the picture above (although the orientation on Chromosphere's boards is sideways, not downwards facing) then put the transistor between the pins of a set of pliers, heat the solder on the pad and shove it in. With the transistor now held in place by the solder it's now easy to solder the other two pads. Afterwards I always check with a DMM to see if there is continuity between the holes for the later to be soldered pins and the tiny transistor legs amidst the solder. Usually there always is but one time I noticed there wasn't, so better to learn this during this phase rather then when I try to stick the transistor board into an actual PCB and wonder why there is no sound.
|
|
Thanks Muadzin, that's useful information. These boards are already cut to size - I can imagine it would be easier to mount a load at once, then break the boards off like you do with Chromosphere's boards.
I've ordered some flux, so will report back when it arrives. |
|
Flux really helps! I got some of this stuff, from this seller:
http://www.ebay.co.uk/itm/ADVANCED-SMD-BGA-paste-no-clean-Flux-Gel-1-4-ml-syringe-/121043073454 It's a tiny syringe, but as you only need the merest smear on the pads, it should last for ages. It has the consistancy of a very thick grease, so easily glues the transistor in place. You can turn the board upside down and shake it hard without the transistor coming off. Soldering is really easy - you dont even need tweezers or anything to hold the transistor in place, so big thanks for the tip! 
|
|
In reply to this post by Beaker
Have you seen Fran blanche,s website for her SMD holddown tool,dead simple but looks good.Did you get to try any of your SMD yet,please let us all know how they are,yours and all the best Myron.
|
|
In reply to this post by Beaker
Ordered that flux and boards today. I wasn't aware flux came as a gel. All the vids I've ever seen looked like it was a fast flowing liquid so I never thought it would be any good for holding a FET in place. Learning every day. Cheers Beaker

|
|
I thought electronics flux was runny stuff too - until I started looking into flux for SMD components. Google soon put me right!
I knew plumbers flux was grease-like paste, but that's a whole different animal. |
|
I just thought I would get back with a quick update.
I'm just finishing another ROG Ginger, and I've used these SMD JFETs and adapter boards. They fit in fine - I have three mounted vertically up off the veroboard, and one horizontally (the one next to the diodes), as there was not quite enough space to mount that one vertically. It all looks pretty neat and tidy - just hope it works! One major caveat though - the Bitsbox boards change the effective pinout from DSG to DGS. Boo! Therefore leg twisting is required. Double Boo! I'm going to order a load from Chromoshere, as his boards maintain the correct pinout. |
|
UPDATE:
Got my Ginger working - fired up first time! I biased the JFETs by ear, and got it sounding just right, then measured the voltages. Q1 measured 4.52V and Q2 4.49V. I know that is only a tiny sample, but to me that just confirms what we have been told about SMD JFETs being much more accurate and much more consistent. Here is a couple of photos:  Close up of the board:  I have put an voltage doubler in since taking these photos for 9V and 18V option. Also, the PCBs from Chromosphere have arrived, and they are thinner, smaller and neater than the Bitsbox ones, so should be even easier to fit. |
|
Cheers for the pics Beaker. That flux is great! I haven't built anything yet with the boards but I've soldered a few just to see how it went. I thought they were unnecessarily big and your pics seem to confirm that.
I'm thinking now I may try to design a PCB that is much smaller and maybe add a feature that helps orientate the Gate and Source. Or our resident Eagle Guru Chris can chime in? 
|
|
I just finished up a few more boards and thought I'd post some pics here for those wary on making the switch to SMD.
I now get Chromesperes (Paul's shop in Australia here) I cleaned him out too sorry! They are much smaller than Bitsbox and keep the pinout DSG. Delivery from Aus to Ireland only cost £2.75 and took 8 days to arrive. Your boards come well packaged and as one piece, with perforated edges that snap off into individual PCBs. (I had already tinned the Gate pads before I got the camera out)  My Method Apply small amount of flux Tin Gate pads Hold the SMD JFET by the sides with reverse tweezers and line up its legs with the pads on the board Heat up the Gate pad and flow the solder onto the JFET leg Release tweezers and tack the other legs. Reflow the Gate if necessary. Using component cut offs, line up 3 and make a small 90 degree bend using needle nose pliers. Place board component side down and "hook" the cut offs into the holes Solder cut offs in place and cut the new legs to the same length. The end result...  As you can see, they are only slightly bigger than a through hole FET. Get into your stride and you could probably complete 1 board with legs in under 2 minutes. Like others have said before...this is much less "hassle" than spending a small fortune on through holes only to find them duds. Seriously lads....make the switch to SMD. No fancy expensive tools (well...I did buy the tweezers for this but they were only a few quid). I didn't even change to thinner solder (I'm using 0.7mm 60/40) or change to a point iron tip (using same conical hoof tip I use for literally every job I've ever done). I'm saving myself a fortune and making FET circuits that just work! |
|
I was gonna get some of those boards from chromesphere (out of stock..............now I know why ya bugger
 ). got some on order from osh which was a lot easier than I thought it would be and cheaper with free shipping. ). got some on order from osh which was a lot easier than I thought it would be and cheaper with free shipping.
can anyone suggest a good uk source for smd j201(beaker are the bitsbox ones good as I often order stuff from there). hope to get some in soon and then i'll take the plunge(I've been put off fet circuits because of the renowned unreliability) wish me luck 
|
|
Yes the Bitsbox ones are great. Get some of the SMD 2N5457 JFETs while you are ordering if you have the money. Most other UK suppliers want you to order in bulk as far as I can see, so Bitsbox is your best option if you only want to order 10 or 20.
I find that I don't even need to hold the FETs on with tweezers - I just "glue" them on with a smear of flux, and that's enough to stop them moving. Apart from that, my method for making legs is the same as Ciaran's. |
Re: SMD Jfet soldering tips?
|
I'm following this thread with interest because eventually we'll all need to go this route or pay astronomical sums for vintage through-hole jfets, but: do you guys know you can get j201s and 2n5457s from Smallbear for 50 to 55 cents? Is it really that much cheaper to go the SMT and adapter route?
|
|
Yes I do know that Smallbear have these at great prices.
However, most of us that are now using SMD JFETs are in Europe. Unfortunately, Smallbear's minimum order and high shipping rates outside the US make them a very expensive option! It's probably a good thing for you guys in the US though, as if they were cheaper, we would have rinsed all their stock a long time ago. 
|
«
Return to Open Chat
|
1 view|%1 views
| Free forum by Nabble | Edit this page |

