Do you have more time than money? Does the idea of paying 5X the shipping compared to what a fiddly bit adapter costs make you want to fling your soldering iron into the wall like a flaming lawn dart? Do you enjoy doing nano surgery under a microscope because bean counters threw us under the bus 30+ years ago when they decided to make everything the size of a grain of rice to save a penny per thousand made? No you don't... I sure as hell don't. SOIC can seriously just shove right off...
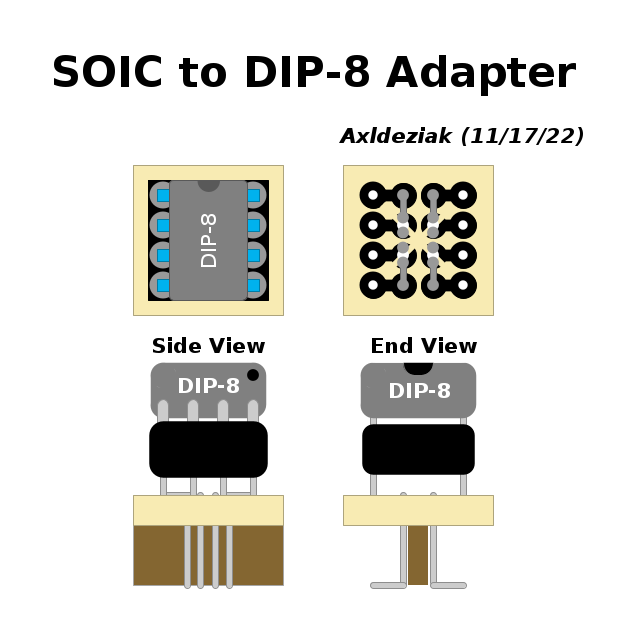
With that said, here is a SOIC to DIP-8 adapter I came up with because one of my amps took a dump and the circuit is an absolute flea circus. I figured if I'm going to replace the opamp it'll be one I can SEE... and most importantly replace easily in the future if needed, or I want to tweak it.
The pins are a bit of a chore but that's why you have a pile of cut off leads saved. You know you do... They are right there next to that pile of old popsicle sticks that have been rattling around the work bench drawer for the last eight years... for... reasons? Grab one of them while your rooting around for scraps, it'll come in handy in a minute.
First slice in two the four inner copper tracks on a 4X4 bit of board. Not much, just enough to separate them. Use an old guitar string (you have those laying around too and you know it...) or a knife to whittle/file a small groove in the edges of the 4 inner holes a bit so the pins won't touch when inserted. Then bend up six staple shapes out of leads and solder a pair of them in the inner holes carefully, just a bit on each side so they stick. Then clip the center of the staples and finish soldering the separated pins in. Then solder in the four other staples and clip off the four outer legs, they are not needed. Add your DIP socket and connect the tracks.
Then trim that stick to the length of the board and the height you want the adapter to sit. Glue the stick to the bottom of the board between the two rows of leads. Now bend the leads into an L shape and trim it all up so it stands straight and flush. This riser will keep the entire mess from collapsing after you have installed it and gently insert the opamp.
Did I tell you how fiddly this is? Just more proof that SOIC/SMD is the tool of Satan himself and should be purged from the face of the Earth.
And yes, this works and is verified. My amp now functions again and that makes me happy.