Sanford & Sonny BlueBeard Fuzz/Distortion

classic Classic list List threaded Threaded
9 messages Options
Reply | Threaded
Open this post in threaded view
|

Sanford & Sonny BlueBeard Fuzz/Distortion

xdaracx
Reply | Threaded
Open this post in threaded view
|

Re: Sanford & Sonny BlueBeard Fuzz/Distortion

adapt
it's this:

http://www.generalguitargadgets.com/pdf/ggg_bmp_ggg_sc.pdf

with a 47 ohm resistor between 9v+ and the circuit, another 220uf in parallel with the one from 9v+ to ground, and a 4.7k resistor instead of 1k for the LED.
Reply | Threaded
Open this post in threaded view
|

Re: Sanford & Sonny BlueBeard Fuzz/Distortion

adapt
here, i just made it.

http://i.imgur.com/een2jdd.png
Reply | Threaded
Open this post in threaded view
|

Re: Sanford & Sonny BlueBeard Fuzz/Distortion

xdaracx
Thanks, is this ggg muff you made or you know what is changed to get a bluebeard?... I found this post by Sonny, and from what I understand, bluebeard is not the same as GGG tuned muff, and the bluebeard has toggle switch on newer versions.


"Hello my name is Sonny friend of Surachai. I would like to clear up some things. Along time ago i tried a 70's lamb's head big muff that sounded very girthsome for bass. The guy Brian would not sell it too me but let me take it to Alfonso Hermida (www.hermidaaudio.com)to copy so that i could have a true bypass version with a barrel type power supply and a sturdier more beer proof hammond box. I am not an electrical wizard ALL credit goes to Alfonso. Alfonso said he had a friend who could make the PCBoards in small batches of ten this man's name is JD Sleep El Presidente of generalguitargadgets www.generalguitargadgets.com Once i heard the prototype and a few changes were made my one pedal was going to be a batch of ten as I had several friends who wanted one. JD wanted to move into eventually making pedals full time and we struck a price for 10 assembled. Years and many pedals later I still do not have a web site just a myspace. JD makes pedals for lots of people and oh yeah the lack of paint... When I had the first ten no one wanted to wait for them to be painted and i didn't want something cheap that would just flake off like alot of projects i had seen I think it would make the build seem cheap. So i looked into powder coating and with every batch i had people waiting saying no just give it to me and after 50 pedals and def after 100 I gave up on the idea of painting them and the idea of engraving or stamping did not work out so well. So I have nothing to hide and all I do is sell to friends and people who hear about me through friends. I pay JD to make the pedals. I do not. There are alot of things to talk about in the world and alot of things to spend time doing on the net but when anyone asks I tell them JD built it and if you get something you want built he is THE man he is now able to build pedals full time for alot of other people. I pass the pedal on to people who want it and in the, i guess 5 years i have been doing this I have always said if this pedal does not work with YOUR rig then you can return it for a 100% refund the only people I have had problems with is some dude that bought through Atomic and was more concerned about hatin online when he could have gotten his money back in full. I do not say that this pedal is the end all be all I waited for the EH BM reissue i even stupidly waited for the line 6 distortion modeler before i made it. I like to use an EQ after but not everyone does that is why i make it as a replacement fdor all the thin black eh out there. I like the green ones but the backdoors and the switches sucking oh yeah and being hella spensive. Well I never pretended to be anything other than a nerd looking for the best bass sound ever I talked to Mike Matthews about the buckets of parts put into the 70's pedals there is a wide variety of parts in them all and the pedal i copied had aged a few years I am trying to build a pedal for people who want a solid pedal that will not crap out on them in ten years and will be just as awesome when they are old. man i hate typing. I have only taken out one ad and that was for an independent publication "give me back" everyone else is word of mouth like surachi. I am already overwhelmed with orders i don't know what S&H to Denmark is. I do NOT want to sell to crappy blues smooth overdrive guys I want to sell to people who kill kill kill. I am not putting out myself as anything other than a conduit. if you don't like the taste don't drink the water. I am not gonna proof read this I have to go play bass now nite nite Metal, Sonny"
Reply | Threaded
Open this post in threaded view
|

Re: Sanford & Sonny BlueBeard Fuzz/Distortion

adapt
this is the GGG tuned muff with the additions i specified. there's a thread on talkbass where they compare the two, the GGG and the BB circuit-to-circuit, and the additions i made are literally the only ones, 47R resistor from power supply, extra cap in parallel (which i combined from 440 to 470uf) and the 4.7k LED CLR. i am sure the toggle switch is just a bigger capacitor on the input.
Reply | Threaded
Open this post in threaded view
|

Re: Sanford & Sonny BlueBeard Fuzz/Distortion

Alamondm
The toggle switch I believe is a Tone Bypass. Any ide how to do this. I’m still on the learning curve.
Reply | Threaded
Open this post in threaded view
|

Re: Sanford & Sonny BlueBeard Fuzz/Distortion

Bolsyo
I recently looked into it myself and found this description by Jack Orman: http://www.muzique.com/lab/tbypass.htm
Reply | Threaded
Open this post in threaded view
|

Re: Sanford & Sonny BlueBeard Fuzz/Distortion

Alamondm
Unfortunately, I am no good at understanding schematics much less being able to apply them to vero but thanks anyway. I tried to understand it.
Reply | Threaded
Open this post in threaded view
|

Re: Sanford & Sonny BlueBeard Fuzz/Distortion

Feral Feline
In reply to this post by adapt
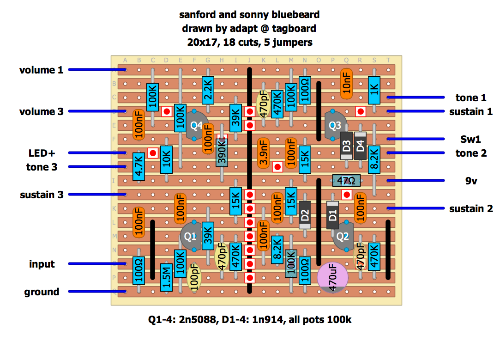
I couldn't figure out "Sw1" on Adapt's vero, so I conceived my own TONE-BYPASS, based on EHX's, for the layout.

The following tone bypass has been verofied by Alamondm...

With "Sw1" as per the vero, note lower case "w",
and "SW#" with a capital "W" repping the DPDT...
DPDT:
1 4
2 5
3 6


- Remove from vero Tone2 Wire — but other end still attached to the tone-pot.
- Take tone-pot2's wire and run it to SW6 lug of DPDT on-on toggle.
- From SW5, run a wire to the Vero where Tone2 was previously attached.
- Vero's "Sw1" wire (still attached to vero) runs to SW2, and...​

We interupt this modcast for a DIY community service announcement...

Top right of 3n9 is a hole, cut the trace right of it between the hole and the 100n. Needs to be a hairline cut, as once soldering there is a chance of bridging it. Alamondm succeeded where I would've slopped solder all over it — so I would...
- Move both 100n & 15k on the right of the 3n9 over one hole to the right, the 15k sharing holes with the jumpers.
- Make the trace cut where the north end of the 100n was, to the right of the hole that's right of the 3n9, right!
- In the hole to the right of the 3n9 (there's a 470k above the needed hole) attach a wire...
- Run that right-of-3n9 wire right to SW3.
- Lastly, attach a 150k resistor between SW1 & SW4.​

Depending on your build and its part tolerances, you may experience a small boost in volume in tone-bypass mode. Adjust resistance to taste — bumped, dropped, unity.


Instead of DPDT, you could make it a 3PDT stomper, with the 3rd pole for an indicator LED, and swap out the resistor with a trimmer or pot.


Head 'm off at the tone-bypass, banditos et banditas.