Stereo Mod for Tremulus Lune

classic Classic list List threaded Threaded
5 messages Options
Reply | Threaded
Open this post in threaded view
|

Stereo Mod for Tremulus Lune

warpeggio
Hello friends!

I've built several of the layouts on this site with great success. For the past few years though, i've desperately wanted to build a Stereo Panning Tremolo, but there aren't really any easy options.

I spent the first few hours today trying to do a point-to-point wiring of the Tremulus Panneur from commonsound/4ms. I got all the resistors onto my cardboard and really hated the nest that was forming. Back to the drawing board.

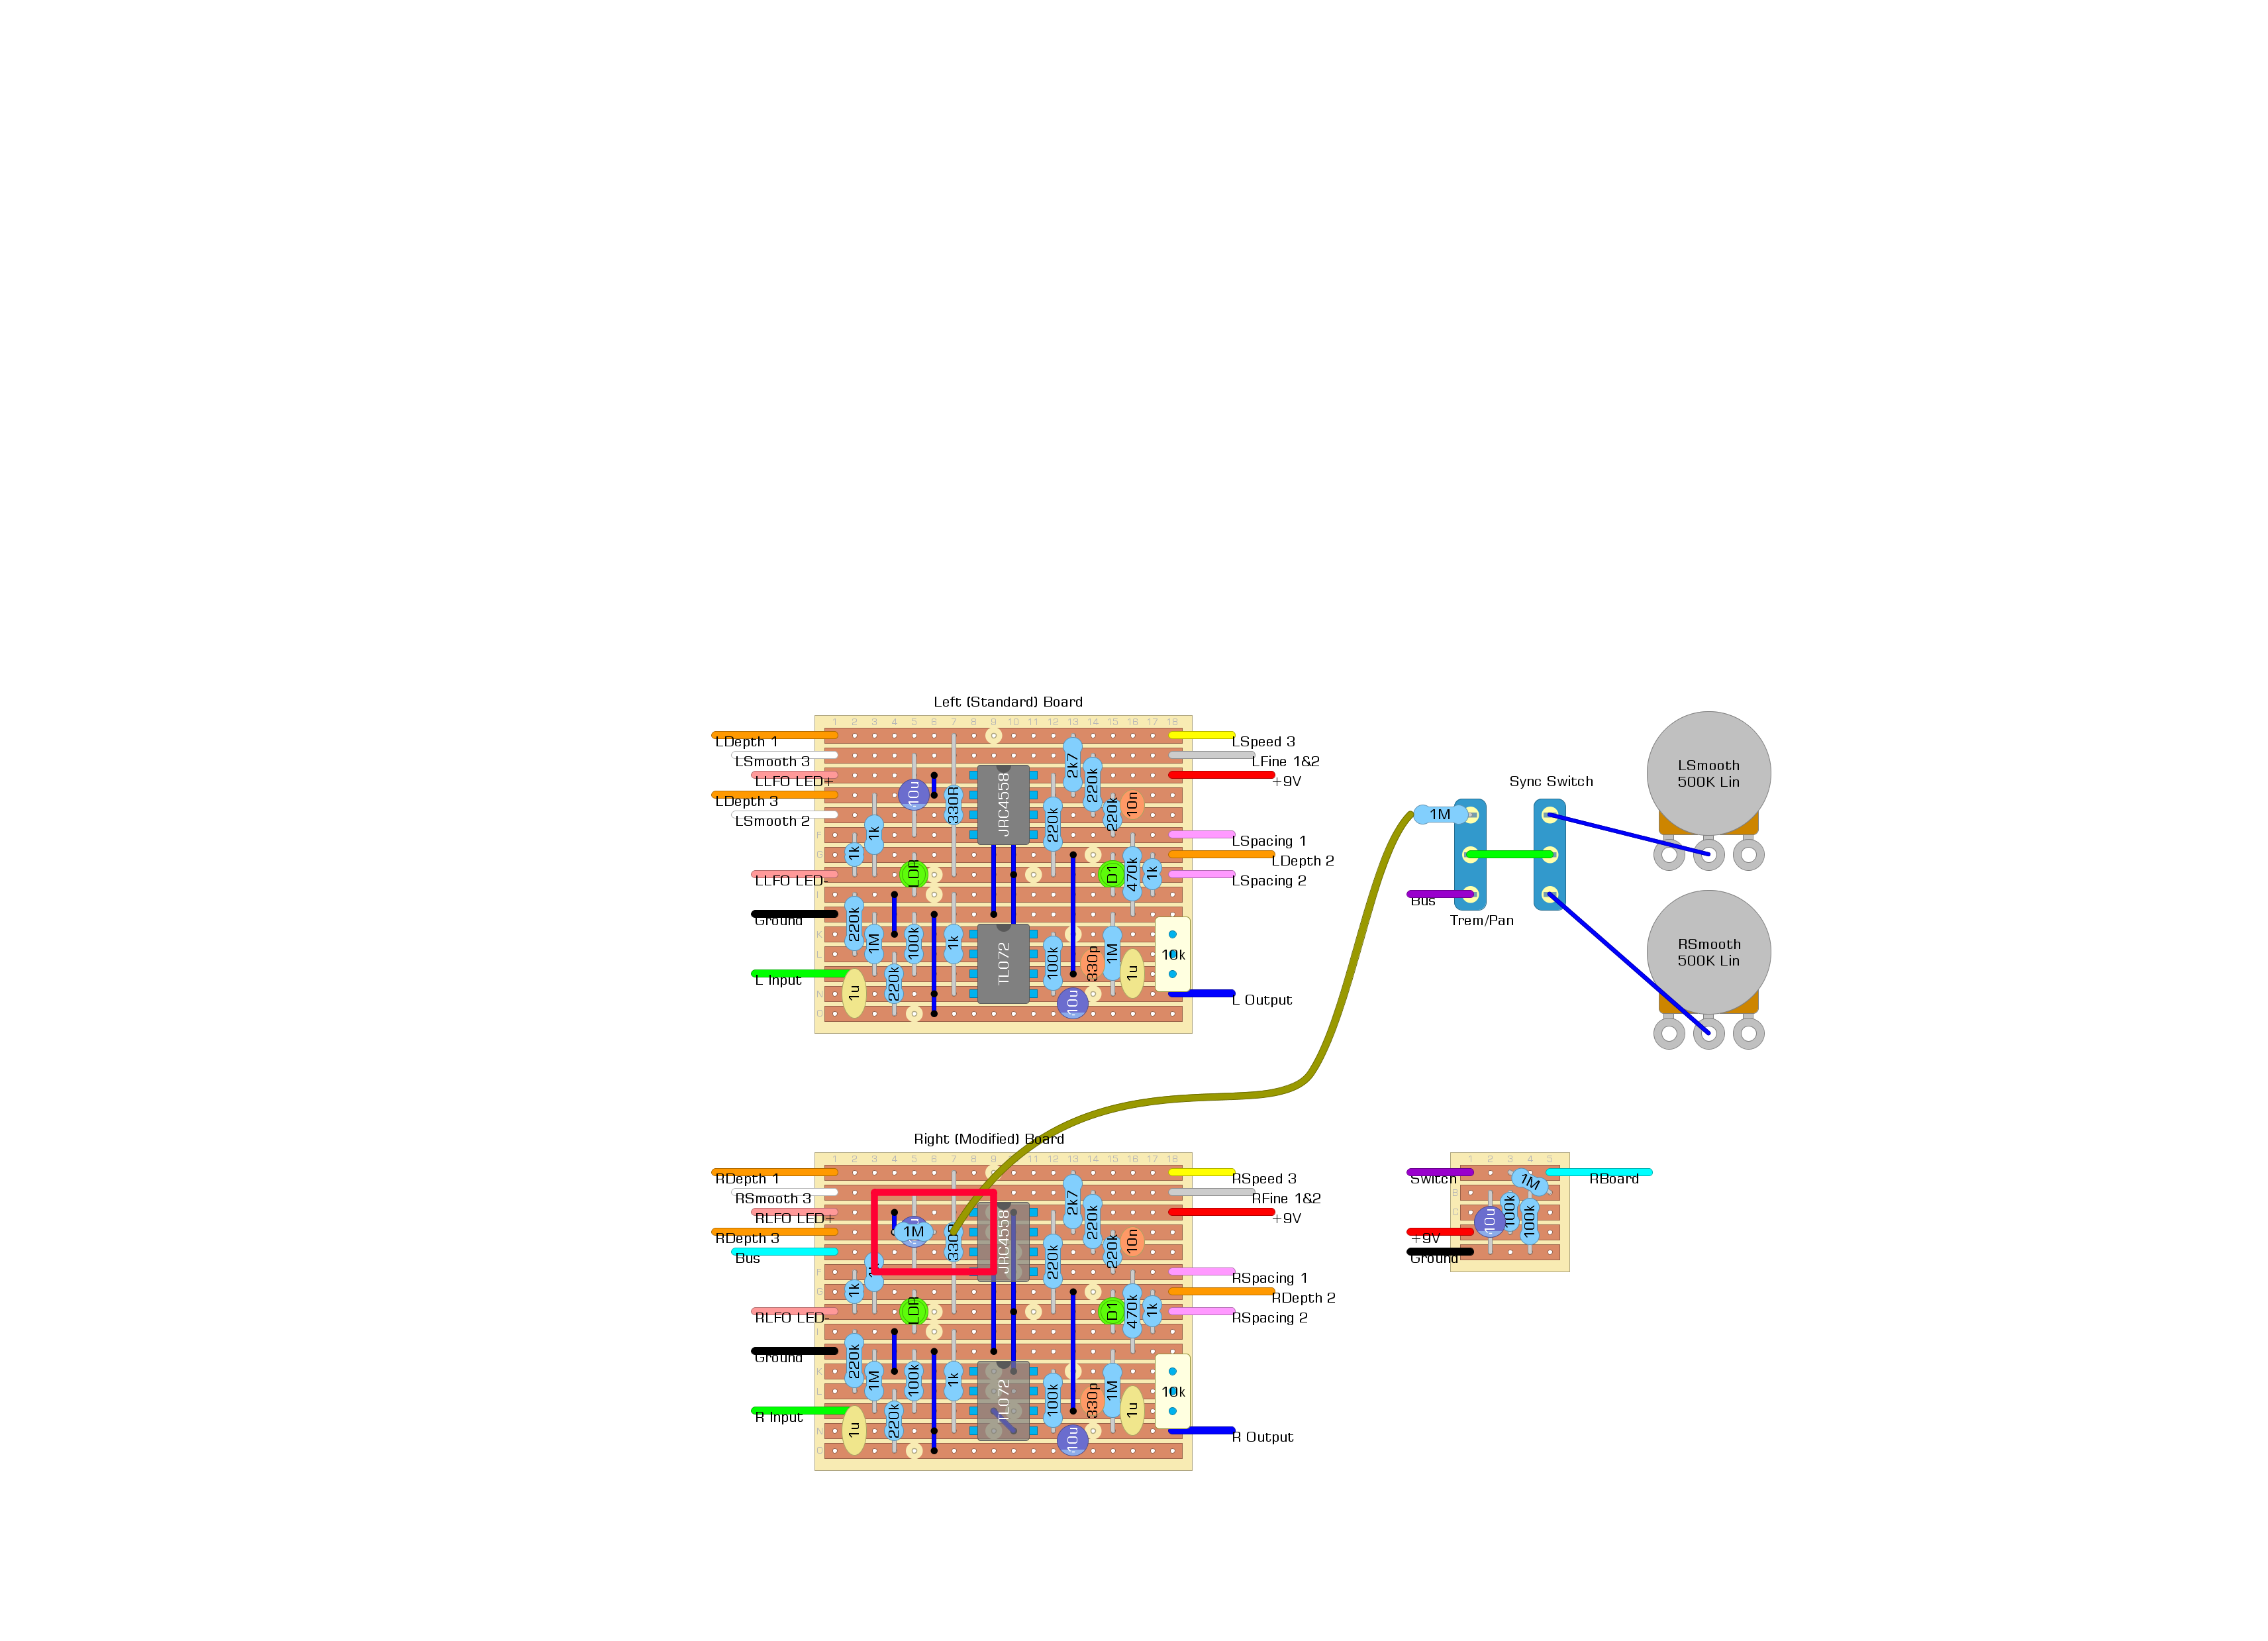
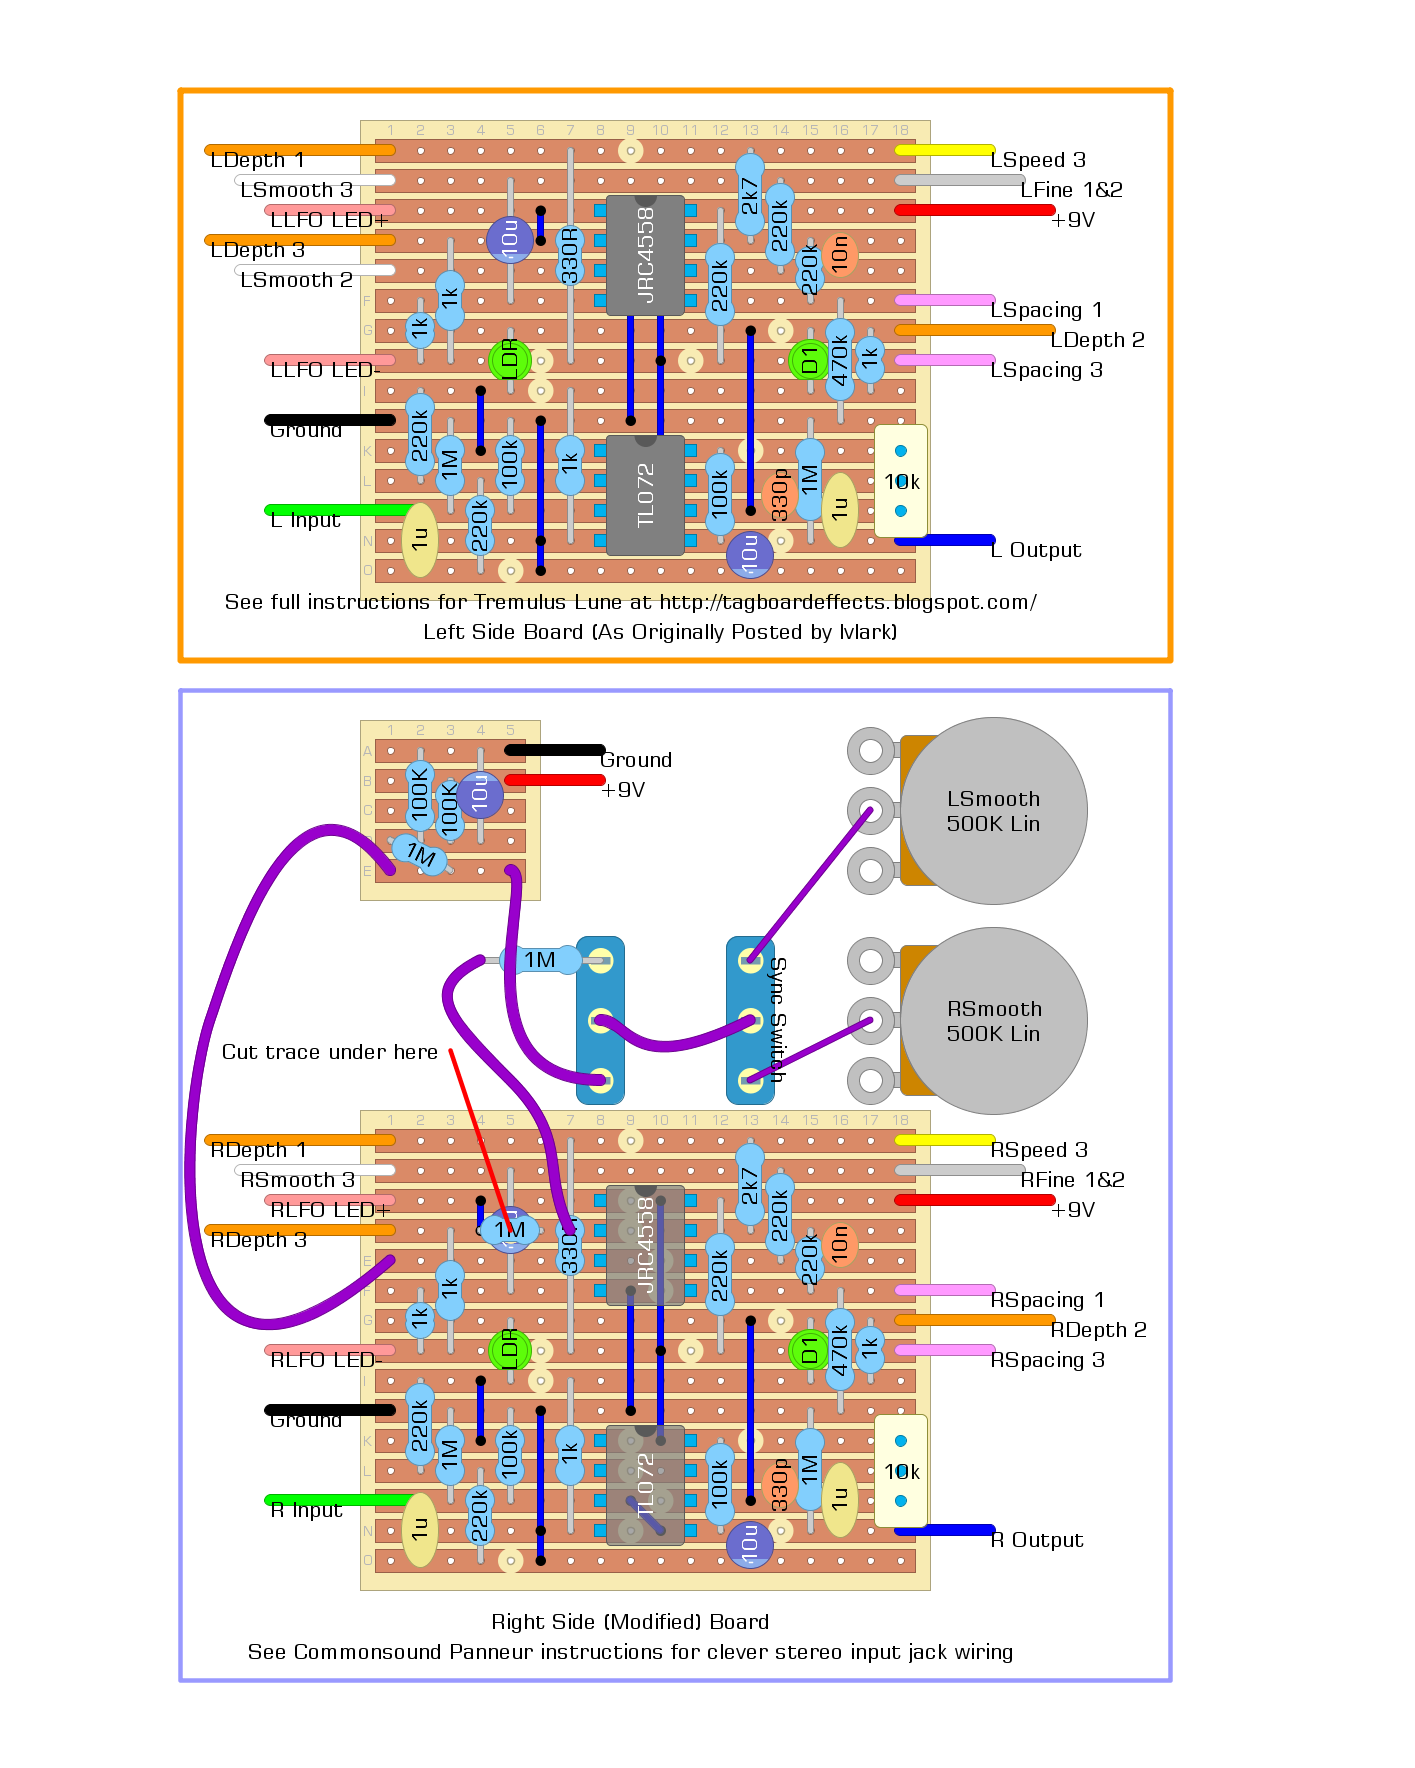
I remembered seeing a layout here for the single channel Tremulus Lune a while back. I started there, and re-created the layout in DIYLC.

Next up, i compared the Lune and Panneur schematics from the 4ms website. Using GIMP, i made the Lune transparent so i could compare the layers, one on top of the other. In this manner, i was able to really get a good grip on how two lunes combine to make a panneur.

Several hours later, i now have this layout. In the attached image, we have the original layout as the Left Channel. Below that, is the board to be used for the Right Channel. The red rectangle shows the most interesting area of change. I moved the link over, made a cut under the cap, and added some 1M resistors where they appear on the schematic. It's ugly, but it's a short walk from the existing layout.

That just left a tiny little bit of the sync circuit left to put on a daughterboard.

I just finished drawing this up, and would love comments / criticism. I'm going to cut a couple boards tonight and get to work testing.

References:
http://commonsound.org/tremulus/tremulusscheme.pdf
http://commonsound.org/panneur/pannerschematic.pdf
http://commonsound.org/panneur/panneurboard.pdf
http://tagboardeffects.blogspot.com/2013/03/tremulus-lune.html


Reply | Threaded
Open this post in threaded view
|

Re: Stereo Mod for Tremulus Lune

andrea83
wow! looks very interesting!
Reply | Threaded
Open this post in threaded view
|

Re: Stereo Mod for Tremulus Lune

warpeggio
It's a busy week, so i haven't made as much progress as i would have liked. My LDRs look to be more like 10k light / 20M dark, so i may have some other challenges ahead of me, as well. I bought Small Bear p/n 2506A, type 9203, when i think p/n 2502, the Hamamatsu P722-7R would have been a closer match. If i can't hack it with tweaks to the other passives, i'll have to wait for some 20k trimmers and different CdS cells.

Current status is two boards (L/R) nearly populated, with no hookup wire or hardware. I'd like to get the LFO wobbulating so i can measure the resistance across the CdS under the LED, but that will be real interesting with my chinese DMM...

As soon as i get the gifts wrapped and dessert made, i'll be back in the lab. Cheers!
Reply | Threaded
Open this post in threaded view
|

Re: Stereo Mod for Tremulus Lune

warpeggio
Got the Right side board working yesterday - Merry Christmas to me! I just have the pots and jacks plugged into some cardboard right now as a test harness. The LDRs i selected are performing adequately; i was able to get it tremulating even unwrapped, under crummy office lighting. Tossed a 25k full sized pot on there for adjustment - might be overkill, but LDRs/vactrols are uncharted territory for me.

I want to change the Speed pot to a higher value for slower LFO speeds, and wire in the Symmetry pot mod. Hoping to have it all wired up by friday evening for further analysis.
Reply | Threaded
Open this post in threaded view
|

Re: Stereo Mod for Tremulus Lune

warpeggio
Yar, she works!

My prototype case was formerly a soda box, and it's just about falling apart at this time. 12 knobs, 2 switches, 5 jacks, 3 boards... but yes, its a proper panning tremolo. I think i might take my Speed pot all the way to 100k, since 50k still didn't seem quite slow enough. I've been skipping the Fine pot; maybe i'll revisit that.

Here's an updated image, hopefully a better size. The wire formerly called "Spacing 2" has been renamed to its correct function, "Spacing 3".


EDIT: Just tweaked the layering on the daughterboard input to better show correct placement