Time saving tips!


|
I think there may have been an older thread here that's about tips and tricks but I figured I'd start a new one that could be pinned to the top?
I think this should be a straight up thread with tips on how to improve builds and speed while building. Some of us enjoy off board wiring and some don't. I guess that can be applied to most aspects of the building process, so why not post what we think could speed up what others hate doing? I'll get the ball rolling with a few of my tips: - Populate all resistors and diodes (that are laying flat) and don't spend too much time bending the leads. With practice you'll be able to bend the leads so that you can just put them in the board and flip it over. This way you can then put the PCB / vero upside down and solder quickly. - After the resistors, work your way through the same way with what stands up higher from the board. Since I exclusively use axial multilayer caps, I can put them with the resistors and do things fast. Next up for me is ICs and then transistors and electros. - If you're unsure about length of wires, cut them longer rather than shorter. It's easier to shorten than to lengthen a wire, right? - Set standards. What do I mean? I always use 8.2K for CLR (current limiting resistors) to keep my LEDs consistent. I always use the same LED lenses. I always use the same jacks and pots. You know, anything that lets you repeat the same process so that you get better at it. I'd love to hear more tips from people and I think this could be great for those with less experience but I'm always learning from others!
www.pedalprojects.com
www.facebook.com/pedalprojects |
|
|
- Drilling templates for enclosures. Make a 1/4" plywood template that drops into the inside of the box, using 1/8" holes to drill pilot holes. You can include multiple footswitch/LED/pot layouts in one universal template. For holes drilled in the sides or front of enclosures, make a plywood box with two sides open, that the enclosure fits perfectly into. Again, use 1/8" holes in the box/template to give yourself multiple options.
|
|
Administrator
|
In reply to this post by Geiri
i'll throw in some of my tricks:
1 - develop a process you follow. something that makes sense to you and works for you. 2 - my build process is similar to Geiri. i start with putting in links, and sockets first. i use them as markers for all other components. i think move to components that lay, resistors and diodes that will not be socketed. then i move to poly caps, as even though they don't lay perfectly flat the board will sill be able to stay flat. then ceramic/multilayer ceramics cause they will just slide into place. finally i do electrolytics. 3 - count rows and columns more then once, and mark your cuts before you cut the board. this way when you go to drill them you have more to hold, and just makes life easier. 4 - after drilling your cuts, don't just use a larger drill bit to clean the actual cuts, but do the same on the top of the board. it helps make it easier to find your position on your boards. 5 - organization, and use a method that YOU understand. i can't stress this enough. especially the part about it making sense to you. if you can't find your parts, or they're disorganized your builds will take forever because you have to search for everything, and you have the chance of grabbing the wrong value part. 6 - clean your tip frequently. it will help keel your soldering clean. also, i highly suggest using the brass ball, rather then sponge, cause you won't have to wait for temp rebound. 7 - clean ALL your tracks before you solder up the board to the pots, switch, etc. even if you don't see anything. it takes 2 extra seconds, but helps prevent the headache a tiny solder bridge can cause. 8 - after cutting your board, clean the tracks with rubbing alcohol. just helps make sure you have very little oils and whatnot on the board preventing good soldering. 9 - i find it easier to solder my ports outside my box then install it and finish up the build. my fingers are just too damn big to work in there easily. i'm actually going to make a tutorial, like frank did, on my next build. it might help some people out, cause i think my way is different then most. i'm sure there's a few other things i'm forgetting. |
|
|
In reply to this post by Geiri
Need to clean between the vero tracks quickly and effectively? Get a small hack saw on eBay for a few bucks and use it to saw between the tracks, which will do a very good job of cleaning anything that may be conducting. I've used this method hundreds of times and it works great!
Using PCB and everything seems to be soldered perfectly fine but it's still not working? I've often saved builds just by doing a quick reflow. My components are facing me when looking into the enclosures so I just reflow at each end of the component. This has literally saved me many times before! I've had faulty 1/4" jacks and there's a quick way to find if one is indeed faulty (because the multimeter can fool, believe it or not!). - Have the pedal turned on (so, not bypassed) plug the output jack in (connected to the amp and the amp turned on). Plug in the power, if you hear a pop or anything that indicates the circuitry is getting power, then that jack is working. Keep it the same way and plug in the guitar cable on the other side. Providing the circuit is working fine, you should either hear the guitar or not. I guess you kinda need to develop a knack for figuring this out.
www.pedalprojects.com
www.facebook.com/pedalprojects |
|
|
Also excellent for cleaning between tracks are the dental picks you can get from certain hardware or surplus stores. The ones with sharp, squarish tips work the best - you don't want the ones that are pointed or conical at the ends.
Through all the worry and pain we move on
|
|
|
In reply to this post by Geiri
For my enclosures I use Photoshop to lay everything out and graphic design.
First I created a set of templates giving the exact size of the enclosure faces. I also measured the size of all off board components. This allows me to mock them up on the enclosure template, allowing me to see exactly what can be fit into the space. I even made a template to see exactly how big of a vero I can squeeze in From there I add my graphics and text. I print one copy on plain paper to serve as a drilling guide. Once the enclosure is drilled and sanded I print another copy onto adhesive backed paper. I cover that with an adhesive back clear lamination sheet to ad gloss and protection. The thing I like is how precise I can set it up and the real work for the templates only needs to be done once.
Give a man a match and he'll be warm for a day.
Set a man on fire and he'll be warm for the rest of his life. |
|
|
In reply to this post by Geiri
Holding parts in place while soldering: the best thing I have found is self-tensioned tweezers.
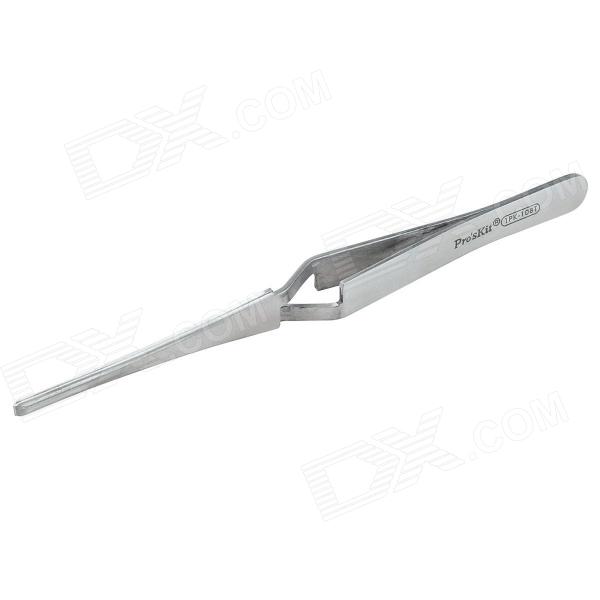 These hold resistors, diodes, caps, etc - best when you have space between the legs. They let you turn the board over and it remains basically flat, and they do not put too much tension on wires or parts to damage them, like locking clamps will. When these don't work - masking tape does the trick. I personally prefer not to bend leads over to solder because they can touch adjoining rows but I know a lot of builders don't worry about this. But I find it easier and cleaner to solder a lead that has been clipped straight up about 1/8-inch above the board. I now build my boards with pots & switches connected, in, out, +9 and ground wires; but nothing else. This makes it easy to test everything with a breadboard to make sure it is working. When I am ready to box something I drill all holes and install a DC jack, guitar jacks and a footswitch and start wiring ground - followed by the LED. I connect the tips to the footswitch. Then I insert the board with pots already wired up (I use extra wire) and connect it to the footswitch. I know some people wire pots after they are installed in the box. That causes me to make mistakes in wiring the pots, so I don't do it that way. I leave a tested & working circuit as is and install it whole. |
|
|
In reply to this post by Geiri
These lead benders can be pretty handy
http://www.ebay.co.uk/itm/321049901671?euid=c4bbed4dbb144e87a85346d47343569a&cp=1 |
|
|
This post was updated on .
In reply to this post by Geiri
Still haven't gotten around to building a test rig. However, a few tips that have helped me:
Build the board, then drill the box. Test fit all components before wiring, then find a clean method to run wires. Always use the same hardware components. I'll alternate between 16mm pots and 9mm alphas but only when I don't have a 9mm and the difference doesn't cause many problems. IO jacks and DC jacks though... no need to constantly have to remeasure and drill differently because you're using a different type of jack. I follow Geiri's order of component placement and grouping with one minor difference. I put all my sockets in first. Diodes > resistors > small caps > LEDs > big caps > trimmers > ICs. I tend to do 10 components at once, solder, clip, and start 10 more. It's a tad wasteful but I print out a copy of the layout and mark off each component after I've soldered. Saved me many times. TAKE PHOTOS OF THE BOARD BEFORE WIRING IT UP. Makes it a lot easier to troubleshoot if the pedal is DOA... you can get a good square shot of the board without all the wires in the way. Also, once I've completed the build, I go back and solder any socketed trannys directly to the socket. I posted in another thread here about how to do that, but basically, bend the component over, put a drop of flux in the socket, and hit it with solder. ICs tend to hold well so I don't bother soldering those into their sockets. Use Vince's 3PDT pcbs. They rule. They keep the LEDs in place, give you multiple 9V and ground connections, and run the in/out/gnd/9v to the board between the IO jacks if you side mount. Equipment: Use a good soldering station. I've been using a WES51 for over two years and holy hell does it make my life easier than a cheapo radio shack iron. Should have been my first purchase. Hakko tip cleaner is great. Stock up on components for bulk discounts. Mouser is your friend. Before you tackle any preamps, make sure you have the proper test circuits to measure J201s and the like. Preamps usually sound like crap with mismatched components. Good wire strippers are your friend. Tried the vero track cutting tool and hated it so now I use a drill and an xacto for cleanup. Liquid flux in a squeeze bottle makes the cheapest switchcraft 1/4" jacks and some of those annoying 3PDT lugs a breeze. I got my bottle from tube amp doctor but I'm pretty sure you can get them on amazon. I know it's costly, but I finally ditched my cheap alligator clip third hands and got a nice set. Made a big difference in board population and wiring for me. The unfortunate thing is there doesn't seem to be any middle ground in the products... it's either $10 for the junk third hands or $150 for a killer set. GRS Third-hands is the setup I use. It's a solid design and works incredibly well, but it's not cheap. Stay organized. Lastly, if you're having big problems getting a board to work (Heath!), just walk away from it. I've gotten frustrated with boards to the point that I didn't do any builds for months. I've learned to just walk away from the problem child, get a 'win' under my belt, and then come back and deal with the issues. Keeps my build rate pretty consistent. |
|
Administrator
|
Lol. I just picture Heath like this when a board doesn't work.

|
|
|
hahaha
|
«
Return to Open Chat
|
1 view|%1 views
| Free forum by Nabble | Edit this page |