Tone Stack with LPB1

classic Classic list List threaded Threaded
19 messages Options
Reply | Threaded
Open this post in threaded view
|

Tone Stack with LPB1

mojo321
SO, I took Mirosol's BMP tone stack with LPB1 and modified it to the James tonestack with LPB1.  This is my first go at doing a layout.  I am pretty sure I got this right now, but I haven't built it.  I did convert the trimmer into a master volume pot to account for the lack of mid control.  You can just adjust high and low relative to the fixed mids, and then just adjust the master volume.  I'm sure there is a more elegant way to do this layout.  I alternated the pot wires so that the component leads wouldn't be one hole apart. (but I think R4 resistor will have to go in vertically).   I kept the component labels to match the tonestack generator, JAMES tab, so you can socket those and adjust to your hearts content.

I won't get to build this till next month.  Waiting for parts order. It is unverified, so if anyone is interested in looking it over and telling me if I messed it up, feel free.  And Thanks to Mirosol for providing the layout that gave me the courage to try this!  
 
Reply | Threaded
Open this post in threaded view
|

Re: Tone Stack with LPB1

mojo321
The tone control on this 2 knob James (Baxandall) tonestack is OUTSTANDING.  

Practically verified.  I messed up the layout above.  The two resistors on the right side bottom of the board (100k and 390k) are supposed to go to the ground row 1, NOT the blank row 2 as I show above..  I will try and repost as soon as I have time to redraw it.  So I did finish it, and it is verified, with that correction. If you already built it, all you need to do is add a link from the ground row to the right side of row 2.)

Also, the pots are as follows:

Volume: 100k Lin
Treble: 470k log
Bass: 1M log

HOWEVER, the James tone stack pots work best with what the calculator calls "LOG-B" tapers, which look a bit like a "470k-D" code.  Not an easy source.  SO, I got back into the tonestack calculator and put normal LOG-A tapers in the pots.  It changed things quite a bit, so I had to make some capacitor changes to get the curve the way I like it.  Season to taste! (I socketed all of the components on the left side)

One complaint though, with the added tone components, the LPB1 is definitely needed to boost the signal.  In fact, I am getting unity with the volume all the way up.  I was hoping to get unity at 50% or at least 75% for a little more headroom.

Anyone have any ideas on how to get a bit more output from the LPB1? A different transistor maybe?
Reply | Threaded
Open this post in threaded view
|

Re: Tone Stack with LPB1

Beaker
Many thanks for this, I've been wanting to use this myself.

I've made a couple of Runoff Groove Ginger pedals (on PCB) that use the Baxandall tone stack, and can confirm that the Baxandall is superb. Ampeg are also using it on their new valve guitar amps.

With the bass and treble knobs on minimum, you cut the bass and treble producing a mid range hump, with the knobs at 12 0'clock you get a flat frequency response, and with the knobs at max, you boost bass and treble, scooping out the mids.

I don't know how to get more gain from the LPB-1, and can only suggest you try using a higher gain booster circuit instead.

I will build this one up myself and see how it compares with my Ginger, might take a while though as I am really busy with other things  at the moment.

Reply | Threaded
Open this post in threaded view
|

Re: Tone Stack with LPB1

mojo321
Cheers Beaker!  --- FYI, save yourself the headache and just use a trimmer for the volume pot, as in Miro's one-knob tone stack BMP with LPB1.  That's three less wires, one less pot and one less hole to drill.  You'll just be setting it at unity and then leaving it alone anyway.  
Reply | Threaded
Open this post in threaded view
|

Re: Tone Stack with LPB1

mojo321
In reply to this post by mojo321
Boxed it.   One more correction:  flip the pot wiring on the Volume and Bass pots.  Treble was correct.

In other words:

switch lug 1 & 3 on the wiring for Volume
switch lug 1 & 3 on the wiring for Bass
Reply | Threaded
Open this post in threaded view
|

Re: Tone Stack with LPB1

toddvirgil
Nice! Can't wait to plug this in somewhere...
Reply | Threaded
Open this post in threaded view
|

Re: Tone Stack with LPB1

mojo321
The Layout above has some errors, please see the comments above for the corrections. (2 resistors, and the pot wiring.) OR,  for the corrected layout, including a trimmer option for the volume pot, go to the new forum section for user submittals!

Thanks,

Mojo321
Reply | Threaded
Open this post in threaded view
|

Re: Tone Stack with LPB1

vid.sicious
In reply to this post by mojo321
Hey everybody. Reviving the thread as I don't want to create a new one. I am planning to install the original lpb1 BMP tonestack with 1 knob to a Proco Rat clone. Im just unclear about where to draw the power from for the daughter board and where to ground it to work properly with a battery snap and a 9v dc power socket. Do I just 'sidechain' the 9v to both the That's pcb and the daughterboard or should I use a separate 8v signal for the BMP tone? And based on what I figured, am I correct to say that I should ground the daughterboard to the same spot as the main That's pcb is grounded? Please help me! :D
aka Dead Eye
Reply | Threaded
Open this post in threaded view
|

Re: Tone Stack with LPB1

rocket88
Administrator
Power and ground will be the same as you normally do for any layout. So power from the dc jack and ground can go to any play you have a ground wire. Like the input/output jacks.
Reply | Threaded
Open this post in threaded view
|

Re: Tone Stack with LPB1

vid.sicious
Thanks for your reply rocket! I just built the Tonestack and used alligator clips to test it out with the Proco Rat. Jeez it works absolute wonders, it can really turn that distortion in to a full on fuzz with the tone turned all the way down! Now I've been thinking that it'd be really awesome to have a footswitch to switch the BMP Tonestack on/off. What kind of switch would this require if the BMP is after my Proco Rat circuit and if I want to include an LED indication for the BMP Footswitch? And how would I wire it? I'm still kind of a newb when it comes down to switches...

Much appreciated!
aka Dead Eye
Reply | Threaded
Open this post in threaded view
|

Re: Tone Stack with LPB1

motterpaul
Are you planning on adding the BMP LPB1 to the same enclosure as the RAT? Or building a new enclosure for both?

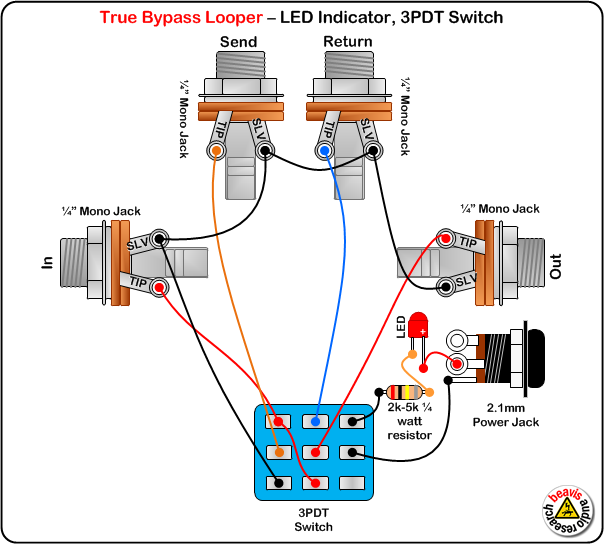
There are different ways to do it - depending on how to plan to lay it out. I am not sure how you could fit all that into a RAT enclosure but maybe you could. Here is a picture I saved from an old site that unfortunately has gone off the air.

This would have to be an added switch that only goes to the BMP. The "In" jack tip would be the out from the RAT. The "send tip" would be the in wire to the BMP. The "return tip" would be the "out" of the BMP and the "out tip" would be the "out" of the enclosure.  Grounding would be simpler than what you see here, just make sure both enclosure jacks are grounded, and that both circuits are grounded. (and the LEDs of course). This one LED would only show you if the BMP is on.

With this config you cannot change the order, the BMP will always follow the RAT, BUT you could turn off the RAT and just use the BMP, or vice versa.

Reply | Threaded
Open this post in threaded view
|

Re: Tone Stack with LPB1

rocket88
Administrator
That will not allow both circuits to run together. That's the way a looper is set up. To have both effects on at the same time or independently it should be wired as 2 effects in one box.
Reply | Threaded
Open this post in threaded view
|

Re: Tone Stack with LPB1

motterpaul
Don't just look at the pictures - read the text, I tell him how to wire it so both effects are in the same box, and I explain how that is the only way this setup will work.

Edit: re-read my first two sentences. And then I say "just be sure both exclosure jacks (two jacks total = 1 enclosure, in and out) are grounded. The circuits are each wired separately within the same enclosure.

Reply | Threaded
Open this post in threaded view
|

Re: Tone Stack with LPB1

rocket88
Administrator
In reply to this post by motterpaul
Paul, I did read what you wrong and looked at the image from beavis. Your description is inaccurate and matches the wiring of the looper, which is the diagram you posted. To accomplish what is being asked the effects should be wired as such.


You should notice the differences.
Reply | Threaded
Open this post in threaded view
|

Re: Tone Stack with LPB1

motterpaul
Okay -

I give in - if you say it won't allow both to run at the same time I see how that makes sense. I didn't think about the "looper" aspect of it.
Reply | Threaded
Open this post in threaded view
|

Re: Tone Stack with LPB1

rocket88
Administrator
nothing to give in about buddy, just two different things. it's no different then comparing a buffer with a booster. similar topography, similar concept, just different purposes.
Reply | Threaded
Open this post in threaded view
|

Re: Tone Stack with LPB1

vid.sicious
Thanks for all the help guys! Yes, I figured it's best to use the dual effect diagram as both of the circuits will be in one enclosure (The C type I believe, it's probably gonna be too big actually). Now I'm just trying to figure out how to split the ground and power wire from the rat's board to the BMP tonestack as I've already got the wires soldered onto the Rat. Heatshrink will probably save this project...
aka Dead Eye
Reply | Threaded
Open this post in threaded view
|

Re: Tone Stack with LPB1

dexxyy
Run your 9v and ground from your rat to the 9v and ground rails on your tone stack, then take wires from 9v and ground on the tone stack back to dc power jack. These 2 should fit in a 1590bb box easily,
If it wasn't for this website I would definitely have a life.
Reply | Threaded
Open this post in threaded view
|

Re: Tone Stack with LPB1

vid.sicious
Yeah I understand where the power and ground have to go. I'm just trying to figure out a way how to connect the wires themselves properly hehe. I've ordered 1590S a few days ago. I hope it won't look ridiculous. I guess I should've gotten the 1590BB instead. Oh well...
aka Dead Eye