You can all make fun of me now...

classic Classic list List threaded Threaded
12 messages Options
Reply | Threaded
Open this post in threaded view
|

You can all make fun of me now...

Kinski
Okay, in a attempt to improve my schematic reading and layout skills, here is my very FIRST attempt at trying to go from schematic to vero. Yeah, it sucks and is most certainly wrong, but here it is. I'd love to hear some feedback if any of you got it.

Reply | Threaded
Open this post in threaded view
|

Re: You can all make fun of me now...

Muadzin
Not making fun of you because I've been there. Do you know if the layout is verified or not? If not it probably never hurts when asking people to check out a layout by providing the schematic it is based upon.

Also things like diodes and transistors should probably be listed as well, besides the information regarding the pots.  

On a sidenote, which software did you use to make this layout and where can I find it?
Reply | Threaded
Open this post in threaded view
|

Re: You can all make fun of me now...

Kinski
Hey, thanks for your thoughts! Certainly not verified.

I used this software:  https://code.google.com/p/diy-layout-creator/

I used this schematic:


Reply | Threaded
Open this post in threaded view
|

Re: You can all make fun of me now...

Frank_NH
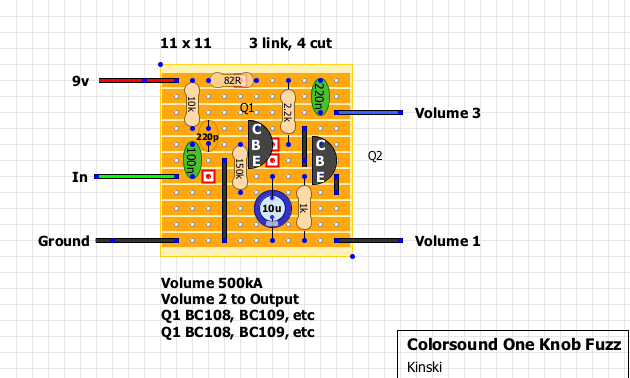
I didn't check the layout (looks OK at first glance), but here are some of my best practices for making vero layouts:

* Resistors and diodes should lie flat, which mean 0.3" lead spacing or greater (diodes can sometimes use 0.2" spacing).
* Capacitors should in general have 0.2" lead spacing (which is perfect for box or ceramic caps) or greater.  An exception to this are some electrolytics which use 0.1" lead spacing.
* 0.1" lead spacing for transistors and ICc (both of which employ sockets in builds).
* Try to keep the audio input away from the power input and audio output if possible.
* Try to keep the board < 23 columns and < 20 or so rows if you want ti to fit (easily) in a 1590B.
* Be mindful of capacitor sizes!  I sometimes see vero layouts with a 100uF electro next to a 47uF electro, and know immediately there will be trouble fitting things in (unless you have some of the smaller body caps).  I would much rather have a larger board with greater spacing between components versus a compact layout where components are crammed together.

Finally, I always build my layouts before I post.  Often I will see an error or a modification which can make the layout better, and so will update the vero before posting.  And there is nothing like the feeling you get when YOUR vero fires up for the first time on your test rig!  It's like turning the key on the new engine your just installed in your hot rod.  Have fun!  

Reply | Threaded
Open this post in threaded view
|

Re: You can all make fun of me now...

rocket88
Administrator
Reply | Threaded
Open this post in threaded view
|

Re: You can all make fun of me now...

Kinski
Yeah, they to lay flat best at 4 spaces but I can usually get them flat enough for my liking at 3. Thanks for your thoughts!

I'll try some harder circuits next and see what I come up with...
Reply | Threaded
Open this post in threaded view
|

Re: You can all make fun of me now...

Silver Blues
Quarter-watt resistors need four hole spans to lay flat. Eighth-watt resistors will comfortably sit across three holes. The kind of diodes we use need three holes to lay flat (some of the larger germaniums may or may not need four).
Through all the worry and pain we move on
Reply | Threaded
Open this post in threaded view
|

Re: You can all make fun of me now...

Kinski
Cool. Thanks guys. This should do it.

Reply | Threaded
Open this post in threaded view
|

Re: You can all make fun of me now...

Travis
Administrator
That doesn't look bad at all for a first attempt to be honest. I think it should work, although it would be a good idea to add a trimmer to bias Q2.
Reply | Threaded
Open this post in threaded view
|

Re: You can all make fun of me now...

motterpaul
Also - there is usually a separate picture just to show the cuts, or else a note to tell us where the hidden cuts are located (under which component). I do not see the location of the fourth cut right now. (edit - just saw it, but a note doesn't hurt)

Otherwise it looks fine.

Another thing that helps (and I do not know if you did this or not) is to make sure the transistor icon has the same orientation as the physical part (put the flat side of the icon on the same side as the physical transistor).
Reply | Threaded
Open this post in threaded view
|

Re: You can all make fun of me now...

Beaker
Small boards often don't have seperate cuts and links image - it's just not needed if they are all obvious on the component layout image. All this needs is a "note cut under 82r resistor" added.

BC108 and BC109 are round "metal can" package, so have no fixed orientation. The pin order shown is correct though, so I see absolutely no problem there.

Well done Kinski, you are doing great - I still can't get my head round using this program!
Reply | Threaded
Open this post in threaded view
|

Re: You can all make fun of me now...

rocket88
Administrator
nice job man. that's a hell of a lot neater and better then my first go around.

beaker, it's not that bad. if you can breadboard you can us DIYLC. it took me awhile and many.....many.....tries before my brain accepted how it works. thank god for mark and induction who really helped guide me. now i just fear IC based circuits. that shit frustrates the hell out of me.