1776 Multiplex with charge/discharge trimmers

classic Classic list List threaded Threaded
55 messages Options
123
MAO
Reply | Threaded
Open this post in threaded view
|

Re: 1776 Multiplex with charge/discharge trimmers

MAO
This post was updated on .
Looks like this layout and the modulation layout will both fit in a 1590BB as follows:(Precise drilling is required)

Replace the rotary switch with a DPDT on/on/on and a SPDT on/off/on toggle switch. Which are used in tandem. Both Up = Echorec, Both Center = Echoplex, Both Down = Space Echo

NOTE: (make sure the DPDT lugs 1&2 and lugs 5&6 are shorted in the center position, if it turns out your on/on/on has lugs 2&3 and 4&5 shorted, you'll need to mirror the SW-A and SW-B connections)  


This allows room to position the vero closer to the top of the enclosure and the jacks can be moved to the bottom.

To include both the speed switch function and the self oscillation, I'm using a DPDT toggle to select the function of the momentary stomp switch. Either original tape speed or self oscillation. (Thanks Travis!)


The modulation board fits under the main board horizontal below the pots or vertical between the stomp switches and jacks. (You'll need to lay down the electrolytic cap)

With the toggles at the top, the board close to the toggles, it looks like there is just enough room to use open style jacks between the board and the stomp switches.

The faceplate is still a work in progress, but this layout shows the locations for the pots and switches.


I've already drilled for the pots and toggles, they fit well. Shorter knobs may be better for accessing the toggle switches. I still need to drill for the jacks and stomp switches. I should have it finished up tomorrow and will post some gut shots.


1978 Gibson Les Paul Standard, Cherry Sunburst
MAO
Reply | Threaded
Open this post in threaded view
|

Re: 1776 Multiplex with charge/discharge trimmers

MAO
It fits!

I got lucky, I mis-drilled for the stomp switches by 1/16 inch or so. Luckily, the low profile 3PDT from BLMS  fit.

Things to note about getting everything to fit:
I used right angle pcb mount tayda pots, snipped of the ends and bent up the tabs.  
I flared out the connection tabs on the jacks.
I laid down the 10u cap on the modulation board, soldered the vactrol without sockets.

Shorter knobs would give easier access to the toggle switches, but they probably need to be moved down a bit and spaced for labels since they will most likely be wider than the tall knobs.

I'll drill the LEDs another day, but like the picture above I'll most likely have 2 peaking through for the modulation rate LEDs and a bezel for the bypass LED.


1978 Gibson Les Paul Standard, Cherry Sunburst
Reply | Threaded
Open this post in threaded view
|

Re: 1776 Multiplex with charge/discharge trimmers

cjonesplay
Oh my damn!

This is incredible! Your idea for eliminating the rotary switch is great. I know what you mean about the on/on/on switches being different. Some connect lugs 1-2 and 5-6 and some connect 2-3 and 4-5 instead. Whose bright idea was it to do that?

I want to lock the two toggles together with a piece of plastic or something so it has the satisfying *snap* that the rotary provides:) I wish there was an affordable low-profile rotary switch, that would really change the game for making Lovetone pedals and stuff like this, but I know that's probably wishful thinking.

Maybe I'm a little too ambitious, but I'm going to try and take your idea and see if I can't adapt it to a slightly different design with the box flipped lengthwise, a third stomp for the oscillation and the jacks on top (since I use right-angle patch cables). I have no idea if this will work, but worst case I end up in a bigger box. I'll post pics if I'm successful, will hide in shame if not!

Thanks again for sharing this project. I've done a bunch of builds over the years and this has been one of the most satisfying I've come across yet.
MAO
Reply | Threaded
Open this post in threaded view
|

Re: 1776 Multiplex with charge/discharge trimmers

MAO
Thanks cjonesplay, its emails like yours that are more satisfying than the build itself!

It looks like you will need a center stomp switch small enough to fit under the board to make it fit in a 1590BB. Probably no problem in a 125BB or 1590 tall.

Here's another idea if you are going to go with 3 stomp switches:

Wire up the 3rd momentary stomp with a toggle to select whether the stomp triggers the original speed switch or temporarily engages the modulation. This would allow you to preset a crazy amount of modulation, then stomp-turn it on momentarily, and then kick in the oscillation stomp switch for some crazy warping repeats. Should be pretty cool.

Then when you want "normal" modulation, set the 3rd stomp switch back to triggering the tape speed and set your modulation to taste and turn it on with it's usual toggle.

I may have to do this one myself!

Mike
1978 Gibson Les Paul Standard, Cherry Sunburst
Reply | Threaded
Open this post in threaded view
|

Re: 1776 Multiplex with charge/discharge trimmers

cjonesplay
This post was updated on .
Great ideas, Mike.

So I would just wire Speed 1&2 of the mod switch through lugs 1&6 of a DPDT on-on and the Fdbk 2 and 3 to lugs 3&4 respectively?
MAO
Reply | Threaded
Open this post in threaded view
|

Re: 1776 Multiplex with charge/discharge trimmers

MAO
Assuming you are using a SPDT on/off/on for the modulation so you can send the modulation to either Delay 1 or Delay 2, then I would probably do it like this.


So the DPDT determines the function on the momentary stomp switch. Up is the Tape Speed, down is the Modulation.

Of course you'll want the Modulation on/off/on toggle set to off when you have the DPDT switch set to modulation.

BTW, I posted a 1790N Multiplex layout a while back in the "show your pedal guts!" section (page 34), I'll probably do a modified version of that one with 3 stomp switches.


1978 Gibson Les Paul Standard, Cherry Sunburst
Reply | Threaded
Open this post in threaded view
|

Re: 1776 Multiplex with charge/discharge trimmers

trom72
In reply to this post by MAO
Thanks a lot for this layout, I already built the Multiplex Jr that I like a lot so I'm very happy to be able to test his big brother. I almost finished it with the modulation board, I'm just waiting to receive my missing component to achieve it.
I just have a question, I want to add a footswitch to engaged/bypass the modulation board. My idea was to break the link between the output of the modulation board (depth 1,2 pot) and the on/off/on toggle. I will use a dptd switch to aslo be able to have a led. I think it should work but I will be happy to have a confirmation as I'm a noob.

I also want to thank you for the drilling layout and to compliment you on your way to mount the wire on the board, it's a brilliant idea.

Thanks a lot
MAO
Reply | Threaded
Open this post in threaded view
|

Re: 1776 Multiplex with charge/discharge trimmers

MAO
This post was updated on .
Thanks Trom72!

I got the idea for the wire routing through the board from looking at Johnk's builds in the Show you pedal guts thread.  Ever since I started doing that, haven't had a single wire come off the board, they still break off the pots or switches though with too much in and out of the enclosure :0)

Lots of creative builds to look at. Those guys are amazing.

Yes, you can use a DPDT stomp switch to engage the modulation, just be sure to send it to Delay 2 or it won't work in the Echoplex mode.

How many stomp switches are you planning to use altogether?
1978 Gibson Les Paul Standard, Cherry Sunburst
Reply | Threaded
Open this post in threaded view
|

Re: 1776 Multiplex with charge/discharge trimmers

trom72
In reply to this post by MAO
Thanks for your answer and for yours advices.

I will use 3 footswitch. Obviously one to engage the delay, one for the speed switch and one for the modulation. Like I already use the Multiplex Jr I already know that I like the modulation part but not all time that's why I want to have a footswitch.
I will keep the spst on/off/on toggle after the footswitch so I will be able to send the modulation to delay 1 or 2.

Once again thanks a lot.
Reply | Threaded
Open this post in threaded view
|

Re: 1776 Multiplex with charge/discharge trimmers

cjonesplay
In reply to this post by MAO
I tried drilling the extra holes for the wires last night on a couple of builds and this totally changes the game. I use 24 gauge wire and the 5/64 drill bit is perfect for this. Just one more great tip, MAO!! You have a great way of communicating ideas that I relate to. It's one thing to be great, it's another to help others be great, too:)

Also, I used your wiring diagram for the Tape Speed/Oscillation switch and am putting this baby in a 1790, which I started working on last night. Now all I have to do is start learning how to do clear label decals to decorate my pedals so they look as good as they sound:)
MAO
Reply | Threaded
Open this post in threaded view
|

Re: 1776 Multiplex with charge/discharge trimmers

MAO
This post was updated on .
Thank you!

Here's my newest tip, which I was going to share on my next show your guts post, but here goes.

I'm now just printing on transparencies, much easier to replace when things don't line up, get mangled or you think of something better afterwards!

I print a reverse image on the underside, so the toner/print side is against the enclosure.

Just angle the corners and make sure its not to close to the edges so it doesn't get caught on your fingers.

The knobs, switches and static keep it in place.

If you have something like a 1 knob build, a little transparent shipping tape just on the edge may be needed to keep it down.

Works great.

The colors are transparent, but look cool if the encloaure has a nice grainy look to it, or polished.

For white labels or what have you, either paint just the top of the enclosure white (I like the look of the bare aluminum on the sides), or use an all white enclosure. I used the white paper insert on the Spy vs Spy build I posted (not recommended due to long term effects of humidity). The Mutron and Maestro i posted show how the transparencies look on the bare metal.

Be sure you post your final look.

Mike
1978 Gibson Les Paul Standard, Cherry Sunburst
Reply | Threaded
Open this post in threaded view
|

Re: 1776 Multiplex with charge/discharge trimmers

cjonesplay
Mike, you're a genius! I've been deliberating which method to use for finishing the enclosures and this is the most logical w the most room for improvisation. Great idea, and you're builds look A+!

Here's a guide to printing on transparencies w a normal printer:
(The guy who did it sounds like he's mafioso, I was highly entertained).

My only concern is that the transparency edges seem like they could be lifted under duress, especially on a 1590A, which is a size I make a lot of. Do you know if lacquer would work over the transparency?

Sent from my iPhone

On May 13, 2016, at 1:31 PM, MAO Pedals [via Guitar FX Layouts] <[hidden email]> wrote:

Thank you!

Here's my newest tip, which I was going to share on my next show your guts post, but here goes.

I'm now just printing on transparencies, much easier to replace when things don't line up, get mangled or you think of something better afterwards!

I print a reverse image on the underside, so the toner/print side is against the enclosure.

Just angle the corners and make sure its not to close to the edges so it doesn't get caught on your fingers.

The knobs, switches and static keep it in place.

If you have something like a 1 knob build, a little transparent shipping tape just on the edge may be needed to keep it down.

Works great.

The colors are transparent, but look cool if the encloaure has a nice grainy look to it, or polished.

For white labels or what have you, either slip a white piece of paper inbetween or use a white enclosure. I used the white paper insert on the Spy vs Spy build I posted. The Mutron and Maestro i posted show how the transparencies look.

Be sure you post your final look.

Mike
1978 Gibson Les Paul Standard, Cherry Sunburst, Nickel Tone Zone & Air Zone Pickups, Russian Oil Filled Caps, 50s Style Modified Jimmy Page Wiring.


If you reply to this email, your message will be added to the discussion below:
http://guitar-fx-layouts.42897.x6.nabble.com/1776-Multiplex-with-charge-discharge-trimmers-tp29819p30593.html
To unsubscribe from 1776 Multiplex with charge/discharge trimmers, click here.
NAML
MAO
Reply | Threaded
Open this post in threaded view
|

Re: 1776 Multiplex with charge/discharge trimmers

MAO
Thanks again cjones, you're too kind.

I haven't tried to laquer them and I don't think its necessary once you get the size right. Although it would be more traditional.

 I have mine sized just shy of the curved edges of the enclosure and I cut the corners straight on a 45° angle. Be sure you can run your fingers up the sides and corners without catching the transparency and your good.

The toner (I don't use inkjets) on the bottom side of the transparency seems to add enough friction to help keep it down. But the control's and switch nuts keep it in place without any buckling.

Once the enclosure is drilled, I tape the transparency in place and use an exacto knife to cut out the holes. Just don't leave the tape on longer than necessary.

On a couple builds that only had one knob,  I did add a small piece of clear shipping tape over the top edge. I butted the end of the tape against the border's inside edge I usually have framing the pedal, then wrapped it over the edge about 3/8 inch or so. You don't see it unless you are looking for it.

The best part is when you mess up, you can't just start over. Try that with paint, laquer or water slides :0)

Let me know how it goes
Mike

Just remember to print a reverse image so the image is not on top.
1978 Gibson Les Paul Standard, Cherry Sunburst
Reply | Threaded
Open this post in threaded view
|

Re: 1776 Multiplex with charge/discharge trimmers

cjonesplay
You CAN start over again! I may do a few now to get the hang of it, but once the process is mastered one can easily create all new designs and switch out with the old ones. I also switch out effects from their boxes occasionally, so it's perfect for that as well. 

On Sun, May 15, 2016 at 3:29 PM, MAO Pedals [via Guitar FX Layouts] <[hidden email]> wrote:
Thanks again cjones, you're too kind.

I haven't tried to laquer them and I don't think its necessary once you get the size right. Although it would be more traditional.

 I have mine sized just shy of the curved edges of the enclosure and I cut the corners straight on a 45° angle. Be sure you can run your fingers up the sides and corners without catching the transparency and your good.

The toner (I don't use inkjets) on the bottom side of the transparency seems to add enough friction to help keep it down. But the control's and switch nuts keep it in place without any buckling.

Once the enclosure is drilled, I tape the transparency in place and use an exacto knife to cut out the holes. Just don't leave the tape on longer than necessary.

On a couple builds that only had one knob,  I did add a small piece of clear shipping tape over the top edge. I butted the end of the tape against the border's inside edge I usually have framing the pedal, then wrapped it over the edge about 3/8 inch or so. You don't see it unless you are looking for it.

The best part is when you mess up, you can't just start over. Try that with paint, laquer or water slides :0)

Let me know how it goes
Mike

Just remember to print a reverse image so the image is not on top.
1978 Gibson Les Paul Standard, Cherry Sunburst, Nickel Tone Zone & Air Zone Pickups, Russian Oil Filled Caps, 50s Style Modified Jimmy Page Wiring.


If you reply to this email, your message will be added to the discussion below:
http://guitar-fx-layouts.42897.x6.nabble.com/1776-Multiplex-with-charge-discharge-trimmers-tp29819p30652.html
To unsubscribe from 1776 Multiplex with charge/discharge trimmers, click here.
NAML

Reply | Threaded
Open this post in threaded view
|

Re: 1776 Multiplex with charge/discharge trimmers

trom72
In reply to this post by MAO
Hello,

I finished my build but sadly I didn't receive the H11F1, it's my only missing part. Do you know if there is a way to test it without that piece? Maybe a way to bypass it? Sorry if it's a stupid question but I'm a noob.

Thanks for everything.

This is 2 pics of my build.

http://dl.dropboxusercontent.com/u/9520625/20160519_170926.jpg

http://dl.dropboxusercontent.com/u/9520625/20160519_170859.jpg

MAO
Reply | Threaded
Open this post in threaded view
|

Re: 1776 Multiplex with charge/discharge trimmers

MAO
Noob?? Who are you kidding?

Multiplex + Modulation + 3 stomp switches + 4 toggles + 1590BB = no longer a noob! 

Looks fantastic!

How did you wire up the 3 stomp switches? Bypass, Speed and Oscillation?

Test away, the H11F1 only controls the speed switch, all other functions should be working.
1978 Gibson Les Paul Standard, Cherry Sunburst
Reply | Threaded
Open this post in threaded view
|

Re: 1776 Multiplex with charge/discharge trimmers

Hozy31
In reply to this post by trom72
Hey trom72, thats a mighty impressive bit of work for a noob
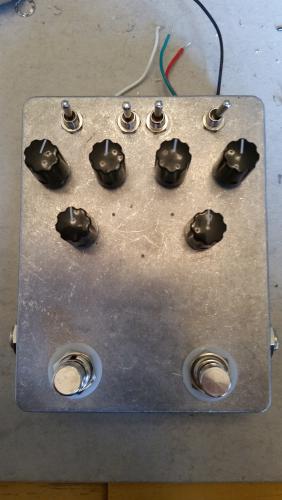
, congratulations! i Wish mine looked as good as that.
"Red velvet lines the black box"
Reply | Threaded
Open this post in threaded view
|

Re: 1776 Multiplex with charge/discharge trimmers

trom72
In reply to this post by MAO
exact for the 3 footswitch, i wanted to be able to control the modulation board with a footswitch.

So I try it without the H11F1 but no effect. I can hear only hear a clean sound with a big volume drop. I have to wait for it before testing. Sadly it's not an easy one to have.

Thank you to have post a layout it help me a lot to be able to have a clean build.
MAO
Reply | Threaded
Open this post in threaded view
|

Re: 1776 Multiplex with charge/discharge trimmers

MAO
Post the IC voltages, I'll compare with mine
1978 Gibson Les Paul Standard, Cherry Sunburst
Reply | Threaded
Open this post in threaded view
|

Re: 1776 Multiplex with charge/discharge trimmers

trom72
Like you told me that it should work without the H11F1 I began to think that my build has an error. That was true. I misplaced a jumper. So now it works, delay part and modulation part and it's a lovely sounding. I was also able to calibrate the 2K trimmer without any problem. I will have to work the modulation part (I use ldr) to find the best value, the first try is already nice but I'm sure to be able to have better result.

Thanks a lot, even if I didn't play yet a lot with I'm very happy and I think that it will be my main delay.
123