Boxing Day
|
This post was updated on .
No, not that silly British holiday after Christmas...
 I thought I post some photos and text of my Tokai Metal Drive build to illustrate my basic boxing process (with a few twists). Hopefully this will be of interest to the group. (1) Drilling the enclosure. I get pre-painted enclosures from the usual sources and drill them myself with a unibit on my old drill press. I use masking tape to mark the hole locations, which also protects the painted surface. 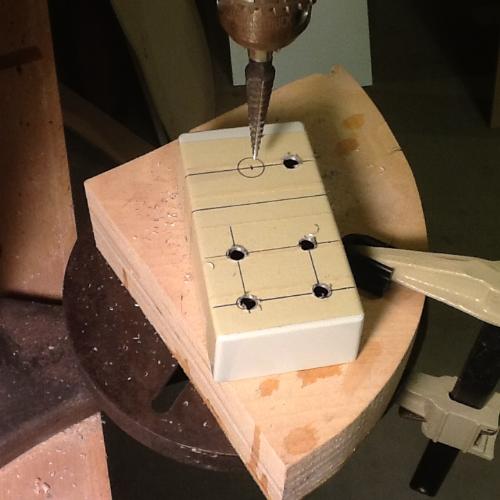 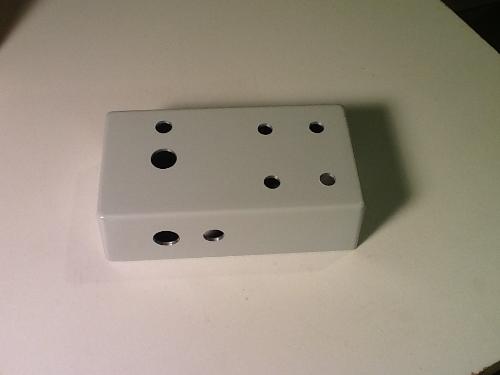 (2) Mounting the pots and planning the circuit board installation. After removing the tab on the pots, I mount them in the enclosure an check my clearances (especially with respect to the input/output jacks). The TMD has a complication in that one of the pots is a dual gang and hence sits higher that the other pots. To correct this, I use thin 2mm foam from Walmart to make square spacers. I also use the foam to mount the circuit board to some plastic perfboard which will sit on top of the pots. 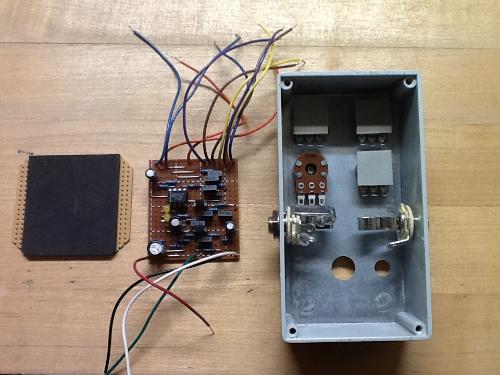 (3) Creating the pot-mounting assembly. I glue the square foam bits to the back of the three single gang pots using gel superglue. The perfboard is glued on top of that. I also use gel superglue for that, but epoxy may be better for the long term. The assembly looks like this. 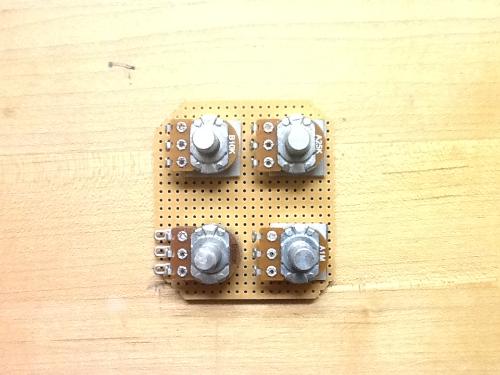 (4) Attaching the circuit board. I attach the circuit board to the foam on the perfboard using a double-sided adhesive tape from the art store (acid free mounting tape). I only use a small piece, and that is strong enough (trust me). The back of the vero embeds safely into the foam, ensuring that nothing will short out. 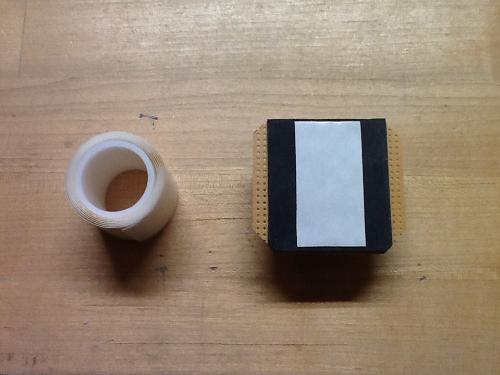 (5) Wiring the pots. I now attach the wires to the pot lugs. This is done VERY carefully to make sure I don't mess up the order. Nothing like having to remove solder from mis-wired controls (grrrr...  ). ).
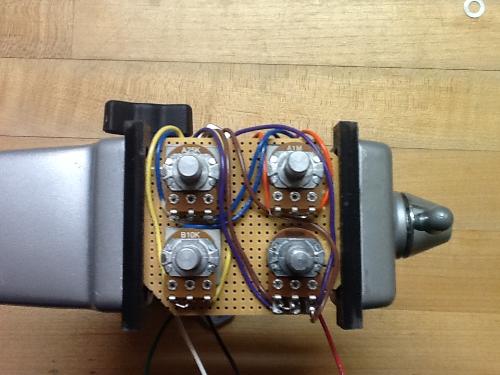 (6) A quick test... I check out the completed assembly using my test rig. Yup...it still rocks and the controls work as they should.  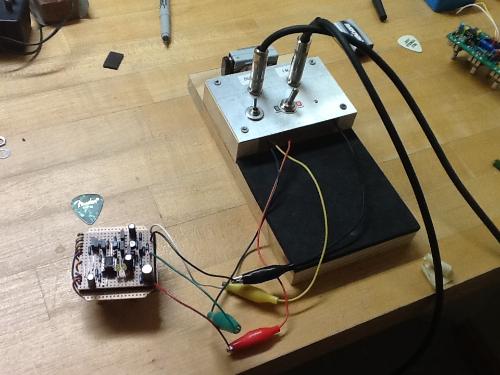 (7) Securing the assembly into the enclosure and wiring up the off-board components. The remaining work is standard off-board wiring. I use the 3PDT boards from Vic Audio which greatly simplifies the process for me. 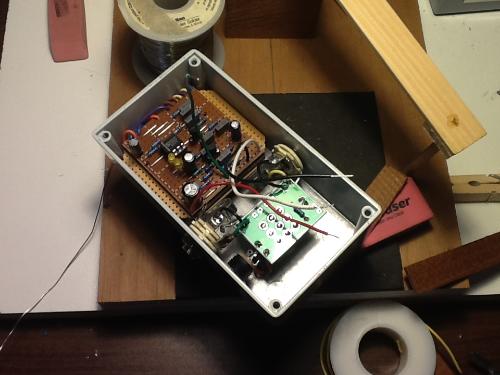 (8) Done and ready to rock! Well, except for the labels. I've not adopted any labeling or artwork for my boxes yet and may just go with a hand painted lettering to give it that "boutique" look. Now, onto the Klon...  . .
 |
|
Administrator
|
Wow. That's a neat idea to mount the jacks to perf board, then have the vero stick to that. Plus, you get such neat wiring now. Makes mine look like a rats nest.

|
|
The jacks aren't mounted to the perfboard (the pots are). Yeah, the perfboard assembly allows my veros to be more modular, like PCBs with board-mounted pots. Assembly is much easier. One thing - do measure all the wire clearances you will need and cut the perfboard to accommodate the wires. I keep the enclosure handy to check and recheck all clearances as I go along.
|
|
In reply to this post by Frank_NH
Thanks for the walk-through, Frank. This is amazing!
|
|
Great idea, and it turns out so neat

Through all the worry and pain we move on
|
|
Thanks all. By the way, that's a 125B enclosure, which gives me a little more depth than the 1590B. That additional depth can be helpful if you have any large, standing components. For smaller boards, however, I definitely go with 1590Bs.
|
|
Administrator
|
Blah, I meant pots. I'm on my iPad at school, so stupid auto correct. This damn thing changes so much of what I type I really have to look at it before I email or type something here. Lol
|
|
Wow this is a revelation! I love the strategy! I always struggle to get motivated to box vero builds (or anything in general without board mounted pots). I just don't like the idea of a board flopping around waiting to short out or break wire. I'll have to try this.
|
|
Nice info Frank, thank you.
You've given us something new here, I might just try a couple of your methods. Thanks buddy I will have to keep my eyes open for a bench drill - and save up. It must be so much easier than trying to use a Black & Decker to drill my holes - boxing is the bit I like the least due to all the prep work and then finding out why my wiring doesn't work after I've boxed (and its always the most awkward wire that is the issue - damn that Murfy Law  ) )
Thanks again Frank - very nice and useful 
|
|
In reply to this post by Frank_NH
Very neat! I love the way the whole thing just drops into the enclosure.
Where can I get some big slabs of that copper-less perfboard? I've been looking for some for a while, but haven't found any decent sizes for decent prices. |
|
I get the plastic perfboard from my local Radio Shack.
 Radio Shack perfboard The perfboard is easy to cut and shape, and if you really want to get fancy, you can drill holes in it and route the wires through the holes. My goal is to make the boards and pots as modular as possible so that the only free wires are the 9V, ground, in, and out wires which connect to the switch and jacks. Now if I can only make the in/out jacks, switch, led, and power jack modular... Hmmmm  . .
|
|
In reply to this post by Frank_NH
Tried this method of mounting the pots (well, cardboard and hot glue), and I love it!
It makes wiring to the pots and installing into the box so clean! |
|
In reply to this post by Frank_NH
Yeah, I can see that Frank. It looks great and seems very practical!
|
|
In reply to this post by Frank_NH
Thank You Frank. I am one of the people who asked builders to specifically take pictures of this step. Connecting the pots to the circuit board has become the biggest challenge for me - and the step when something usually goes wrong.
I always knew the more experienced builders had a better system, other than just stuffing everything into the enclosure. On my last build I pre-mounted & wired all the pots and started wiring them to the circuit board, and lo & behold, soon noticed my circuit board was upside down (components toward pots) - sh*t. So, I started over). It's almost impossible to really pre-build anything with the exact wire lengths you need and to get it mounted in an enclosure without a lot of fuss and planning ahead - but its worth it. Nothing is more frustrating than having a great sounding circuit not work when you get it boxed up. I also like the idea of masking tape to measure drill spots - thanks a million. EDIT: one question - how do you figure out the spacing on the pots mounted to the perfboard? - just by measuring the distance between posts? |
|
Q: How do you figure out the spacing on the pots mounted to the perfboard? - just by measuring the distance between posts?
A: Hey Paul - it's easier than that. Here's what I do: (1) Drill out your enclosure first. Install the pots in their holes with the lugs in the desired orientation. Tighten the nuts down so the pots don't rotate. (2) Prepare the perfboard by cutting it to size and shaping the edges if needed. Lay it on top of the pots and check and clearances. Make sure you have enough room to route the control pot wires. Also, install the input/output jacks to make sure your board has enough clearance on that side. (3) Take out the perfboard. Apply some glue (either epoxy or gel superglue) on the backs of the pots, enough to hold the perfboard. Set the perfboard in place and press down making sure the glue has sufficient contact. With superglue, the bond will set in 30 seconds; with epoxy, it will take longer, so make sure the perfboard doesn't shift before it sets. (4) When the glue is dry, remove the nuts holding the pots to the enclosure. You can then remove the entire unit (perfboard+pots) as one. (5) Glue the foam to the top of the perfboard, attach the circuit board to the foam with double-sided tape, as shown in my presentation above. (6) Solder the control pot wires from the circuit board to the lugs. I use a vice to hold the assembly while soldering. Double check each connection because you don't want to have to desolder a connection! (DAMHIKT  ) )
(7) Your module is ready to install, pots and all. The only wire connections you should have left are switches, +9V, ground, input, and output. One note - I have not used this approach with SPST, SPDT, ot DPDT toggle switches, as you may have with overdrive circuits which implement diode selections, for example. However, I would check the clearances, and if possible wire the switches as free components (not attached to the perfboard). It may be possible to attach switches to the perfboard by using some spacers - you can be creative here. Hope this helps.  |
|
Sequencing question for wiring pots in an enclosure...
Frank, it looks like you leave wires connected to your circuit board ready to connect to the pots, so you must leave extra length on the wire with the plan to trim off the excess? What is the length of wire you leave before trimming? What about pot lugs that do not connect to the circuit board? For example, in the JCM800 emulator you have some pots that connect to the circuit board, which you explain, but there are also some pot lugs that connect elsewhere in the enclosure, four that connect to ground, many that connect to each other and one that connects to output. When and how do you make those connections? With the four lugs connecting to ground - how would you handle that? Would you go pot to pot, and then to a singular ground point? Which ground point is best to use for grounding multiple pots (or even one pot?) On the foot switch, circuit board, the DC input, or elsewhere? When (in your build sequence) do you make that connection? I assume you wire it before mounting and leave enough wire to make the connection. same with the one pot lug connects to output? Thanks in advance. |
|
Just FYI - as I commonly do, I see answers to my own questions after I have posted them. Obviously you have to leave wire ready to connect from all pot lugs that do not go to the circuit board, and you connect them after re-mounting the pots.
Still - I would like some consensus on the best place to ground pots when you have a circuit where the only instruction is (for example) "volume 3 goes to ground". |
|
Sorry for mult posts - but I also just found this step by step on Sabrotone that I had not seen before.
http://www.sabrotone.com/?page_id=386 I am guessing a lot of you have seen this and that it is the typical method. He uses what I suspected a lot of people seem to do. They get fairly short wires from pots to circuit board on one side (because it's wired first) - but on the opposite side the wires stay longer because the extra length is needed to get from pot to board (because now the board is anchored down on the opposite side by the first set of connections between pots and circuit board). Still - this is a different and a pretty decent tutorial on another way of doing this process I was asking about (connecting the circuit board to the pots already mounted in the enclosure). Seems like you end up with some pretty long wires in your enclosure, not that it matters much. Overall, it seems like people use a lot more wire inside their pedals than I would have expected, and maybe one problem has just been that I have been cutting my wire too short all along. But fwiw; I like your method better Frank. It seems like a more stable build in the long run that just letting your circuit lay loose inside the box. Also _ I would still like to hear thoughts on the best place to ground pots - especially when you have multiple pot lugs to send to ground. |
|
In reply to this post by motterpaul
Good questions, Paul.
Q: Frank, it looks like you leave wires connected to your circuit board ready to connect to the pots, so you must leave extra length on the wire with the plan to trim off the excess? What is the length of wire you leave before trimming? A: Usually about 3 - 4" or so. You want to leave enough so that a wire can be routed nearly anywhere in the enclosure. Note that the wires will be trimmed later when connections are made to the pots, jacks, or 3PDT board. I also try to color code the wires so that it's easier to identify the wires when they're being soldered. NOTHING is worse than unsoldering a misconnected wire! Q: What about pot lugs that do not connect to the circuit board? For example, in the JCM800 emulator you have some pots that connect to the circuit board, which you explain, but there are also some pot lugs that connect elsewhere in the enclosure, four that connect to ground, many that connect to each other and one that connects to output. When and how do you make those connections? A: There's no hard rule about wire connections, except that grounds should be tied to a single point if possible. The multiple ground wire situation arises a lot in stompbox circuits. There are several ways to handle it: (a) attach extra ground wires to the circuit board, (b) daisy chain a connection which ultimately goes to the common ground point on the 3PDT board or simply use the ground lug (sleeve) on the input jack. Similarly for wires which go between different pot lugs, you can solder the wires between lugs when the pots are mounted to the perf board. You can also prewire common components, like soldering the 9V and ground wires to the 9V jack, or connections for your LED/resistor. That makes the final wiring easier later on. Whatever you do, try to make sure your connections are secure (I tin the wires before bending them to make the mechanical connection to the lugs) and that you reduce the amount of excess wire as much as possible. There is a bit of art to this. Some people leave the wires long and cram them in the enclosure. Others neatly twist the wires and route connections straight and smooth. I'm somewhere in between. But as long as nothing shorts, I'm good to go.  One more thing, try to sequence your soldering so that you don't have to solder in narrow spaces. I like to install the input/output jacks before final wiring, but often I need to be careful to keep the hot iron tip away from fragile components and wires. It doesn't take much to burn through the insulation! (DAMHIKT  ) )
|
«
Return to How To's & Guides
|
1 view|%1 views
| Free forum by Nabble | Edit this page |

