Refin project
12
12
|
Look what I got.....
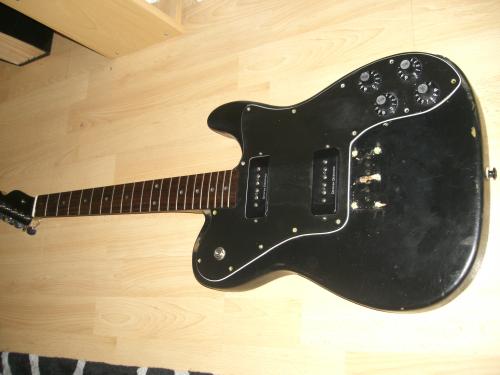 It is a Squier custom tele ii, the one with p90 pups. Got if for a bargain (imo) £60. The neck is glorious and the pickups are good. The paint however looks as though it was sanded by the previous owner and looks pretty bad so I think I'm going to have a go at refinishing it. Has anyone here done this before? any tips? Thanks Dave |
|
CONTENTS DELETED
The author has deleted this message.
|
|
Thanks for the tips, some good advice there. I've done a bit of reading around and am going to use a heat gun to get the paint off as I don't want black. Its the sanding the clear coat at the end that I'm nervous about really.
Thanks Dave |
|
Use some scrap wood as a makeshift short neck, that way you can use it to hold onto and spray the body angles more easily.
If you put a hook in the end of the scrap neck you can hang it up to spray and/or dry too. I've heard Grain Filler can help with rougher wood types (if your taking it back to bare wood), but I have yet to try it. Most of my guitar finishes have ended up "rustic" due to impatience, so take your time and enjoy the process ;) |
|
That's a nice hybrid you've got there Dave. The neck is not from a Tele Custom II - they have maple fretboards. It looks to me as though the neck is from a Squier Black and Chrome Tele, due to the black headstock. I have both of these guitars myself, and the Custom II is a doozy. The best punk rock guitar since the Les Paul Jr. in my opinion.
I am more a Guitar tech who migrated into pedal building, so I have some experience with refins on these types of guitars. The first question to ask yourself is "Do you REALLY want to strip this?" I can tell you that removing poly finishishes is a total pain in the rear as it usually stubbornly refuses to come off. It is really easy to do more damage to the wood underneath than you would believe possible. When you finally get it all off, often the wood underneath is far from attractive anyway, which rules out anything other than opaque solid colour finishes. |
|
Thanks for the replies folks, useful stuff.
Hi Beaker, yeah I realised it wasn't a custom ii neck but I'm not sure what it is from because the headstock was repainted so????? I was going to go for an opaque colour anyway so wood ugliness isn't a problem and since I built my own jazzmaster from parts (which is still the best guitar I've ever played, completely unbiased haha) I've been curious about refinishing and thought that this might be the ideal project to give it the ol' college try. I've got access to a heat gun and have read that this is the best way to remove poly finishes (what's left of this one). Whats your experience? Thanks Dave |
|
Ok Dave, no problem. Take a look at this link, as it covers everything you need to know.
http://www.stewmac.com/tsarchive/ts0151.html Some tips for you. #1. Buy or borrow a good quality putty knife, with a flexible blade, like this one: http://www.ebay.co.uk/itm/CK-Putty-Knife-T5076-/130803245516?pt=UK_DIY_Material_Paint_Varnish_MJ&hash=item1e747b21cc #2. And a flat scraper like this: http://www.ebay.co.uk/itm/25Mm-Silverline-Decorating-Paint-Chisel-Putty-Filler-Scrapper-Knife-/400364264903?pt=LH_DefaultDomain_3&hash=item5d3791ddc7 #3. De-burr and round off the cutting edges thouroughly to avoid scoring or cutting into the wood. #4. DON'T overheat. It's really easy to scorch the wood. #5. Take yor time and don't rush. #6. Safety- wear leather gloves and goggles. Don't do it with bare forearms , and watch your face. You get the ocassional chip of finish "explode" at you, especially if you start to rush things,which will stick to and burn into exposed skin. Ouch! |
|
Fantastic, thanks mate. I'll probably have loads of stupid questions as I'm going along so would really appreciate any and all guidance.
Thanks Dave |
|
I finished a Gordon Smith G60 recently with a wipe on oil
Came out a very smooth satin , a lot better than you would get out of a can It was a cross between tru oil , & varnish that dried very fast Tru oil can take days to weeks to dry Looked very professional ! |
|
Danish oil? I love using this stuff, dead easy to use and gives a superb finish with half a dozen coats. Only "problem" is that you need a nice bit of wood to start with.
UNLESS... you want a really gnarly distressed finish complete with dings, dents and burn marks. It is the perfect finish for a "Barncaster"project. if you are not sure what I mean check out Anders Parker's and Will Johnson's guitars made by Vermont's finest at crestonguitars.com |
|
Wasnt Danish Oil it was called Finishing Oil but Im sure it is similar in properties
It was all I could find locally Body wood is Agathis which might be ok , similar to alder Even if the wood was not great you could always use some wood dye on it Something like this http://www.thomann.de/ie/fender_modern_player_tele_thinline_bk.htm |
|
In reply to this post by Beaker
Overheat? Tell me about it...  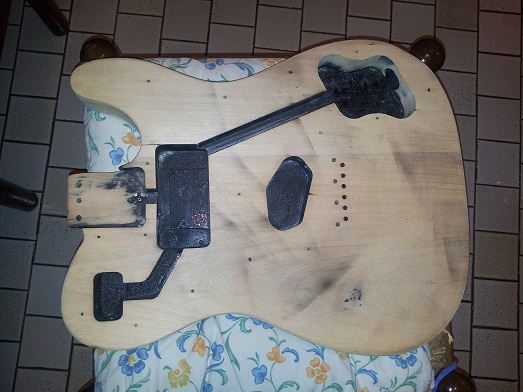 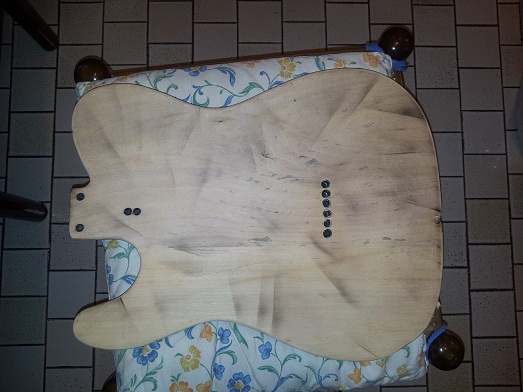 Do you see all the little "balck shadows" on the body? This is the EXACT MEANING of overheating... Unfortunately this refinishing project started in the wrong way, I tried to use some "unpainter" product, didnt'work and turned the surface in a mess. Then I bought a heat gun and started scraping off the finish with it, it worked but I had to be quite rough on the surface, because of the first treatment I gave it. After using the heat gun, I gave the body to a relative, who's a carpenter, and ask him to "clean" the surface as much as he could, the pictures are the final result! Right now the body is getting painted, I used a color I bought from Wudtone, I'm happy with the finish but unfortunately I cannot cover the "shadows" completely (but I blame myself, not the product). So, getting back to the subject, as Beaker stated, don't rush and try to keep the heat gun as far as you can from the body!  |
|
In reply to this post by Dave
Sweet guitar!
|
|
In reply to this post by Dave
So jealous about the £60 tele!
Keep us posted with the future development! I have a couple guitar projects going on at the moment so it's nice and interesting to see hat others are doing. Will post about mine if anyone's interested, though I'm sourcing parts pretty slowly, keeping an eye on the bargains to keep the price low...! |
|
In reply to this post by Kost1978
CONTENTS DELETED
The author has deleted this message.
|
|
In reply to this post by Dave
Hmm I think I'm starting to see why this was £60.....Started stripping the paint and have found a few white patches under it that look a bit like someones tried to fill in dents with plaster or something. Additionally, the neck had a stripped hole which also looks like its been filled in with plaster. It looks as though I'm not the first to refin this, should make life more interesting.
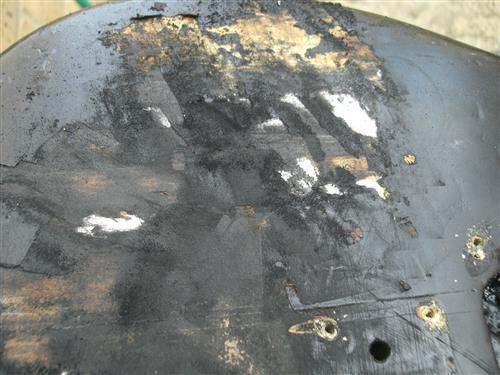 The black stuff left is paint, not scorch marks, dont worry haha. Thanks Dave |
|
Well, after attacking the body with heat gun, scraper and paint stripper and some sanding here's what I'm left with.....
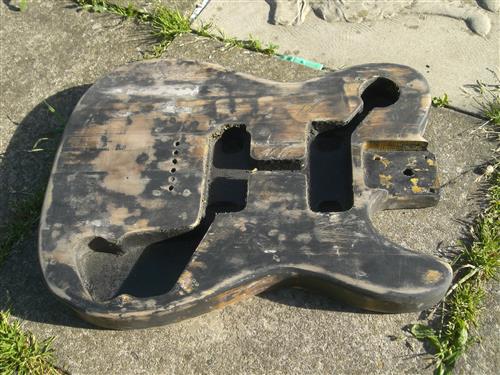 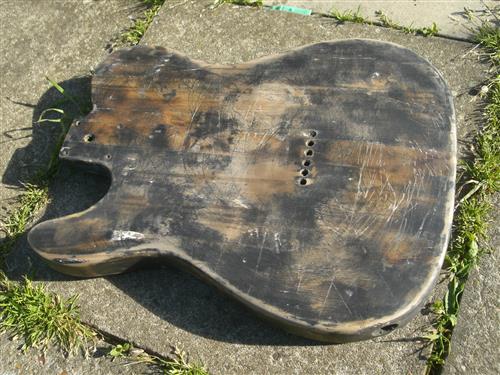 The remaining black appears to be within the grain of the wood itself, it definitely isnt scorching as I was very cautious with the heat gun. I spent this afternoon sanding with some 160 paper and it's now smooth as a babies bum. So now I'm going to fill some of the dings with wood filler and sand smooth, then I need to grain fill right? And then the painting. Honestly this has been a pain so far but I feel like this body has been abused and treated poorly and I feel like it'd be cool to restore it into something nice. Thanks Dave |
|
I would run some paint stripper over it now
|
|
Update. Well after a few more hours of sanding I got it looking considerably better than it did. I filled in a few of the major holes with wood filler, in hindsight I should have filled a few more but hey, I knew this was never going to be perfect, it's a learning curve.
So I went up the sand paper gauges till about 600 grit, after which I sprayed on a nitro cellulose sanding sealer and primer. Here it is now... 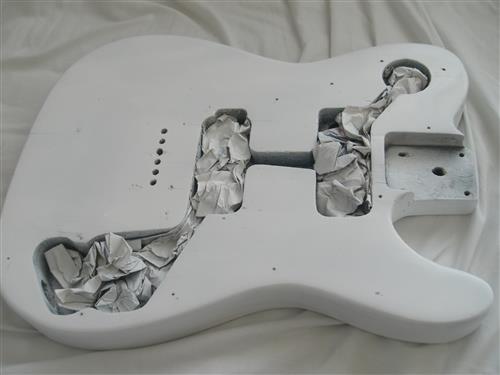 Today I'm going to smooth the primer with some 600 paper and then shoot the first colour coat. My colour scheme is burgundy mist, all gold hardware (bling), original black pickguard, maple neck with matching headstock. Should be pretty cool. Thanks Dave |
|
In reply to this post by Beaker
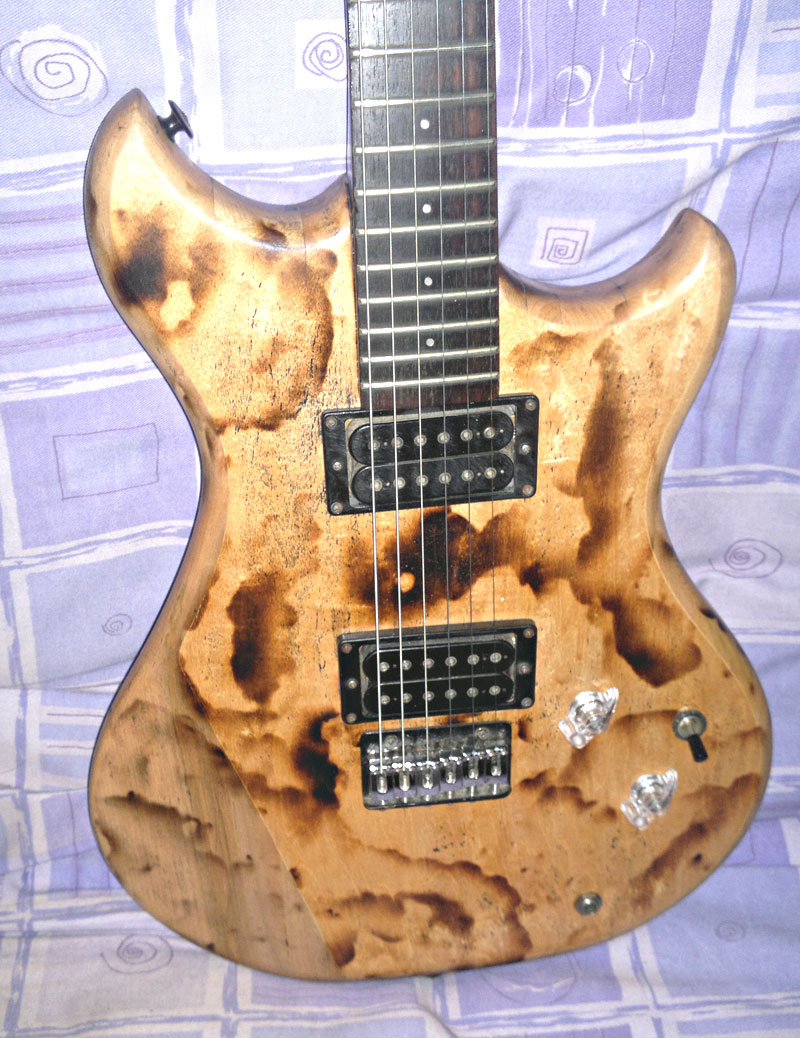
Did exactly what Beaker said! My distressed, blowtorched westone thunder jet. Danish oiled to death !!!
|
«
Return to Open Chat
|
1 view|%1 views
| Free forum by Nabble | Edit this page |

