Thank you!! First pedal built.

classic Classic list List threaded Threaded
20 messages Options
Reply | Threaded
Open this post in threaded view
|

Thank you!! First pedal built.

tonecut
Just wanted to say thanks to Mark and Greeny for the site and build guide.

I learned to solder 2 weeks ago and started reading about electronic components, etc. for the sheer reason of building some pedals.

Yesterday, my pedal was complete and (much to my amazement) actually works!! Sounds awesome, too. Very unlike the other distortion/OD pedals I have already.

Here's my "Pinecone Overdrive":
http://instagram.com/p/XQd5rEvhs2/
http://instagram.com/p/XQeWGvPhtd/

Gut shot (as I said...just learned to solder...have mercy):
http://instagram.com/p/XPuhgivhuQ/
http://instagram.com/p/XJjTykPhpx/

Thanks again! Looking forward to building another of the same using my newfound experience. :)
Reply | Threaded
Open this post in threaded view
|

Re: Thank you!! First pedal built.

Olav
Cool design for the enclosure! Nothing to be embarrassed about concerning the soldering job afaic. I wish my first board had looked that neat. On to the next... and the next... and the next...
Reply | Threaded
Open this post in threaded view
|

Re: Thank you!! First pedal built.

tonecut
Thank you for the kind words. :)

For the sleeve connection on the output jack, would anyone recommend a small 1 row piece of stripboard to solder the 4 connections to, versus trying to gob them all on the sleeve tab?

For that matter (going into "assumptions" territory), could I just have 1 row on the main stripboard where nothing connects to it from the rest of the board, but that I solder on the 4 connections and then use a wire from that row to the sleeve tab of the output jack?

Looking for ways to de-gob the guts.
Reply | Threaded
Open this post in threaded view
|

Re: Thank you!! First pedal built.

Silver Blues
In reply to this post by tonecut
Looking good! Is that circuit your design?

Also, what kind of diodes did you use?

--Silvie
Through all the worry and pain we move on
Reply | Threaded
Open this post in threaded view
|

Re: Thank you!! First pedal built.

tonecut
No, not my design. It's the Menatone Red Snapper - 3 Knob (the same in Greeny's build guide).
Just thought I'd snazz it up with different graphics. :)

I used 1N914 Small Signal Diodes (200mA 100V) from Tayda Electronics.
Reply | Threaded
Open this post in threaded view
|

Re: Thank you!! First pedal built.

Geiri
That looks pretty good for your first build!
www.pedalprojects.com
www.facebook.com/pedalprojects
Reply | Threaded
Open this post in threaded view
|

Re: Thank you!! First pedal built.

tonecut
Thanks!

Still looking for some guidance from anyone as to how to handle the 4 wires going to the output jack's sleeve? Hating trying to gob solder all over it. Ideas?
Reply | Threaded
Open this post in threaded view
|

Re: Thank you!! First pedal built.

Milkit
Try loading then all into a ferrule or crimp terminal & then you can just solder that to the lug of the jack. That's what I do, as I too hate to see globs & splaps of solder!  
It's better to have it & not need it, than to need it & not have it!
Reply | Threaded
Open this post in threaded view
|

Re: Thank you!! First pedal built.

GoranP
In reply to this post by tonecut
I'm sorry, I may be a bit slow (it's almost midnight right now) but why is it that you ended up with four leads there?

Did you check out Mark's offboard wiring diagram? Most I ever get is two...

If you really need four, we'll come up wih something...  
Reply | Threaded
Open this post in threaded view
|

Re: Thank you!! First pedal built.

tonecut
Milkit: Thanks, ill look into those.

GoranP: I actually ended up with 5 soldered to it. Maybe I did this wrong. The layout for the 3 knob Red Snapper has a ground, then it says two of the pots go to ground, then I followed this offboard tutorial (http://gaussmarkov.net/wordpress/thoughts/wiring-up-a-1590b/) and one goes to the sleeve from the switch and another from the DC power. So...5.

Did I do this wrong? Should I be linking more things instead of all going direct? Did I confuse what "ground" is?
Reply | Threaded
Open this post in threaded view
|

Re: Thank you!! First pedal built.

dodido
CONTENTS DELETED
The author has deleted this message.
Reply | Threaded
Open this post in threaded view
|

Re: Thank you!! First pedal built.

GoranP
This post was updated on .
That's right... while your way certainly works, there are many ways to skin a cat (not that I'd ever consider skinning a cat  )

This is what I do and has served me well to keep the number of wires concentrating in one point to a reasonably-easy-solderable number


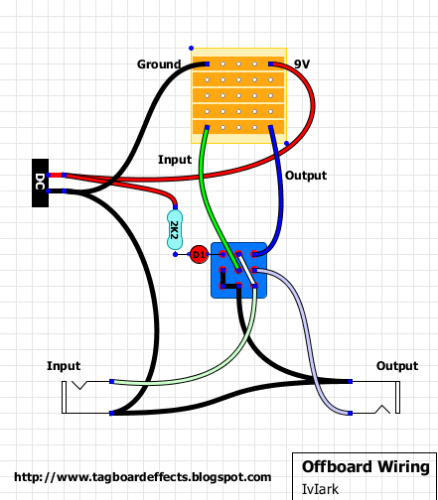
If your board has more than one ground line (and there are a few on this site), just find a ground strip on the actual board with holes to spare and connect them together so that you only have one ground coming off your board. No need for a separate ground strip, I've yet to see a vero with all ground strip holes used up.

Like here, one of my recent builds. Instead of having two ground wires coming off the board, I put in one more wire that connects one of the holes in the top row with one of the holes in the bottom row and just omitted one of the ground wires coming out. I don't recall which exact holes I used, I just made the wire fit between board components and out of sight.
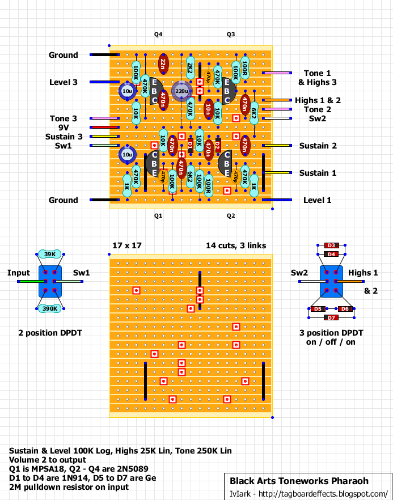
Same thing if the schematic calls for one pot lug to be connected to ground. That's the case here as well, lug 1 of Level pot is grounded. I don't connect it separately to DC or in/out jacks because there's already a ground strip on the circuit, other pot wires are connected to the board anyways so why not the ground wire as well.

Certainly cuts down on the wiring mess. I still make quite a mess but it's slowly getting better.

Reply | Threaded
Open this post in threaded view
|

Re: Thank you!! First pedal built.

tonecut
Awesome explanation, thank you!

So for my purposes, if 2 lugs go to ground, I could just wire them to the ground strip of the board and just go once from the board?

Would this also work for the leads coming off a switch?
Reply | Threaded
Open this post in threaded view
|

Re: Thank you!! First pedal built.

GoranP
tonecut wrote
Awesome explanation, thank you!

So for my purposes, if 2 lugs go to ground, I could just wire them to the ground strip of the board and just go once from the board?
Absolutely. After all, they are all at the same electrical potential, the ground.
Furthermore (a bit redundant but certainly won't hurt to reiterate), if two lugs of the same pot went to ground (I don't see much purpose to this but just for argument's sake and since you mention it), you don't need to run one lead from each to the board, you can connect them on the pot side and run only one lead back to the board ground strip.

tonecut wrote
Would this also work for the leads coming off a switch?
It would and it does. Please refer to Mark's offboard wiring that I posted above, ground lugs from the 3pdt (pins 4, 7 and 8) are connected to sleeves of both jacks which are connected to dc negative lug which is connected to the board ground strip. If you follow this diagram you won't need to connect the switch to the board ground strip because, well, they are already connected.

Reply | Threaded
Open this post in threaded view
|

Re: Thank you!! First pedal built.

tonecut
Great! Many thanks again. I can already tell that my next pedal will be much happier internally from your knowledge dump to me.

I really appreciate it!
Reply | Threaded
Open this post in threaded view
|

Re: Thank you!! First pedal built.

GoranP

Don't sweat it, you'll pick up the nuances of this hobby in no time!
It's all about finding out what works best for you and following a few simple electrical rules.

Reply | Threaded
Open this post in threaded view
|

Re: Thank you!! First pedal built.

smoss469
Looks great! Are you doing anything with the vero board or is it just floating?
Reply | Threaded
Open this post in threaded view
|

Re: Thank you!! First pedal built.

tonecut
Thanks! It's just floating right now. I could barely close it, as it was (there's not much headroom for the caps).
Reply | Threaded
Open this post in threaded view
|

Re: Thank you!! First pedal built.

tonecut
And for those playing along at home...here's the end result (a bit of picking noise since the amp volume was very low):

https://soundcloud.com/tonecut/pinecone-overdrive
Reply | Threaded
Open this post in threaded view
|

Re: Thank you!! First pedal built.

GoranP
Very nice, thanks for sharing!