Build it, rock it, box it - advice wanted

classic Classic list List threaded Threaded
28 messages Options
12
Reply | Threaded
Open this post in threaded view
|

Build it, rock it, box it - advice wanted

PMowdes


Hi all

I'm looking for some tips regarding boxing.

I've built the test rig and I've used it a couple of times but the thing that pisses me off is having a board wired to pots which are just floating about.
I also seem to have trouble making the wires to the pots the right length so that when it comes to boxing it all fits nicely first time.
So I end up having to unsolder the pots, cut the wires down to the right size and re-solder when it goes in the box (kinda defeats the object doesn't it)


Could I box it but put push fit connectors in the 9v, ground input and output lines and also on the lines coming from the input jack and 3PDT in the box so that I can box it once but still connect it up to the test box?

I'm guessing that this sorta thing gets easier with experience but I'm on pedal #8 now and I'm still finding the boxing to be a real bitch.

Cheers

Phil
Reply | Threaded
Open this post in threaded view
|

Re: Build it, rock it, box it - advice wanted

Muadzin
I never rock it before I box, but methinks if you're deadset on doing that one way to do so and still get everything wired up to the correct length is to box it first, then take everything out again to rock it. With the exception of the power jack everything can be unscrewed and taken out anyway. It shouldn't be that hard to desolder only the power and ground wires to that jack. And if you use one of those power jacks with an external nut even that shouldn't be a problem.
Reply | Threaded
Open this post in threaded view
|

Re: Build it, rock it, box it - advice wanted

Marbles
In reply to this post by PMowdes
I know what you mean, I wish I had an easy way to connect the pots without soldering.

You could make a socket where you can fit the three lugs in and connect them to alligatorclips etc.

But too be honest, you then have the problem when wires go to multiple lugs etc


So what I do is: I have a box where I misdrilled, (or if im sure I'm going to box it I used the predrilled enclosure). I don't solder on the inside, but stick the pots in the top (on the outside). Much easier to get to.
It gives a rough, but for me good enough, idea what the lengths have to be.


If you really want it to be the exact lenghts and use as little wire as possible to make it superclean, this is not the way. But it get's you in the ballpark.
Reply | Threaded
Open this post in threaded view
|

Re: Build it, rock it, box it - advice wanted

Frank_NH
This post was updated on .
Here's my vero board mounting / boxing process:

Boxing Day


You can see my crude (but serviceable) test rig which allows me to hook up any basic circuit to my amp so I can test it out before committing to an enclosure.

For vero projects, there are three building phases for me:

(1) Build the basic board + pots connected with alligator clips.  This allows me to see if I like the circuit at all - it may be a dud, in which case I don't want to spend any time soldering/desoldering pots and switches.

(2) Use the perfboard/foam mounting approach in my link to mount the vero + pots using a standard pot spacing (you can use a simple jig to hold the pots in a given arranemgent while you glue the perfboard).  Having the vero+pots mounted like this allows you to cut/solder the wires into a neat, compact unit as shown above.  Since there are only four wires (in/out/gnd/+9v), you can easily "rock" this in you test box to your heart's content.  Note that SPST/SPDT switch controls are general left off the perf unless you can mount them so that their washers and nuts are at the same level as the pots.

(3) Finish the project by mounting the vero+pots unit into an enclosure with I/O jacks, power jack, 3PDT switch and LED.

If you've ever built a PCB from Madbean, Aion, etc., you'll notice that the vero+pots unit is very much like having board mounted pots on a PCB.  These compact units can likewise be "rocked" using your test rig to hook up the I/O, power, and ground.  Note that you can leave your projects like this and decide later if you really want to box them.  In fact, if you used mechanical connectors for the I/O/power/ground, it would be feasible to make a "standard" 3 or 4 control box such that you could easily remove a circuit and replace it with another with the same number of controls.   I've actually done this by desoldering connections so I could replace one tubescreamer circuit with another in my favorite green enclosure.  Anyhow, food for thought...
Reply | Threaded
Open this post in threaded view
|

Re: Build it, rock it, box it - advice wanted

PMowdes

Interesting

I like the pots mounted to the board, my only concern would be the overall height of the combined board + pots, I've been using green mylar and electrolytic caps and they do add quite a bit of depth to the board.  I'll have to see if I can find a UK seller for the perfboard and try myself.

I was thinking about using some of  these so I can plug/ unplug the board + pots in and out of the box.
That way I can prewire the box and just plug the board in once I'm happy with it.

http://www.ebay.co.uk/itm/261794346681?_trksid=p2060353.m2749.l2649&var=560662605837&ssPageName=STRK%3AMEBIDX%3AIT
Reply | Threaded
Open this post in threaded view
|

Re: Build it, rock it, box it - advice wanted

Frank_NH
The perfboard+foam adds about 3 mm or so to the overall height.  I use 125B style enclosures mostly, so the height is manageable.  But always measure everything.

As for connectors, I've been thinking about Molex-type connectors:


Reply | Threaded
Open this post in threaded view
|

Re: Build it, rock it, box it - advice wanted

PMowdes

I use 1590B or BB so the height might be a bit of an issue.  125B's aren't so common in the UK, Tayda do them but the postage becomes an issue if you want to buy more than a couple.  I'll have a look around some of the European sites and see if they sell them.

Is the perfboard cardboard?  and does it have copper inlay?
Reply | Threaded
Open this post in threaded view
|

Re: Build it, rock it, box it - advice wanted

Frank_NH
This post was updated on .
Perfboard (bare, no solder pads) is plastic (phenolic).  It's strong and easily cut and sanded.  I get mine on Amazon.com, but you can get it on eBay too.


By the way, for tons of ideas on how to mount and box the vero builds, just visit the "Show your pedal guts!" thread on this blog:

http://guitar-fx-layouts.42897.x6.nabble.com/Show-your-pedal-guts-td8569.html
Reply | Threaded
Open this post in threaded view
|

Re: Build it, rock it, box it - advice wanted

Beaker
In reply to this post by PMowdes
My method is similar to Frank's, but does not use perfboard. It's not quite as elegant as his solution, but it works for me.

I made a couple of templates for two, three and four hole pot mounts out of thick plastic card from my local model shop. An A4 sized sheet of 3mm thick card is less than £2. These match the hole positions I drill in the face of the enclosure. I use the same card to make drill templates for the enclosures themselves.

I solder up my board pot wires about 75mm long, and strip and tin the ends, connect to the pots with crocodile leads, and test.

If everything is good, I mount the pots to my template "jig", and hot glue the board to the back of the pots.

Then I remove the template, leaving the pots in exactly the right place, and glued to the board.

I trim the wires to length and solder to the lugs.

I'm left with something that looks like Frank's version, minus the perfboard and tape.

Finally I can drop the whole assembly into the drilled enclosure, knowing the pot shafts are correctly aligned to my enclosure holes, fit the nuts on the pot shafts, and hook up my input, output, ground and power wires from the board.

For tiny circuits that do not span effectively across two pots, I use a small strip of fibreboard to act as a bridge between the pots - fibreboard glued to back of pots, and circuit board glued on top.

Reply | Threaded
Open this post in threaded view
|

Re: Build it, rock it, box it - advice wanted

Frank_NH
Yes, there are many variations on this idea.  I assume you are using the plastic pot covers to keep the board from shorting out on the pots?  Or does the hot glue provide enough protection?  I suppose perf+foam is overkill but it's strong and not too hard to do.

The main thing is that you can drop the completed "module" into the enclosure of your choice.  All you need to do is drill access holes for the pots.  My idea is to (eventually) create a batch of standard enclosures where the I/O jacks, power plug, 3PDT switch and LED are all prewired.  When the urge hits you to box a build, take one of these prewired enclosures and simply drill the pot access holes (and possibly switch holes), plop the module in, wire the in/out/gnd/9V and you're done!  And if you used Molex connectors, then you could reuse your enclosures on a similar layout build, or replace a board that was somehow damaged or not working.  (Of course, you'd also have to relabel the box, or just use A, B, C, D for your control labels...).
Reply | Threaded
Open this post in threaded view
|

Re: Build it, rock it, box it - advice wanted

rocket88
Administrator
for me i wire everything from outside the box using the holes to position everything and get the wires as short as i can. there's a build i'm working on that i'm going to do a guide to actually. hopefully i'll get to build it this week, and if so i'll have it up on the site this weekend.

i really like franks and beakers method, but i'm just used to what i do after figuring it out after getting beyond frustrated trying to wire everything up in the box when i first started. my sausage fingers need as much room as possible.
Reply | Threaded
Open this post in threaded view
|

Re: Build it, rock it, box it - advice wanted

Beaker
In reply to this post by Frank_NH
I'm sure the hot glue would be enough - it's a plastic after all, so should be a perfect insulating material, providing you don't press the circuit down hard and short it out on the back of the pots. I always use Alpha pots from Tayda with the plastic "condoms" on them (whenever possible), so no problems.

Back to the original post though, eight builds is a very steep learning curve, so just try to make small improvements every time. You are doing great.
Reply | Threaded
Open this post in threaded view
|

Re: Build it, rock it, box it - advice wanted

PMowdes

Thanks for all the advice guys, I really like the idea of just dropping everything in in one "brick".

So far i've been managing to get things made OK, not as pretty as i'd like but stuff works, the only failure i've had was with the JFET tester which fried a few transistors (judging  by the smell).  

I'm relying hugely on my ability to read a layout and use a soldering iron, my actual electronics knowledge is pretty limited so if things don't work i'm gonna be screwed

I'm just about to finish a valve caster and naga viper in the same case with dual wiring, can't wait to get it working, I also just finished pink jimi photons MKII jeurgluator after a whole lot of head scratching.

Cheers
Reply | Threaded
Open this post in threaded view
|

Re: Build it, rock it, box it - advice wanted

motterpaul
I won't say this is the best method, but it is working for me. I tend to leave the in/out and 9v +/- wires about 4 inches long (100mm) so I can hook it up to the test box easily. I always tip the wire ends right after stripping. I also use the same colors as the pictures (green input, blue output, red 9v+ and black grnd)

For pots I tend to make leads about 3 inches - because really how much difference does and extra 1.5 inches of wire make?

I drill my enclosures - insert the LED, guitar cords jacks, footswitch and DC jack. I wire all those up first. I especially make sure the LED works before I go on because fixing that after the fact is a hassle.

Then I figure out the best way to position the VERO. I then insert the pots and fasten down. I usually find a way to get them all in with minimum hassle. If not, I might make a lead or two longer. I rarely trim any wires down but I might position wires around the pots to add clearance.

I usually have the DC jack at the top - and I usually have the VERO with the DC leads at the top, so I do trim those down to 1 inch and connect them to the DC jack. The in/out wires are usually long enough to reach the footswitch and I will trim them if they are excessively long.

I guess the thing about wire is that it is always easier to make it shorter than to rewire a longer lead if you need one.

I asked this question a lot at first also, and unlike Rocket, I never found a logical yet expedient way to make the pot leads as short as possible, I would end up trying to wire them onto the vero after the were mounted, and I found that to be too hard. So I just make them a little longer and don't worry about it.


Reply | Threaded
Open this post in threaded view
|

Re: Build it, rock it, box it - advice wanted

scimitar
I have to say, these sort of questions perplex me, the layout of the pots obviously needs to be planned before wiring them up but in my experience once you know the box size and the pot layout it is pretty easy to eyeball the wire lengths to get the pots in the right position. After all you need some slack in there otherwise the wires are likely to get broken in time, this slack should be enough to allow a little error in the eyeballing.
All that said I always wire up the jacks and foot switch before boxing and I seem to be the only one doing that - I am currently using multistrand wire which I'm sure makes this easier.
Reply | Threaded
Open this post in threaded view
|

Re: Build it, rock it, box it - advice wanted

motterpaul
I think you do need to leave some slack because people will try to tighten nuts on pots & switches, and sometimes they end up rotating the part instead of tightening the nut, and that can pull tight wires off if there were wired too tight.

I would not pre-wire anything except pots, though, because it is just easier & cleaner to do footswitches, guitar jacks & DC (especially all the ground wires) in the box. But if you can do it outside and not have problems getting everything stuffed in there then there is nothing wrong with that.
Reply | Threaded
Open this post in threaded view
|

Re: Build it, rock it, box it - advice wanted

Beaker
But that is the beauty of Frank's method - because the pots are mounted to the perf board, even if the pot nut comes loose, there is no way that the pot can rotate at all. It can't short out on anything, and it can't rip the wires off the lugs.

If you are selling your pedals, that's got to be a good thing - fewer failures and fewer returns!
Reply | Threaded
Open this post in threaded view
|

Re: Build it, rock it, box it - advice wanted

rocket88
Administrator
In reply to this post by motterpaul
here's the short version of a long explanation in determining wire length. you need to plan ahead as much as you can, and have things ready to go. what i mean by that is you need to know where the pots, jacks, switches, etc. are going to be. if you don't you'll never get it right and end up with wires too short or way too long. if you plan on boxing, i don't build what i don't plan on boxing btw, you want to have the box drilled first so you can use the drill holes to find the right positions so you can determine the right wire length. its as simple as that. as beaker said before, you do it right the first time or you're going to do it again. or as i've always been taught measure twice, cut once. it's all in the planning, simple as that.

you never want them just long enough because you want to have some movement so you can get things into place, and if you need to open it up to fix a part you want to be able to move things out of the way and back into place easily.

you want to run your wires so they are neat, easily accessible, and easy to identify. not saying i'm an expert, but here's an example of what i'm talking about


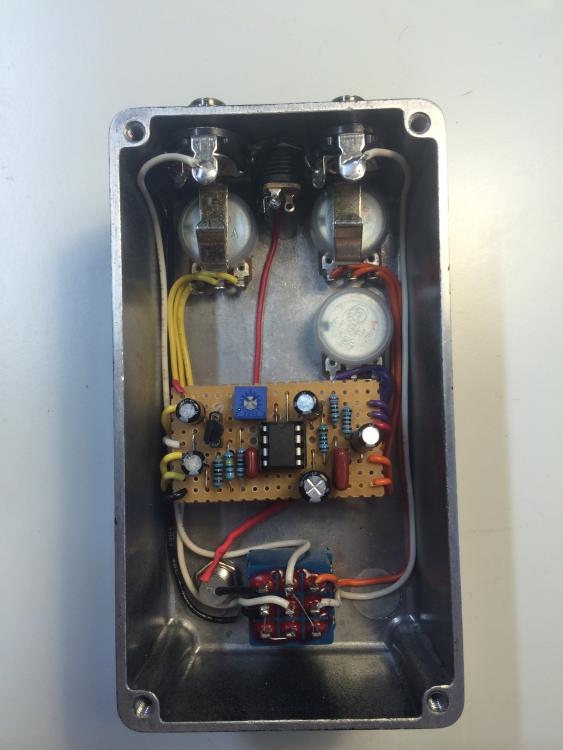
notice the wires aren't short, they're are as long as they should be, neat, and easily identifiable. note that the input/output wires and the power wires aren't near each other except where it's impossible to avoid. it you look at the enclosure from the outside as seen here


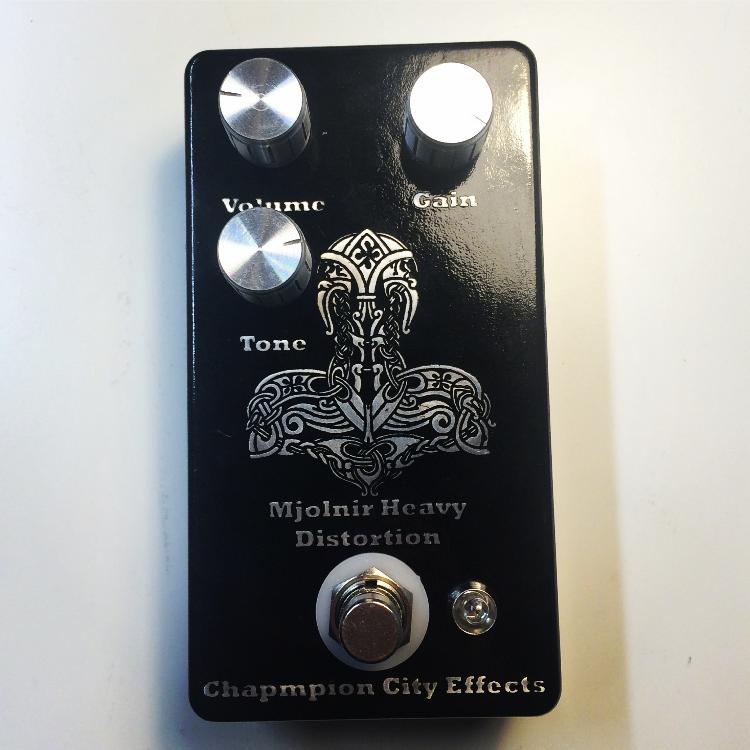
you'll notice everything is spaced where it should be, this includes the text and graphic. the planning of the complete design allowed me to ensure that the insides would be how they should be, professional looking. also, i wire the jacks switch and LED AFTER the board and pots are done and installed. this allows me to run then around the various components and make the neatest wiring i can, as i can run wires behind and round parts that i wouldn't know how much wire i would need without them installed. never assume it's the right amount. also, with this build i made sure to leave space for an additional control i'm planning on going back and putting in, but didn't want to do it at the point the pedal was being made.

my last build, which i haven't posted yet, was a germanium brassmaster. the offboard was a nightmare and as a result the wiring isn't up to my standards really. it's not bad by any means, just due to the use of a 3PDT switch for one of the controls it got unruly IMHO. it's not a mess by any stretch of the imagination, just not as neat as something as many of my other builds. it's part of the reason that even though i love the build and how it sounds, i do not plan on selling them like the other builds i do sell.

pot rotation is not a problem with short or long wire lengths. when you put them in you either use your fingers or a tool to stop it form spinning when you tighten the nut, if you don't you're doing it wrong IMHO.
Reply | Threaded
Open this post in threaded view
|

Re: Build it, rock it, box it - advice wanted

scimitar
Not wanting to point out the obvious... but have you checked the spelling of champion
Reply | Threaded
Open this post in threaded view
|

Re: Build it, rock it, box it - advice wanted

rocket88
Administrator
Haha. Yea I saw that after it was etched. Went with it anyways since it was for me, not for a customer. I made that one around 3am when I couldn't sleep. Mistakes happen.
12